How to Deploy an Express.js Application?

Choosing the right deployment option is essential to ensuring your application can easily scale as it grows. This article explores different deployment options available for Express.js applications. Specifically, it focuses on how to deploy Express.js applications to a Back4app container.
Contents
- 1 What is Express.js?
- 2 Advantages of Using Express.js
- 3 Disadvantages of Express.js
- 4 Express.js Deployment Options
- 5 How to Deploy an Express Application to a Back4app Container
- 6 Prerequisites
- 7 Create a Simple Express API
- 8 Dockerizing the Express Application
- 9 Deploying a Dockerized Express Application to Back4app Container
- 10 How to Optimize the Docker Image
- 11 Conclusion
- 12 FAQ
- 13 What is Express.js?
- 14 What are the deployment options for Express.js applications?
- 15 How to deploy an Express.js application to a Back4app container?
What is Express.js?
Express is an unopinionated lightweight framework built on top of Node.js that simplifies the process of building complex web and mobile APIs.
It offers a simple routing system that helps you easily define endpoints for API routes and map them to handler functions.
It also has middleware support that allows you to add functionality like logging, authentication, and error handling in the request-response cycle.
Advantages of Using Express.js
Some of the advantages of using Express are:
- Minimalist and simple to use: Express.js abstracts the complexity of some of Node.js features like routing. It provides a simple way of handling API requests and responses.
- Highly extensible: Express.js has a large community resulting in an extensive ecosystem of NPM packages and extensions that you can easily integrate into applications.
- Highly performant: Because of its minimal design and leveraging Node’s non-blocking, event-driven architecture, Express is highly performant.
- Strong community support: Express.js has been around since 2010. Within this time, a lot of developers have adopted it. There’s therefore a large community building with Express that can assist you if you get stuck. Furthermore, there are a lot of articles, tutorials, and well-written docs that explain how Express works.
Disadvantages of Express.js
The following are some of the disadvantages of Express.js:
- Unopinionated: Compared to frameworks like Nest.js, Express.js is highly opinionated. This lack of opinion means you need to make decisions about the project structure and organization which can be tedious especially when you have multiple ways of doing things.
- Lacks built-in features: Express.js does not come pre-configured and for most advanced features like logging, you need to install additional dependencies.
Express.js Deployment Options
Infrastructure as a Service (IaaS)
Infrastructure as a Service is a cloud computing service that offers computing, network, and storage resources over the Internet on demand.
With IaaS, you are responsible for provisioning and configuring the resources for your application while the IaaS provider maintains the underlying physical infrastructure. For example, if you want to deploy an Express application, you can create and configure a virtual machine on the IaaS provider of your choice.
On the VM, you need to install the necessary dependencies such as Node and npm then add the Express code to the VM. You can then start your Express application on the VM and it will be accessible over the internet.
One of the main advantages of IaaS is the level of control it provides. You can customize the VM’s CPU, memory, and storage resources to suit your application’s needs
However, its important to consider some downsides to this approach.
Managing the infrastructure and resources as your applications scale and demand changes can be complex and time-consuming.
Some of the popular IaaS providers include:
- Microsoft Azure
- Amazon Web Services (AWS)
- Google Cloud Platform (GCP)
Container as a Service (CaaS)
Container as a Service (CaaS) is a cloud service module that abstracts away the underlying infrastructure allowing you to quickly deploy and run containerized applications.
To deploy the Express application to a CaaS provider, you package the code, the dependencies, and the runtime needed to run the application in a container using a containerization tool like Docker. Once you’ve created the container, you deploy it. The CaaS provider provisions and manages the infrastructure required to run the container for you.
The main benefit of using CaaS is that the high level of abstraction simplifies deployment since you don’t need to worry about configuring the low-level infrastructure. You can instead focus on building the application’s logic. Additionally, containerization ensures your application runs consistently across multiple environments.
Some of the popular CaaS providers include:
- Back4app Containers
- Amazon Elastic Container Service (ECS)
- Google Kubernetes Engine (GKE)
How to Deploy an Express Application to a Back4app Container
Prerequisites
To follow along with this tutorial, ensure you have the following:
- Node.js is installed on your machine.
- A GitHub account.
- Docker installed on your machine. If you don’t, visit the Docker site and install Docker desktop.
- Working knowledge of Express.js.
Overview of Back4app Containers
Back4app containers is a platform that automates deployment by managing the server-side infrastructure for you.
Some of the features of Back4app containers include the following:
- GitHub integration: You can connect your GitHub repositories to Back4app enabling automatic deployments of your application when the code base changes.
- Docker deployment: You can use Docker, a popular containerization tool, to package your application code in a container. This ensures your application works in a predictable manner across environments.
- Automatic deployments: Once you’ve connected the GitHub repository to Back4app, every code push to the default branch will trigger deployment.
- Real-Time deployment tracking: You can view the status and progress of your deployments.
- Real-Time application monitoring
- Zero downtime updates
Project Introduction
In this guide, we will walk through the process of deploying an Express application to Back4app. We will first create a simple Express REST API with a single endpoint, dockerize it using Docker then push it to GitHub. We will then deploy it to a Back4app container.
Create a Simple Express API
Follow the steps below to create an Express application:
- Run the following command in your terminal to initialize a new Node.js project.
npm init
This command will prompt you to enter your application details like the package name, version, description, entry point, author, and license. Once you respond, it will create a package.json file with these configurations.
To use the default configurations, use the -y flag as shown below:
npm init -y- Install Express as a dependency by running this command.
npm install express- At the root of your project folder, create an index.js file. If you specified another name for your entry point file, use that.
- Open the index.js file and create an instance of the Express application.
const express = require('express');
const app = express();
- Add a route handler to handle GET requests to the “/” endpoint.
app.get("/", (req, res) => {
  res.json({
    message: "Success",
  });
});
This endpoint sends a JSON message as a response.
- Define the port number and listen for incoming requests on the specified port.
const port = process.env.PORT || 3000;
app.listen(port, () => {
  console.log(`App listening at <http://localhost>:${port}`);
});
Note that process.env.PORT refers to an environment variable named PORT. If this value is not defined in the .env file, the application will use the value 3000.
- Run the following command to start the Express server.
node index.js
If you visit http://localhost:3000/api on your browser, you should receive the following response.
{
  "message": "Success!"
}
This is a very basic example of an Express API and a real application would be more complex with more endpoints, external data, middleware, etc.
For the purposes of this article, this is enough to demonstrate how you can deploy a dockerized Express application.
Dockerizing the Express Application
Dockerizing an Express.js application refers to creating a Docker container for it to make it easier to run the application across different environments.
What is Docker?
Docker is an open-source tool that lets you package your application, its runtime, libraries, and dependencies in an isolated and portable container environment.
By encapsulating the application within this container, Docker provides a consistent environment for the application to run regardless of the underlying host system.
This eliminates the “it works on my machine” problem. You can work on your Express application in your local environment, containerize it, and deploy it in multiple environments without worrying about compatibility issues.
Install Docker
Docker can run on multiple platforms including macOS, Windows, and Linux. You can download and install Docker for your OS from the official website.
How to Dockerize an Express.js Application
Once you’ve installed Docker, you need to dockerize your application i.e. you need to package it in a Docker container.
Follow the steps below:
- At the root of your project, create a file named
Dockerfile. This file contains the instructions for building the Docker image for the Express application.
- Usually, when creating the Dockerfile, the first thing you do is specify a base image. A base image is a pre-built image that acts as starting point for your application’s image and typically contains minimal instructions for running the application.
- In the Dockerfile, you can then provide instructions and configurations that will run on top of this image. You can create your own custom base image but Docker has official images that are sufficient in most cases.
- In this guide, we will use the node base image specifically the alpine variant which is small in size. Let’s specify this base image in the Dockerfile by adding the following.
FROM node:20-alpine
Here, node:20-alpine comes pre-installed with Node.js version 20.
- Add the following line to set the working directory inside the container.
WORKDIR /usr/src/app- Copy package.json and package-lock.json to the working directory. This lists all the dependencies that Docker should install.
# A wildcard ensures package.json AND package-lock.json are copied
COPY package*.json ./- Add the command for installing the dependencies.
RUN npm install- Copy the rest of the code to the working directory in the container.
COPY . .- Expose the port number the Express application listens to. In this case, port 3000.
expose 3000- Add the command for starting the application.
CMD["node", "index.js"]Altogether, your DockerFile should look like this:
FROM node:20-alpine

WORKDIR /usr/src/app

COPY package*.json  ./

RUN npm install

COPY . .

EXPOSE 3000

CMD [ "node", "index.js" ]
Add a .dockerignore file
A .dockerignore file specifies the files Docker should ignore. It helps you reduce the size of the Docker image by allowing you to ignore unnecessary files. It also helps you hide sensitive files from the image.
To add it to your project, create a file at the base of your project and name it .dockerignore . Add the following contents to it.
.git
.gitignore
.env
README.md
Dockerfile
node_modules/
.github
.vscode
npm-debug.log
npm-debug.log.*
The above file prevents the git files, node modules, logs, and env variables from being copied to the Docker image.
Build the Docker Image Locally
In your project directory, run the following command to build the Docker image.
docker build -t docker-express-api .The -t flag stands for tag and allows you to give the docker image a meaningful name. The dot (.) at the end tells Docker to look for the Dockerfile in the current directory and run the instructions inside it.
Run the Docker Image Locally
Once you’ve built the Docker image, use it to run the Express application using the following command:
docker run -p 3000:3000 docker-express-apiHere -p 3000:3000 maps port 3000 of the localhost to port 3000 in the container. You should be able to access the application by visiting http://localhost:3000 in the browser.
To view the running Docker instance, use the following command:
docker psTo stop the instance, run:
docker stop docker-express-apiDeploying a Dockerized Express Application to Back4app Container
Now that we’ve ensured the Docker image runs locally, we need to deploy it to Back4app.
Push Express Application to GitHub
Backapp deploys your application from GitHub. You, therefore, need to push the application repository to GitHub by following the steps below:
- Navigate to the GitHub site and log in to your account.
- After logging in, locate the “+” icon at the upper right corner of the page and click it. From the drop-down menu, select “New repository”.
- On the “Create a new repository” page, give your repository a name. For this guide, we’ll use “express-api”. Click the “Create repository name” button. Remember the URL of the repository on the next page as you’ll need it for pushing the local repository to GitHub.
On your local machine, navigate to your project folder and run the following command to push the application to the remote repository on GitHub.
git remote add origin <https://github.com/remigathoni/express-api.git>
git branch -M main
git push -u origin main
You should be able to view your app’s files in the GitHub repository.
Deploy the Express Application
Follow the steps below to deploy the app to Back4app:
- Navigate to Back4app and sign up for an account. If you already have an account, log in. Back4app will redirect you to the dashboard after authentication.
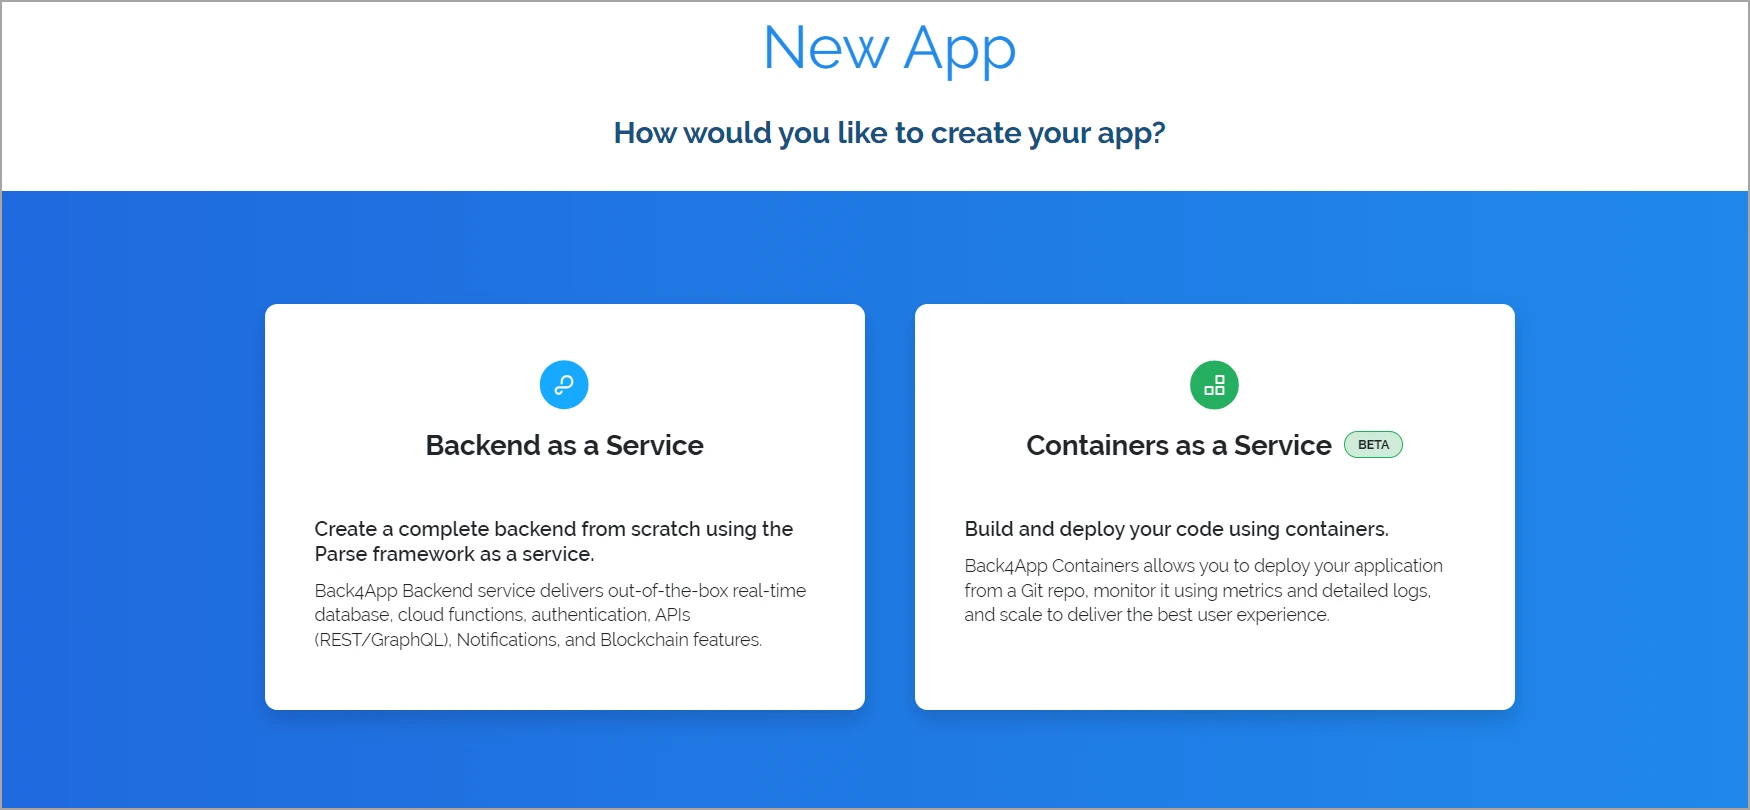
- On the dashboard, click on Build a new app button. You will be presented with two options — Backend as a Service and Container as a Service. BaaS takes care of the backend on your behalf while CaaS allows you to deploy your application in a containerized environment. Given we only want to deploy the application, click Containers as a Service.

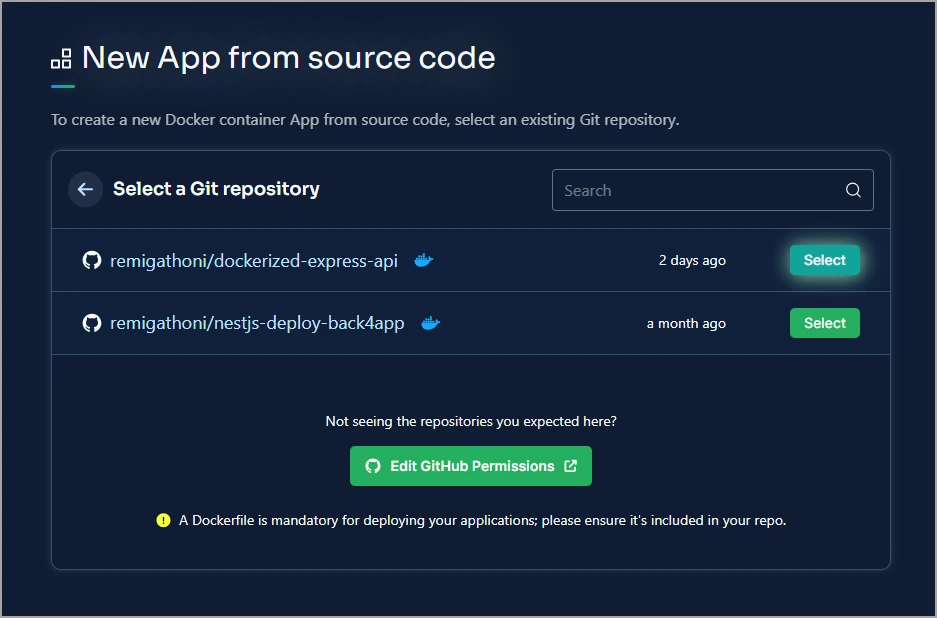
- On the prompt, grant Back4app access to your GitHub account and select the Express repository.

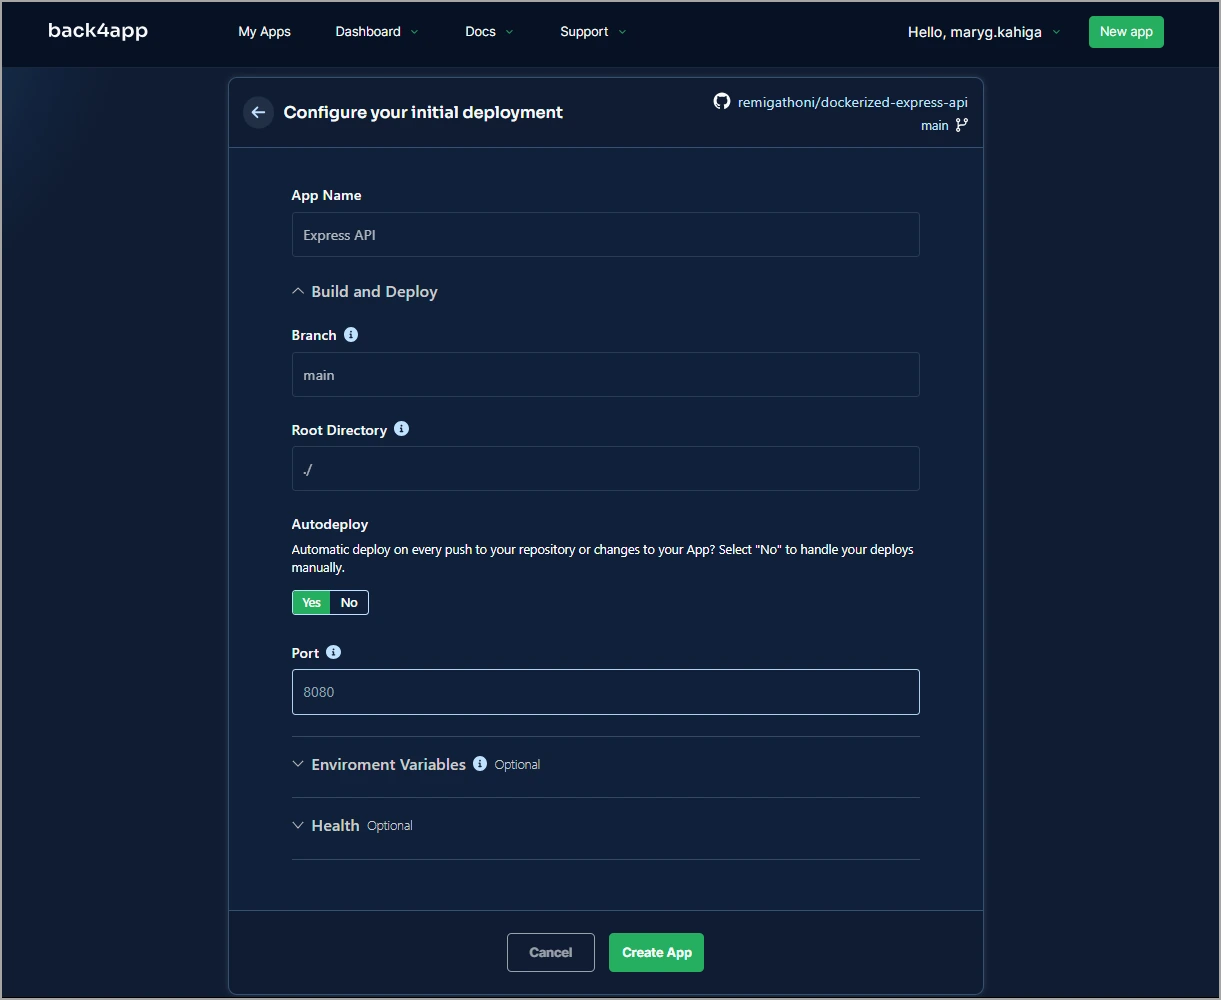
- Give your deployed app a name. In this guide, we are using “Deployed Express API”. You can also set additional deployment options such as the default branch, root directory, auto-deploy status either yes or no, and the environment variables.

- Click the Create App button to finalize the deployment process.
You have now deployed your Express application to Back4app for free.
How to Optimize the Docker Image
It’s crucial to optimize the size of your docker image for the following reasons:
- Improved performance: A small image does not include unnecessary layers that need to be executed. This results in fast startup times.
- Faster deployment: Smaller images deploy faster.
- Lower resource consumption: Smaller images consume less disk space and memory when running.
- Enhanced security: By excluding unnecessary libraries and dependencies, smaller images reduce the attack surface of the application.
To optimize the Express.js Docker image, we can use a multi-stage build.
Multi-stage builds allow you to separate the build environment from the runtime environment. You can build the application in the build stage and then copy only the necessary files to the final production stage.
Going back to the Express application, we can define two stages — the build stage where we will install the dependencies and the production page where we will create the runtime image.
Creating the Build Stage
Follow the instructions below to define the build stage:
- Delete all the contents of the Dockerfile and define the build stage from the base image.
FROM node:20-alpine AS buildA stage is named by appending AS name-of-stage to the FROM instruction. Also note that alpine base images are much smaller than node:<version> images.
- Define the working directory.
WORKDIR /usr/src/app- Copy the package.json and package-lock.json files to the container.
COPY package*.json ./- Install the development dependencies.
RUN npm install --only=development- Copy the application code to the build stage.
COPY . .- Run the application.
CMD ["node", "index.js"]The command you run here depends on your project. For example, if you have used TypeScript to build your application, you may need to transpile your application.
Creating the Production Stage
In the second stage, you’ll copy only the built application files from the build stage. Follow the steps below:
- Add the Node.js base image and name it production.
# Production Stage
FROM node:20-alpine AS production- Set the working directory.
WORKDIR /usr/src/app- Copy the necessary files from the “Build Stage” by specifying
--from=buildin theCOPYinstruction. Since there’s no build command, we copy everything directly.
COPY --from=build /usr/src/app .- Expose the port your Express app listens on.
EXPOSE 3000- Start the Express application.
CMD ["node", "index.js"]After creating the Dockerfile, push your changes to GitHub and Back4app will automatically redeploy your application.
If you want to view the code for this article, see the application’s GitHub repository.
Conclusion
Express.js is a lightweight unopinionated Node.js framework. It helps developers build fast and minimal APIs for web and mobile applications.
When it comes to deploying Express applications, you have various options including Infrastructure as a Service (IaaS) and Container as a Service (CaaS) platforms.
IaaS platforms are better suited for when you want the maximum control over the underlying server infrastructure which CaaS is a good choice for when you want to go from developing to production quickly without having to manually manage the infrastructure.
One of the best CaaS providers is Back4app containers. Back4app manages and monitors the application deployment on your behalf leaving you to concentrate on actually building the application’s features.
In this guide, you learned how to dockerize an Express.js application and deploy it to a Back4app container. To learn more, visit the Back4app containers documentation.
FAQ
What is Express.js?
Express is an unopinionated lightweight framework built on top of Node.js that simplifies the process of building complex web and mobile APIs.
What are the deployment options for Express.js applications?
– IaaS (AWS, GCP, Azure)
– CaaS (Back4app Containers, AWS ECS, Google Kubernetes Engine (GKE))
How to deploy an Express.js application to a Back4app container?
Create an Express.js application.
Dockerize Express.js application.
Push the dockerized application to GitHub.
Create a Back4app account.
Create a Back4app container.
Give Back4app access to your GitHub.
Select the Express.js repository and deploy your application


