How to build a REST API?
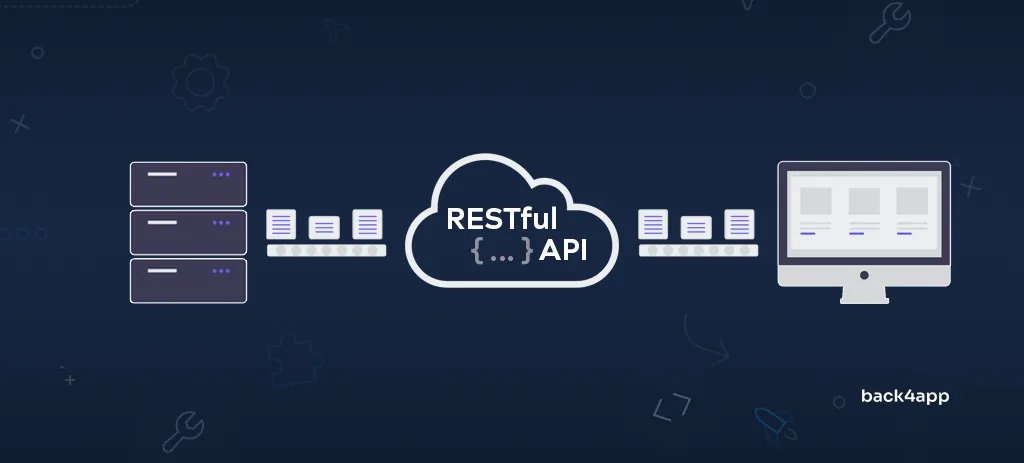
This article provides an introduction to APIs, specifically RESTful APIs. We’ll look at their benefits, limitations, and alternatives. Additionally, we’ll demonstrate how to build a REST API using Back4app — one of the best BaaS providers.
Contents
- 1 What is an API?
- 2 What are the differences between an API and an SDK?
- 3 What is REST?
- 4 How do RESTful APIs work?
- 5 What are the benefits of RESTful APIs?
- 6 What are the limitations of RESTful APIs?
- 7 What are RESTful authentication methods?
- 8 How to build a RESTful API?
- 9 Conclusion
- 10 FAQ
- 11 What is an API?
- 12 What is a RESTful API?
- 13 What are the benefits of RESTful APIs?
- 14 What are the limitations of RESTful APIs?
- 15 How to implement a RESTful API?
What is an API?
An application programming interface (API) is a set of rules that defines how two devices or systems can communicate with one another. APIs are created by developers and meant to be used by other developers or systems, and not by the end users directly. End users usually use them indirectly through so-called frontends or clients.
You can think of an API as a mediator between a client and a resource or a web service. The client sends a request, the request is then processed and finally, a resource or a response is returned.
These days APIs are used almost everywhere. Most businesses have multiple internal and publicly accessible APIs. Just today you’ve probably already interacted with more than a hundred APIs. For example, when you checked the time, the weather, scrolled through Facebook, or watched a YouTube video.
What are the differences between an API and an SDK?
As mentioned above an API is a set of rules that defines how two devices or systems can communicate. A Software Development Kit (SDK) on the other hand is a collection of tools, libraries, and documentation that help developers build software for a specific platform (e.g. Windows, Web, Android, iOS).
SDKs often utilize various APIs behind the scenes. We’ll look at a practical example in the second part of the article.
What is REST?
The software architectural approach called Representational State Transfer (REST) characterizes the framework of the internet. It doesn’t constitute a protocol or standard, allowing for diverse implementation methods by developers. Roy Fielding introduced REST in 2000, and it has served as the predominant standard for creating web APIs for more than ten years.
REST is based on the HTTP protocol and utilizes different HTTP methods such as GET, POST, PUT, and DELETE to manipulate the resources. These operations are oftentimes called CRUD (Create Retrieve Update Delete). REST supports multiple data formats including JSON, HTML, XLT, Python, JavaScript, and so on. The most commonly used data format is JSON.
For an API to be considered RESTful it has to align with the following six constraints:
- Client and Server architecture — client and server components should be separate.
- Statelessness — server applications aren’t allowed to store any client data between requests.
- Cacheability — when possible resources should be cachable on the client or server side.
- Layered system — APIs should allow intermediaries, yet this shouldn’t affect the client.
- Uniform interface — the interface between the server and the client should be uniform.
- Code on demand (optional) — allows the server to send executable code to the client.
The difference between REST and RESTful is that REST refers to the set of constraints, while RESTful refers to an API that complies with those constraints.
How do RESTful APIs work?
RESTful APIs work in a similar way as browsers. The main difference is that browsers use HTTP to request web pages and other resources from servers, while RESTful APIs use HTTP to request and manipulate data resources.
A typical RESTful API call follows these steps:
- Client sends a request to the server.
- Server authenticates the client and checks if it has sufficient permissions for the request.
- Server processes the request, e.g. performs calculations, and fetches data from the database.
- Server returns a response to the client.
- Client processes the response.
The steps may vary depending on the API implementation. The instructions on how to use an API are defined in the API reference (or API documentation).
Request structure
A request contains the following:
| Property | Description |
|---|---|
| URI | Defines what resource the server should manipulate. The URL can also contain query parameters to filter or sort the results. |
| HTTP method | Tells the server what to do with that resource. For example GET returns the resource, POST adds a new resource, PUT updates an existing resource, and DELETE deletes the resource. |
| Headers (optional) | Contains metadata about the request, such as authentication information, cookies, user agent, and content type. |
| Body (optional) | Contains additional information to perform the requested operation. |
A sample request looks like this:

Response structure
A response contains the following:
| Property | Description |
|---|---|
| Status code | The status codes define whether the request was successful (2xx) or not (4xx, 5xx). |
| Headers | Contain metadata about the response, such as the server time, content length, and content type. Additionally, the server can use the Set-Cookie header to set cookies on the client. |
| Body | Contains the resource representation. The representation format is based on the request’s Content-Type header (e.g. application/json). |
A sample response looks like this:

What are the benefits of RESTful APIs?
Scalability
RESTful APIs are highly scalable and can scale both vertically and horizontally. The addition of new endpoints or resources has minimal impact on the API’s performance, making it easy to scale as needed.
Multiple data formats
RESTful APIs can return data in different formats based on the client’s request headers. This makes them extremely flexible and easy to integrate into existing systems. Data can be returned in form of JSON, XLT, Python, HTML, JavaScript, and so on.
Efficiency
RESTful APIs are lightweight and have a smaller overhead than SOAP (Simple Object Access Protocol). That makes them fast and efficient in handling requests. A typical RESTful API can handle between 10.000 to 15.000 requests per second.
Platform independence
Another great benefit of RESTful APIs is that the server and the client are completely independent. That allows developers to implement RESTful APIs and clients in several programming languages such as Java, JavaScript, Python, and more!
Easy to understand
Since REST is based on HTTP it is extremely easy to understand. Most developers have almost surely worked with or implemented a RESTful API at least once.
What are the limitations of RESTful APIs?
Data underfetching & overfetching
One of the biggest problems of RESTful APIs is data under-fetching and over-fetching. Overfetching happens when more data is returned than required and under-fetching happens when not enough data is returned (that is mostly when handling relationships).
No real-time data subscriptions
RESTful APIs don’t allow subscribing to data changes. This means that the clients need to poll the server to detect them. Polling is extremely inefficient and can result in unnecessary network traffic, increased latency, higher bandwidth usage, and reduced scalability.
No versioning system
RESTful APIs don’t have a built-in versioning system. On top of that, there’s no way to deprecate fields, which makes it difficult to evolve APIs over time. Every time you release a major API update you’ll be forced to modify all the clients.
To solve the above-mentioned problems several REST alternatives have emerged. Some of the most popular ones include Simple Object Access Protocol (SOAP), GraphQL, and gRPC.
What are RESTful authentication methods?
RESTful APIs can use different authentication methods to secure their endpoints. The most commonly used authentication methods are:
- HTTP authentication
- API keys
- OAuth 2.0
- OpenID Connect
- JWT Authentication
Most of these methods require the client to send over their credentials or their API key in the request header. Different authentication methods should be considered when starting a project.
How to build a RESTful API?
This portion of the article examines constructing a RESTful API using Back4app and establishing a connection with a Next.js frontend.
Prerequisites
- Experience with JavaScript ES6
- Experience with React and Next.js
- Basic understanding of REST
What is Back4app?
Back4app is an amazing BaaS – Backend as a Service solution. It uses open-source software and offers many features to help developers make mobile and web applications faster. This lets businesses focus on their business logic, without worrying about the cloud infrastructure.
Featuring a user-friendly dashboard and command-line interface, the platform offers Software Development Kits (SDKs) compatible with widely-used tools such as Node.js, Flutter, React Native, Android, Angular, and iOS.
Back4app has a simple pricing model that can suit any app. They also have a free plan, which doesn’t require a credit card, that is a good option for development, testing and prototyping.
To know more about Back4app, please read What is Back4app?
Project Introduction
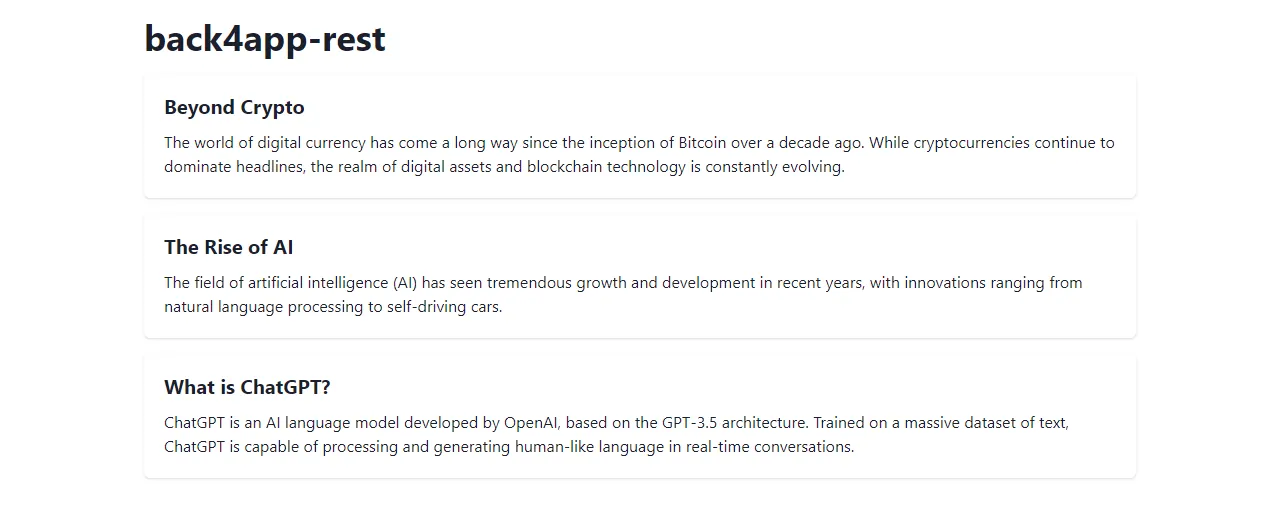
In this article, we’ll build a simple blog web application. The web app is going to allow editors to add articles and users to read them. The app will have two parts: the backend (REST-based) and the frontend. For the backend, we’ll use Back4app and for the frontend, we’ll use React with Next.js.
Backend
Create Back4app App
The following steps will require you to have a Back4app account. Go ahead and log in or create an account if you don’t have one yet.
Navigate to your Back4app dashboard and create a new app by clicking “Build new app”.
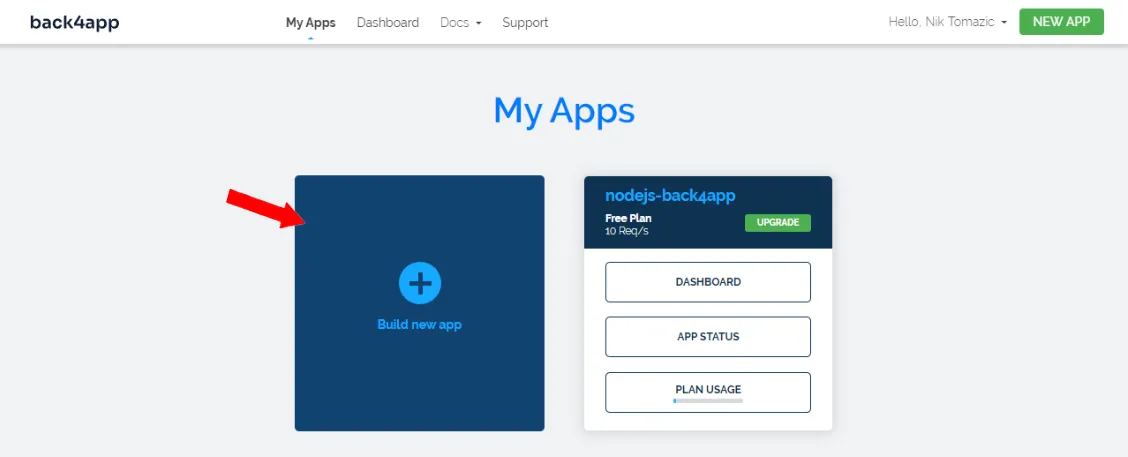
Select “Backend as a Service (BaaS)”, give it a custom name, and select “NoSQL Database” as your database. Lastly, click “Create” to start the app creation process.
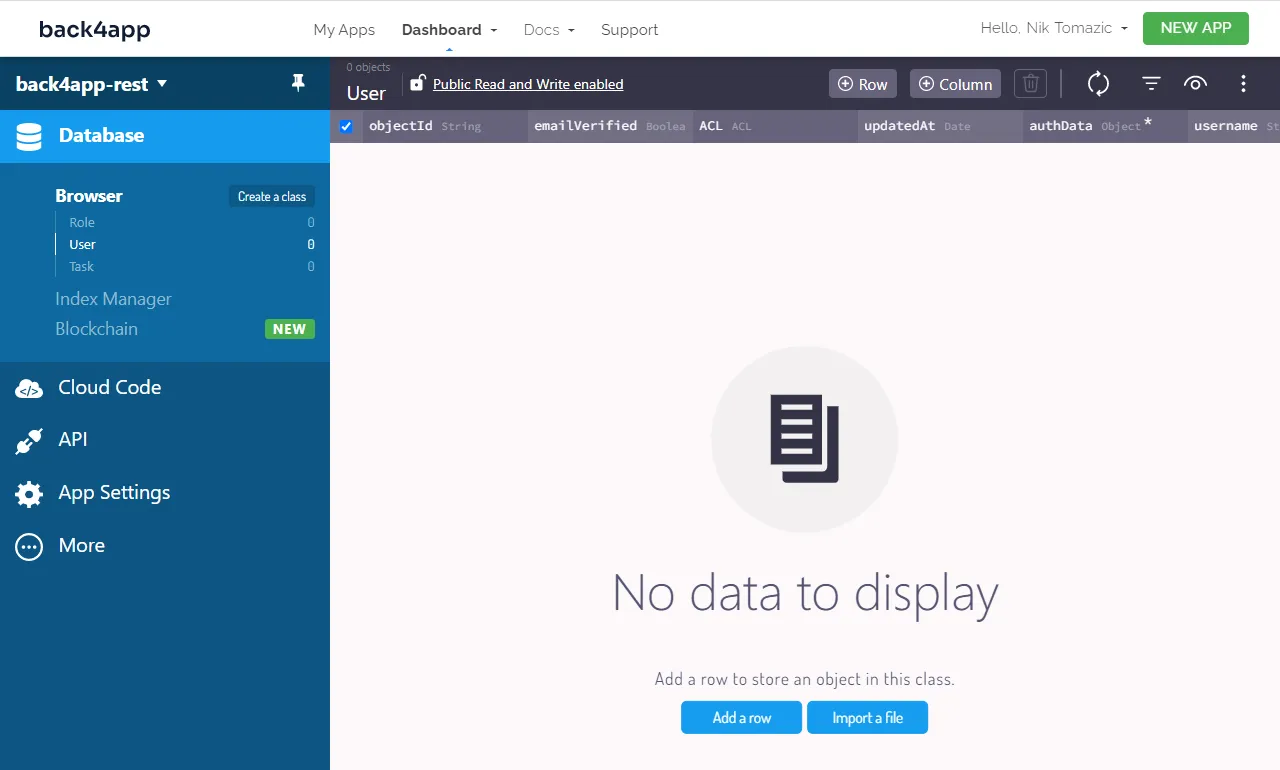
Back4app is going to take a few moments to prepare everything required for your app such as the database, scaling, and security. Once your app is ready you’ll be redirected to the “Database” view.
Define Database Classes
Moving along, let’s define the database classes.
We’ll have the following two classes:
ArticleCategoryrepresents an article category (e.g. blockchain, AI, programming)Articlerepresents an article. An article can have multiple categories (M:N).
To create a class navigate to your Back4app dashboard and select “Database” on the sidebar. Then click on “Create a class”, name it ArticleCategoy and enable “Public Read and Write”.
When moving to production you should disable “Public Read and Write” and strengthen the security with ACLs and CLPs. For more information review Parse Server Security.
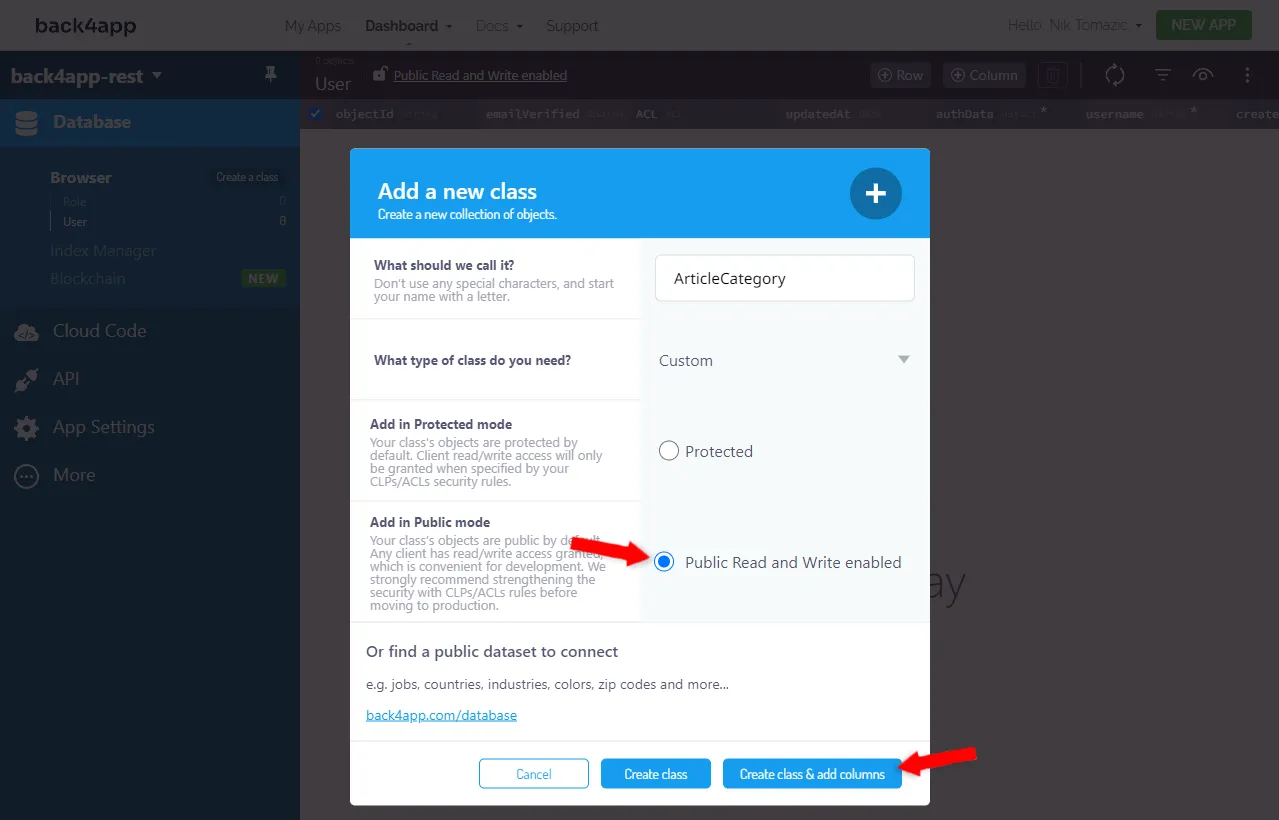
Next, add the following fields to it:
+-----------------------------+-----------------+--------------------+-------------+
| Data type                   | Name            | Default value      | Required    |
+-----------------------------+-----------------+--------------------+-------------+
| String                      | name            | <leave blank>      | yes         |
+-----------------------------+-----------------+--------------------+-------------+
| String                      | slug            | <leave blank>      | yes         |
+-----------------------------+-----------------+--------------------+-------------+
| String                      | description     | <leave blank>      | no          |
+-----------------------------+-----------------+--------------------+-------------+
Perform the same steps for the second class named Article. Add the following fields:
+-----------------------------+-----------------+--------------------+-------------+
| Data type                   | Name            | Default value      | Required    |
+-----------------------------+-----------------+--------------------+-------------+
| String                      | title           | <leave blank>      | yes         |
+-----------------------------+-----------------+--------------------+-------------+
| String                      | slug            | <leave blank>      | yes         |
+-----------------------------+-----------------+--------------------+-------------+
| String                      | shortContent    | <leave blank>      | yes         |
+-----------------------------+-----------------+--------------------+-------------+
| String                      | content         | <leave blank>      | yes         |
+-----------------------------+-----------------+--------------------+-------------+
| Relation -> ArticleCategory | categories      | <leave blank>      | no          |
+-----------------------------+-----------------+--------------------+-------------+
Great, that’s it.
Populate Database
In the future steps when we test the API we’ll need some data to work with. Go ahead and populate the database with some sample article categories & articles.
To add a new ArticleCategory select it in the sidebar and click “Add a row”.
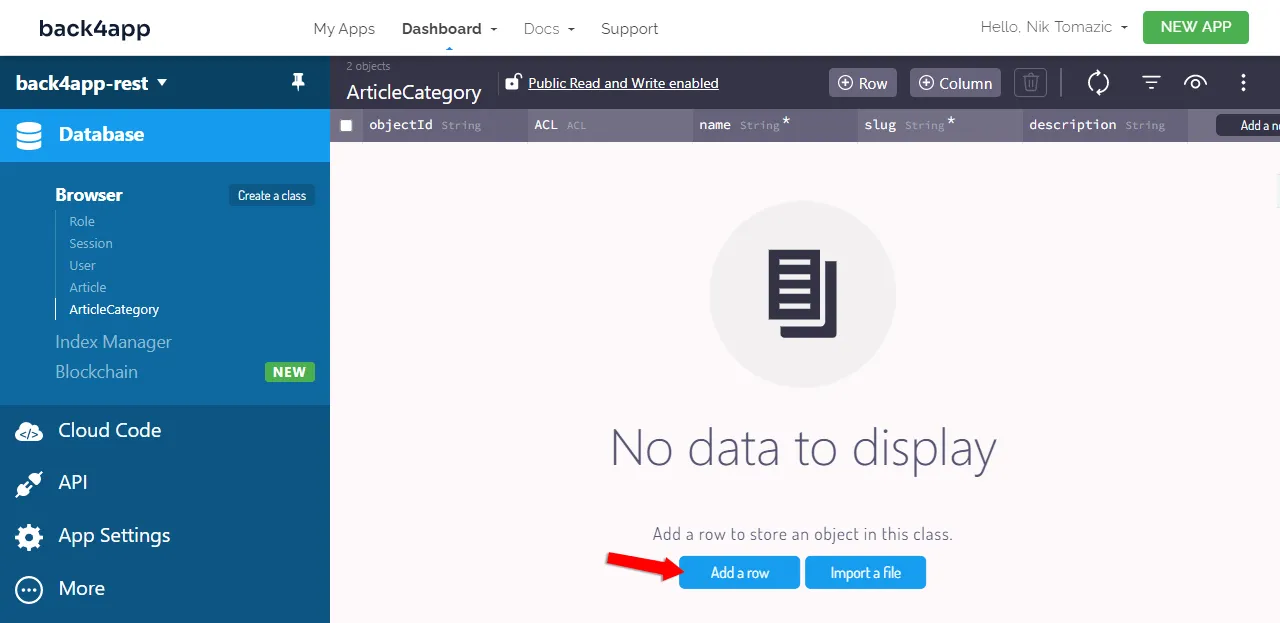
You can use these article categories or come up with your ones:
+------------+------------+---------------------------------------------------------+
| name       | slug       | description                                             |
+------------+------------+---------------------------------------------------------+
| Blockchain | blockchain | Blockchain, crypto & more!                              |
+------------+------------+---------------------------------------------------------+
| AI         | ai         | Artificial intelligence, LLMs, stable diffusion.        |
+------------+------------+---------------------------------------------------------+
You can also use ChatGPT to generate sample data. To learn more about ChatGPT check out How to use ChatGPT to build an app?
Do the same for the Article class:
+------------------+---------------+--------------+---------+-----------------------+
| title            | slug          | shortContent | content | categories            |
+------------------+---------------+--------------+---------+-----------------------+
| Beyond Crypto    | beyond-crypto | ...          | ...     | <blockchain.objectId> |
+------------------+---------------+--------------+---------+-----------------------+
| The Rise of AI   | rise-of-ai    | ...          | ...     | <ai.objectId>         |
+------------------+---------------+--------------+---------+-----------------------+
| What is ChatGPT? | chatgpt       | ...          | ...     | <ai.objectId>         |
+------------------+---------------+--------------+---------+-----------------------+
Make sure to replace <blockchain.objectId> and <ai.objectId> with the actual ArticleCategory objectId. In my case, those are SxS0yiWDij and Hf8yBDTO79 (image above for reference).
REST API
The great thing about Back4app is that as you define the database classes Back4app will automagically set up a REST API for you. The generated REST API allows you to perform basic CRUD operations on all the classes in your database.
REST API Console
To test the API navigate to your Back4app dashboard and select “API > Console > REST” on the sidebar. Then select GET as the request type, and classes/Article as the endpoint. Lastly, click “Send Query” at the bottom right of the screen to send the request.
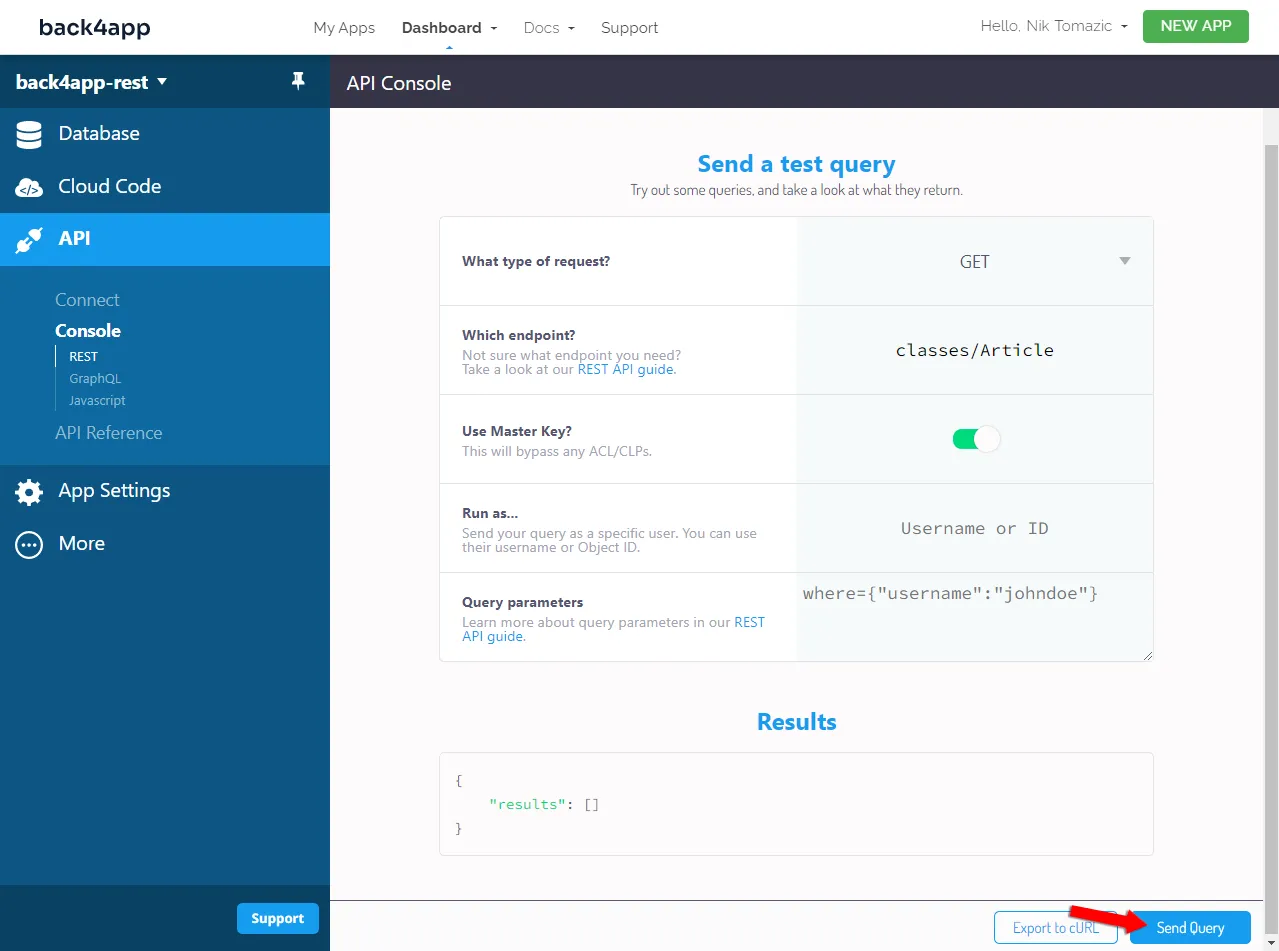
This request is going to return all the articles in your database. You should get a similar response:
{
   "results":[
      {
         "objectId": "yEaR8K44il",
         "title": "Beyond Crypto",
         "slug": "beyond-crypto",
         "shortContent": "...",
         "content": "...",
         "createdAt": "2023-04-17T14:26:19.016Z",
         "updatedAt": "2023-04-17T14:26:30.922Z",
         "categories": {
            "__type": "Relation",
            "className": "ArticleCategory"
         }
      },
      {
         "objectId": "l46nMkHElH",
         "title": "What is ChatGPT?",
         "slug": "chatgpt",
         "shortContent": "...",
         "content": "...",
         "createdAt": "2023-04-17T14:27:34.931Z",
         "updatedAt": "2023-04-17T14:27:42.636Z",
         "categories": {
            "__type": "Relation",
            "className": "ArticleCategory"
         }
      }
      // ...
   ]
}
The REST Console also allows you to perform POST, PUT, and DELETE operations. On top of that, you can use Parse Query parameters to filter data, handle relationships, and more.
For example, if you want to fetch articles that belong to the “Blockchain” category you could use the following where statement:
where={"categories": {
    "__type": "Pointer", "className": "ArticleCategory", "objectId": "<objectId>"
}}
Make sure to replace <objectId> with blockchain’s objectId.
Learn more about query parameters by checking out Parse REST API Guide.
cURL
The REST Console is great, but when you’re working on actual applications you’ll want a more programmer-oriented approach to API requests. One of the tools you can use is cURL – a command-line tool for various protocols such as HTTP, FTP, and SMTP.
An example cURL command for listing the article categories would look like this:
$ curl -X GET \
  -H "X-Parse-Application-Id: YOUR_APPLICATION_ID" \
  -H "X-Parse-REST-API-Key: YOUR_REST_API_KEY" \
  https://parseapi.back4app.com/classes/ArticleCategory | jq
You can obtain the keys from “Back4app Dashboard > App Settings > Security & Keys”.
As you can see when using cURL you have to specify the HTTP method type and provide your application ID and REST API key. On top of that, you can pipe the response into jq to automatically format it and color highlight it.
API Reference
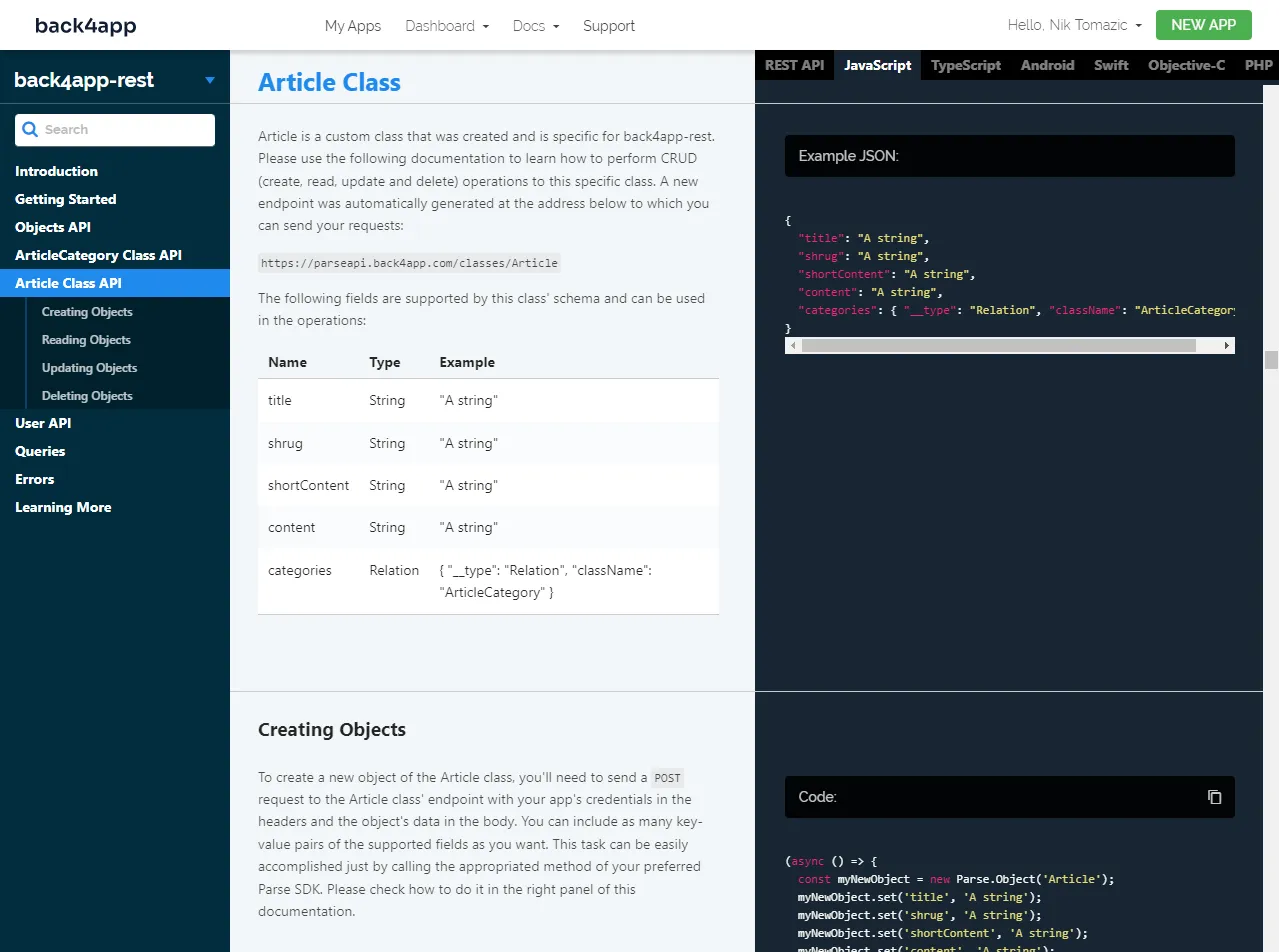
Another great thing about Back4app is that it automatically generates API reference for all your database classes. Every time you make a change the change is reflected in the documentation.
To access the API reference, select “Database” on the sidebar, and use the three dots top right of the screen to see all the options. Lastly, select “API Reference”.
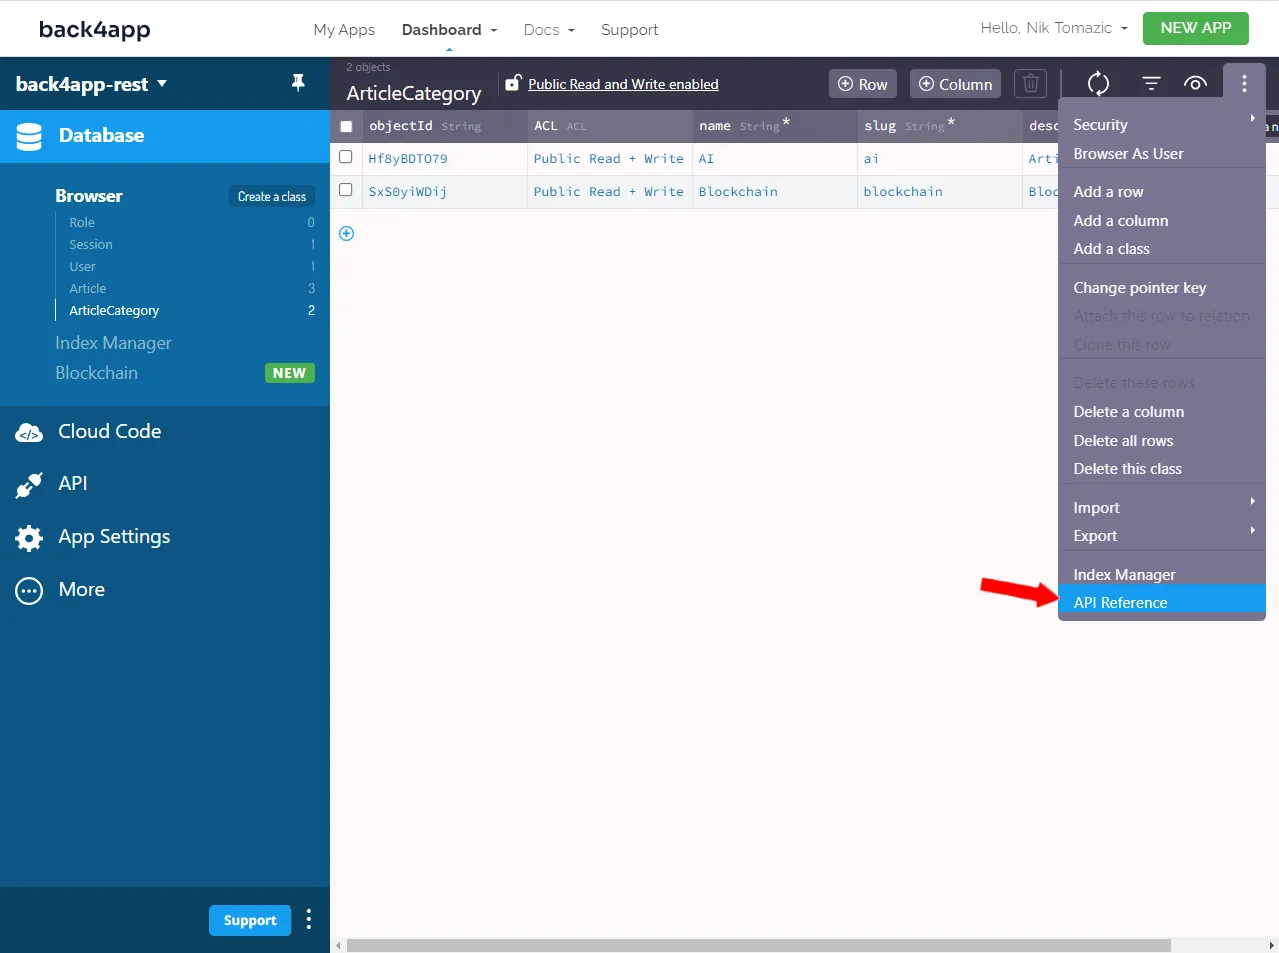
The API reference contains the descriptions of all your database classes, instructions for CRUD operations, sample requests, responses, and code snippets.
That’s it for the backend. In the next section, we’ll take a look at how to implement a frontend that can communicate with the backend.
Frontend
As mentioned above we’ll use React with Next.js 13 to build the frontend. Generally speaking, there are three ways to connect to a Parse-based backend from a JavaScript frontend:
- By using REST API (HTTP requests and responses)
- By using GraphQL API (covered in this article)
- By using JavaScript SDK
You should opt for the last or the second last option. The direct usage of the REST API is not recommended in client apps that can utilize Parse SDKs (e.g. JavaScript, Flutter, Android, iOS, Xamarin). This is because Parse SDK allows you to write cleaner code and is less prone to errors. Behind the scenes, Parse SDKs use the REST API.
Create Next App
Go ahead and bootstrap a Next.js project by using the create-next-app utility. Open your terminal and run the following command:
$ yarn create next-app

√ What is your project named? ... back4app-graphql
√ Would you like to use TypeScript with this project? ... No
√ Would you like to use ESLint with this project? ... Yes
√ Would you like to use the `src/` directory with this project? ... No
√ Would you like to use the experimental `app/` directory with this project? ... No
√ What import alias would you like configured? ... @/*

Successfully created a Next.js app.
Next, run the development server:
$ yarn devNavigate to http://localhost:3000 and you should see the Next.js landing page.
ChakraUI
To make the UI/UX building process easier we’ll utilize ChakraUI. Chakra UI is an uncomplicated, modular, and user-friendly component library that provides all the necessary elements for developing your React applications.
In case you run into any problems refer to ChakraUI: Getting started with Next.js.
First install Chakra and its dependencies by running:
yarn add @chakra-ui/react @emotion/react @emotion/styled framer-motionNext, navigate to your _pages/app.tsx and wrap your app with the ChakraProvider like so:
// pages/_app.tsx

import "../styles/globals.css";
import {ChakraProvider, extendTheme} from "@chakra-ui/react";

export const theme = extendTheme({});

function MyApp({ Component, pageProps }) {
  return (
    <ChakraProvider theme={theme}>
      <Component {...pageProps} />
    </ChakraProvider>
  );
}

export default MyApp;
Don’t forget to import the ChakraProvider:
import {ChakraProvider} from "@chakra-ui/provider";Load the color mode script before the content to avoid random color flashes. To do that, you can utilize _document.js like so:
// pages/_document.js

import {ColorModeScript} from "@chakra-ui/react";
import { Html, Head, Main, NextScript } from "next/document";
import {theme} from "@/pages/_app";

export default function Document() {
  return (
    <Html lang='en'>
      <Head />
      <body>
        <ColorModeScript initialColorMode={theme.config.initialColorMode} />
        <Main />
        <NextScript />
      </body>
    </Html>
  );
}
Great, you’ve successfully installed ChakraUI.
User Interface
Moving along let’s implement the UI. We’ll create the following two pages:
/displays the list of articles/<articleSlug>/displays a specific article
Start off with the index. Replace pages/index.js contents with the following:
// pages/index.js

import {Card, CardBody, Container, Heading,
        Link, Spinner, Stack, Text} from "@chakra-ui/react";
import NextLink from "next/link";
import {useEffect, useState} from "react";

export default function Home() {

  const [isLoading, setIsLoading] = useState(true);
  const [articles, setArticles] = useState([]);

  return (
    <>
      <main>
        <Container maxW="container.lg">
          <Heading as="h1" my="4">
            back4app-rest
          </Heading>
          {isLoading ? (
            <Spinner size="lg"/>
          ) : (
            <Stack spacing="4" direction="column">
              {articles.map((article, index) => (
                <Card key={index} w="100%">
                  <CardBody>
                    <Stack spacing="3">
                      <Heading size="md">
                        <Link as={NextLink} href={article.get("slug")}>
                          {article.get("title")}
                        </Link>
                      </Heading>
                      <Text>
                        {article.get("shortContent")}
                      </Text>
                    </Stack>
                  </CardBody>
                </Card>
              ))}
            </Stack>
          )}
        </Container>
      </main>
    </>
  );
}- We prepared the
articlesandisLoadingstates which we will use later when fetching data. - We used basic ChakraUI components to design the user interface.
- To display all the articles we loop through the
articlesstate.
Next, navigate to pages/[slug].js and change it to the following:
// pages/[slug].js

import {useRouter} from "next/router";
import {Card, CardBody, Container, Heading,
        Link, Spinner, Stack, Text} from "@chakra-ui/react";
import NextLink from "next/link";
import {useEffect, useState} from "react";

export default function Article() {

  const router = useRouter();
  const {slug} = router.query;

  const [isLoading, setIsLoading] = useState(true);
  const [article, setArticle] = useState(null);

  return (
    <>
      <main>
        <Container maxW="container.lg">
          <Heading as="h1" my="4">
            back4app-rest
          </Heading>
          {isLoading ? (
            <Spinner size="lg"/>
          ) : (
            <>
              {article == null ? (
                <Text>This article does not exist.</Text>
              ) : (
                <Card w="100%">
                  <CardBody>
                    <Stack spacing="3">
                      <Heading size="md">{article.get("title")}</Heading>
                      <Text>
                        {article.get("content")}
                      </Text>
                      <Text fontSize="sm">
                        Posted on {new Date(article.get("createdAt")).toDateString()}
                      </Text>
                    </Stack>
                  </CardBody>
                </Card>
              )}
            </>
          )}
          <Text size="sm" mt="2" align="right">
              <Link as={NextLink} href="/">← Go back</Link>
          </Text>
        </Container>
      </main>
    </>
  );
}- We prepared the
articlestate to hold the article. - We used Next Router to fetch the
slugparam from the URL.
Backend Integration
In this last section, we’ll connect the frontend to the backend.
To use the Parse SDK we first have to install it. Go ahead and run the following command:
$ yarn add parse @react-native-async-storage/async-storageNext, navigate to your pages/_app.js and initialize Parse like so:
// pages/_app.js

const PARSE_HOST_URL = "https://parseapi.back4app.com/";
Parse.initialize("YOUR_APPLICATION_ID", "YOUR_JAVASCRIPT_KEY");  // replace me
Parse.serverURL = PARSE_HOST_URL;

export default function App({ Component, pageProps }) {
  return (
      // ...
  );
}
Don’t forget about the import:
import Parse from "parse/dist/parse.min.js";To fetch the articles on the index page we can use a Parse.Query. Once the data is fetched we can store it in articles and set isLoading to false:
// pages/index.js

export default function Home() {

  // ...

  const getArticles = async () => {
    const query = new Parse.Query("Article");
    setArticles(await query.find());
    setIsLoading(false);
  };

  useEffect(() => {
    getArticles();
  }, []);

  return (
    // ...
  );
}
We can then do a similar thing for the article in pages/[slug].js:
// pages/[slug].js

export default function Article() {

  // ...

  const getArticle = async () => {
    const query = new Parse.Query("Article");
    query.equalTo("slug", slug);
    const results = await query.find();
    setIsLoading(false);
    if (results.length === 0) return;
    setArticle(results[0]);
  };

  useEffect(() => {
    getArticle();
  }, []);

  return (
    // ...
  );
}
Again, don’t forget to import Parse in both of the files.
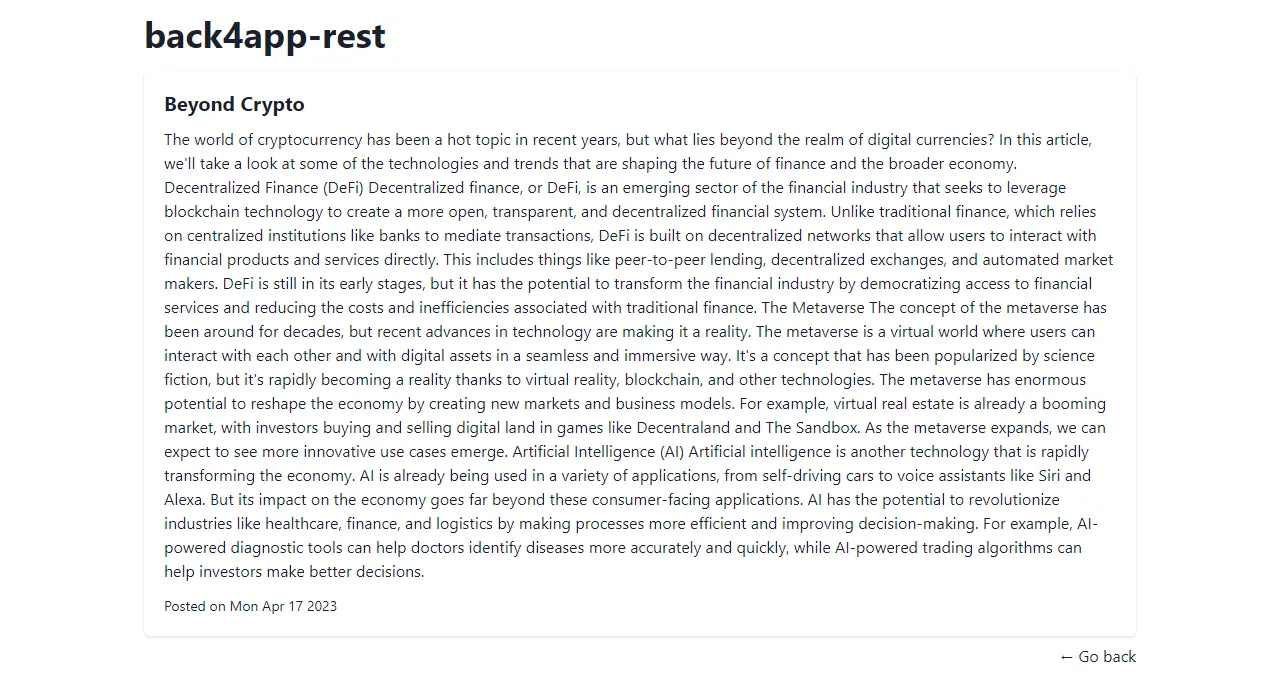
import Parse from "parse/dist/parse.min.js";Start the Next development server (if it isn’t running already) and visit http://localhost:3000 in your favorite web browser. You should see the list of your articles and the articles should be readable.
Conclusion
In this article, you’ve learned about APIs, RESTful APIs, and their advantages and disadvantages. You should now be able to build your simple RESTful APIs and connect to them from a frontend app.
You can grab the final source code on GitHub.
If you enjoyed this article, please checkout also the article How to make a GraphQL API.
FAQ
What is an API?
An application programming interface (API) is a set of rules that defines how two devices or systems can communicate with one another.
What is a RESTful API?
REST is a software architectural style that describes the structure of the web. It is based on HTTP and utilizes different HTTP methods. RESTful APIs can support multiple data formats including JSON, HTML, XLT, and Python.
What are the benefits of RESTful APIs?
– Efficiency
– Scalability
– Platform independence
– Easy to understand
What are the limitations of RESTful APIs?
– Data under-fetching & over-fetching
– No real-time data subscriptions
– No versioning system
How to implement a RESTful API?
1. Sign up for free on Back4app.
2. Define the database models using the Back4app Database view.
3. Back4app will automatically generate a basic RESTful API.
4. Take a look at the generated API reference.
5. Code a client that connects to the backend.


