How to host a React application?
In this article, we’ll talk about React — one of the most popular frontend libraries for building user interfaces. We’ll first explore its advantages and disadvantages then take a look at how to build a React web app and finally how to host it on Back4app Containers.
Contents
What is React?
React is a free and open-source JavaScript library for building interactive user interfaces. It was created by Meta (formerly known as Facebook) in 2013. At the time of writing it is one of the most popular UI libraries. It is a versatile tool for building single-page applications (SPAs), server-rendered apps, and native apps (desktop as well as mobile).
React uses a component-based architecture in which a page can be broken down into multiple reusable pieces or so-called “components”. This architecture improves code quality, readability, and maintainability and allows independent people or teams to work together.
Other important React features include:
- Declarative nature — developers describe the desired state of a user interface, while React handles efficient updating and rendering of the UI based on that state.
- Unidirectional data flow — data can only be passed from parent to child.
- Virtual DOM — React uses a virtual DOM to update the browser’s displayed DOM efficiently.
- Hooks — simple JavaScript functions that can be used to isolate parts of components.
- JSX — extended syntax for JavaScript that is similar to HTML. It allows direct JS execution, which is useful for formatting data, conditional statements, looping, and more.
In the past few months, React also became a popular tool for building full-stack applications. That is thanks to Next.js and Remix, which are two of the most popular frameworks for building React applications. They greatly simplify the development process by providing out-of-the-box routing, image optimization, font optimization, simplify data fetching & more.
Most popular React alternatives in 2023 are Vue, Svelte, Solid and Angular.
To learn more about React alternatives check out Top 10 React Alternatives.
Benefits of React
Performance
React uses a virtual DOM to optimize the updating and rendering process. Instead of directly manipulating the DOM, React creates an in-memory representation of the UI. It then efficiently updates only the necessary parts of the DOM, which results in faster rendering and improved performance.
Component-based Architecture
React uses a component-based architecture. This allows for great code reusability and improved code maintainability. On top of that it makes it easy to integrate 3rd-party components into your project (e.g. video player, gallery, carousel).
To speed up the development process you can also choose from several ready-made React component libraries such as ChakraUI, MUI, AntDesign, or React Bootstrap. Alternatively, you can utilize TailwindCSS.
Easy to Learn
If you’re familiar with JavaScript and building UIs then React will be fairly easy to learn. React team recently released new documentation, which is way better than the legacy one. By reading the documentation you’ll grasp the basic React concepts, which you can later apply when building real-world projects.
If you’re a visual learner there are also many free and paid React video courses available on YouTube and Udemy.
Cross-platform
By learning React you’ll be able to code web apps, desktop apps, as well as native mobile apps.
There are many libraries available for building apps for a specific platform. If you’re building a mobile app I recommend you to go with Expo or React Native. For Windows apps there’s react-native-windows and for macOS there’s react-native-macos.
Community
React has a large ecosystem and is backed by a huge community of developers. There are a bunch of packages on NPM that you can use instead of reinventing the wheel. A list of awesome React packages can be found on GitHub.
Limitations of React
High Pace of Development
Despite being more than ten years old, React continues to undergo extensive development. React team often releases features that fundamentally change how React apps are built. In 2019 they released hooks and then all React apps shifted from class-based components to function-based components. Now a similar thing is happening with server-side rendering.
But don’t worry, React team does its best to keep everything backward compatible.
Relying on 3rd-party Libraries
React is a library and not a framework. That means that you’ll need to install several 3rd party packages when building complex React applications. For example, React doesn’t have a built-in routing system, image optimization, and form handling.
Lack of conventions
React, and JavaScript in general lack standardization and conventions. There are multiple ways of achieving something which oftentimes results in React source codes being quite different from company to company.
To write clean React code I suggest you pick a style guide like Airbnb JavaScript Style Guide and stick to it.
SEO
React is mostly used for building single-page applications (SPAs). SPAs are highly dynamic sites that need to execute a decent amount of JavaScript to render. On top of that SPAs don’t define a clear site structure. These two characteristics make them less optimal for SEO since web crawlers and robots can’t figure out the site structure or run JavaScript to fetch the site’s contents.
Logic in Views
React doesn’t define a clear separation of logic and views. Instead, it’s considered good practice to include some logic in the views (e.g. conditional rendering, map()). Developers, especially beginners sometimes misinterpret this and include too much logic in views. That can make the code less readable and maintainable.
Where to host a React application?
Back4app Containers
Back4app Containers is an awesome Containers as a Service (CaaS) that enables you to deploy dockerized applications with ease. The platform bridges the gap between development and production by automating the deployment process. Since it’s based on Docker you can use it to deploy any app. Best of all it offers a free tier that can be used for hosting simple applications and prototyping.
Other Back4app Containers perks include:
- Automatic deployments
- Zero downtime updates
- Real-time deployment tracking
- Real-time application monitoring
- Automatic HTTPS/SSL certificate
Want to learn more about containerization technology? Check out What are Containers?
Vercel
Vercel is a powerful front-end platform for deploying static and hybrid applications. It is a popular choice for React/Next.js applications since it’s easy to use, doesn’t require much configuration, and has a free tier. On top of that it supports cutting-edge technology such as edge functions, app integrations, and advanced analytics.
The platform has an amazing CI/CD integration and guarantees an uptime of 99.99%. Additionally, Vercel recently announced four different types of databases including Postgres, KV, Blob, and Edge Config.
Netlify
Netlify is a Platform as a Service (PaaS) computing platform for building, deploying, and scaling web applications. It offers similar features as Vercel and is their biggest competitor. It’s extremely easy to use and has a free tier. The platform natively supports many programming languages including Ruby, Node, Python, PHP, Go, and Java.
The platform is mainly used for deploying company websites, e-commerce sites, web apps, and other large sites. The cloud computing company is well-tested and has been around since 2014.
DigitalOcean App Platform
DigitalOcean App Platform is a simple, fully-managed infrastructure solution for building, deploying, and scaling apps. It can be used to deploy web apps, websites, APIs, static sites, web services, and more. The platform natively supports many frameworks and programming languages such as Python, Django, Go, PHP, and Node.js. On top of that it has built-in security features, supports rollbacks, alerts, advanced logs & more.
You can easily combine the App Platform with other DO products such as Managed Databases, Object Storage, and Cloud Functions.
How to host a React application?
In this article section, we’ll look at how to build and deploy a React app to Back4app Containers.
Prerequisites
- Experience with JavaScript ES6
- Experience with React and React Hooks
- Basic understanding of Docker (and containerization technology)
- Node.js and a JavaScript IDE installed on your local machine
Project Overview
To demonstrate the power of React and Back4app Containers we’ll build a simple pomodoro timer web app. The timer will have two phases, the “focus phase” and the “rest phase”. After a phase is over it will automatically switch to the other phase. We’ll first code the app, then dockerize it, and lastly deploy it to Back4app Containers.
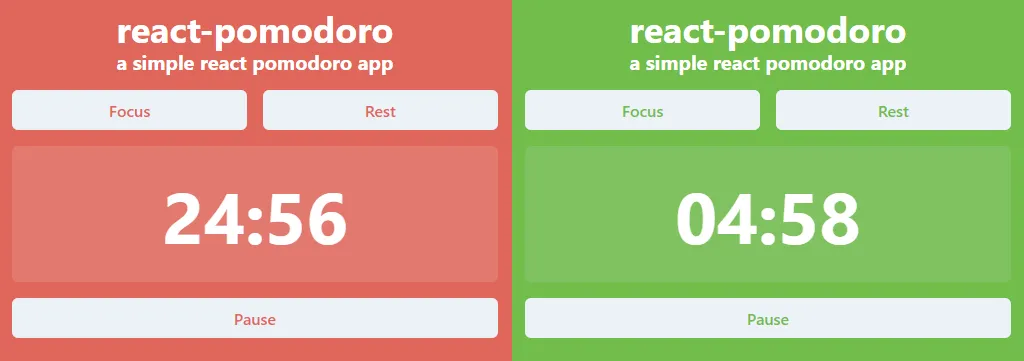
If you’re interested in just the deployment process you can skip the “Build App” section.
Build App
In this section, we’ll create a new React project, install ChakraUI, and implement the app logic.
Create React App
Start by creating a new React app using the Create React App (CRA) tool:
$ npx create-react-app react-pomodoroThis tool will generate the project directory structure, install React along with its dependencies, and freeze them to package-lock.json.
Next, navigate to the newly created app:
$ npx react-pomodoroStart the development server:
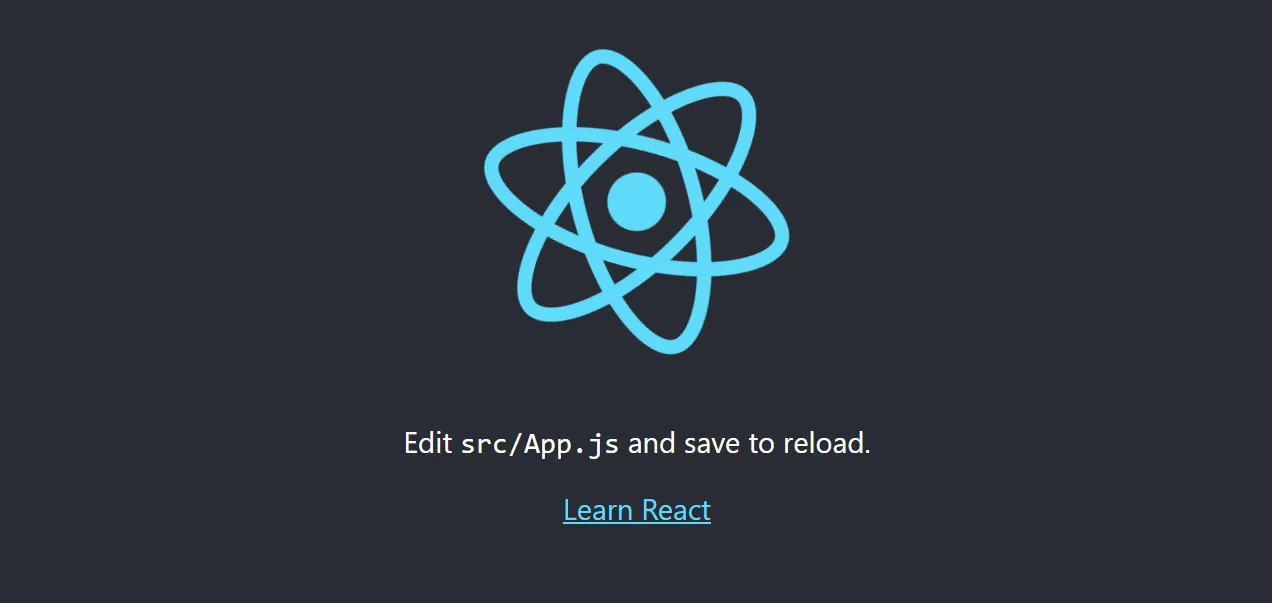
$ npm startLastly, open http://localhost:3000/ in your favorite browser and make sure you can see the default React landing page.
Install ChakraUI
To simplify the UI/UX building process we’ll utilize ChakraUI, a versatile and user-friendly component library.
Open your command line interface and install Chakra along with its dependencies:
$ npm i @chakra-ui/react @emotion/react @emotion/styled framer-motionNext, navigate to index.js and make sure to wrap your entire app in <ChakraProvider>:
// src/index.js

// ...
import {ChakraProvider} from "@chakra-ui/react";

const root = ReactDOM.createRoot(document.getElementById("root"));
root.render(
  <React.StrictMode>
    <ChakraProvider>
      <App/>
    </ChakraProvider>
  </React.StrictMode>
);
Great, you’ve successfully installed ChakraUI. You can now use Chakra’s components, styled systems, hooks, and everything else Chakra has to offer.
Constants
As mentioned in the project overview our app will have two phases:
- Focus phase (25 minutes)
- Rest phase (5 minutes)
Before we can implement the app logic, let’s first define a few constants at the top of App.js:
// src/App.js

// ...

const FOCUS_KEY = "focus";
const REST_KEY = "rest";

const FOCUS_TIME = 25 * 60;  // 25 minutes, specified in seconds
const REST_TIME = 5 * 60;    // 5 minutes, specified in seconds

const phaseStyles = {
  [FOCUS_KEY]: {
    color: "#ffffff",
    background: "#DF675B",
    backgroundSecondary: "#e1796e",
  },
  [REST_KEY]: {
    color: "#ffffff",
    background: "#71bd4b",
    backgroundSecondary: "#81c260",
  },
};

function App() {
  // ...
}

export default App;
Constant rundown:
FOCUS_KEYandREST_KEYare keys used to identify the phases.FOCUS_TIMEandREST_TIMEdefine the duration of the phases (in seconds).phaseStylesdefines the CSS style for both the focus and the rest phase. In our case the focus phase is red and the rest phase is green.
Don’t worry about these constants too much, it’ll all make sense after the next few sections.
User Interface
Next, modify the App component to render the UI:
// src/App.js

import {Box, Button, Container, Heading, Link} from "@chakra-ui/react";
import {useEffect, useRef, useState} from "react";

// ...

function App() {

  const [phase, setPhase] = useState(FOCUS_KEY);
  const [timeLeft, setTimeLeft] = useState(FOCUS_TIME);
  const [isRunning, setIsRunning] = useState(false);
  const intervalRef = useRef(null);

  const onFocusClick = () => {};

  const onRestClick = () => {};

  const onStartClick = () => {};

  return (
    <Box
      width="100%" height="100vh"
      background={phaseStyles[phase].background}
      color={phaseStyles[phase].color}
    >
      <Container width="container.xl" py={12} centerContent>
        <Box my={2}>
          <Heading as="h1">react-pomodoro</Heading>
          <Heading as="h2" size="md">a simple react pomodoro app</Heading>
        </Box>
        <Box
          width="100%" display="flex" flexDirection="row"
          color={phaseStyles[phase].background}
          my={2}
        >
          <Button width="100%" mr={2} onClick={onFocusClick}>Focus</Button>
          <Button width="100%" ml={2} onClick={onRestClick}>Rest</Button>
        </Box>
        <Box
          width="100%" display="flex" justifyContent="center"
          background={phaseStyles[phase].backgroundSecondary}
          p={8} my={2} rounded="md"
        >
          <Heading size="4xl">{timeLeft}</Heading>
        </Box>
        <Box width="100%" my={2}>
          <Button
            width="100%" color={phaseStyles[phase].background}
            onClick={onStartClick}
          >
            {isRunning ? "Pause" : "Start"}
          </Button>
        </Box>
      </Container>
    </Box>
  );
}

export default App;- We used Chakra’s components (such as
Box,Button, andLabel) to build the UI. - We used React’s
useState()hook to define the state forphase,timeLeft, andisRunning. - We defined dummy functions such as
onFocusClick(),onRestClick(), andonStartClick()that are triggered by buttons.
If you restart the server now and visit http://localhost:3000 you should see something like this:

It looks decent, but it would look better if timeLeft had a more user-friendly format. Instead of displaying only seconds, we can parse timeLeft and display minutes and seconds left like so 00:00.
To achieve that define the following function at the top of App.js:
// src/App.js

const formatTime = (timeInSeconds) => {
  const remainingMinutes = Math.floor(timeInSeconds / 60);
  const remainingSeconds = timeInSeconds % 60;
  return `
      ${String(remainingMinutes).padStart(2, "0")}:
      ${String(remainingSeconds).padStart(2, "0")}
      `;
};

// ...
Then use it in your JSX like so timeFormat(timeLeft).
Logic
To define the app logic change the click functions like so:
// src/App.js

function App() {

  // ...

  const onFocusClick = () => {
    setPhase(FOCUS_KEY);
    setTimeLeft(FOCUS_TIME);
    setIsRunning(false);
  };

  const onRestClick = () => {
    setPhase(REST_KEY);
    setTimeLeft(REST_TIME);
    setIsRunning(false);
  };

  const onStartClick = () => {
    setIsRunning(!isRunning);
  }

  // ...
}useFocusClick()changes the phase to focus, resets the time, and stops the timeronRestClick()works analog touseFocusClick(), but for the rest phaseonStartClick()toggles theisRunningstate.
Next, add useEffect() with an interval that counts down every second:
// src/App.js

function App() {

  // ...

  useEffect(() => {
    if (isRunning) {
      intervalRef.current = setInterval(() => {
        setTimeLeft(prevState => {
          if (prevState <= 0) {
            setPhase(phase === FOCUS_KEY ? REST_KEY : FOCUS_KEY);
            setIsRunning(false);
            return phase === FOCUS_KEY ? REST_TIME : FOCUS_TIME;
          } else {
            return prevState - 1;
          }
        });
      }, 1000);
    }
    return () => clearInterval(intervalRef.current);
  }, [isRunning, phase]);

  // ...
}
That’s it! Run your development server and test the app. If everything works well the timer should count down after you press “start”, pause when you press “pause”, and the phases should auto-switch after the timer hits zero.
Dockerize App
To deploy a React app to Back4app Containers you first need to dockerize it. To dockerize an application you’ll generally have to do the following:
- Define a Dockerfile.
- Create a .dockerignore file.
- Build the image and test it locally.
Let’s perform these steps.
Dockerfile
A Dockerfile is a plain text document that contains all the instructions the Docker engine has to perform to build an image. These instructions can be used to set the working directory, base image, copy files, run commands, and so on. The instructions are usually written in all caps and are directly followed by the arguments. Example:
INSTRUCTION argumentsFor more information on Dockerfile instructions take a look at the Dockerfile reference.
A basic React Dockerfile would look something like this:
FROM node:18-alpine
WORKDIR /app

COPY package.json ./
COPY package-lock.json ./
RUN npm ci

COPY . .

RUN npm run build
RUN npm install -g serve

EXPOSE 5000

CMD ["serve", "-s", "build", "-l", "5000"]
This Dockerfile creates an image that is based on the Alpine Node.js image. It sets the working directory, copies over the dependencies file, and installs them, it then builds the app and finally serves it via the serve package.
For a line-by-line explanation check out the Back4app Containers docs.
That image works, but we can optimize it by taking advantage of multi-stage builds. Multi-stage builds allow us to optimize the image size, simplify the debugging process, use cached images to make the building process faster, and so on.
Go ahead and create a new file named Dockerfile in the project root with the following contents:
FROM node:18-alpine as dependencies
WORKDIR /home/app

COPY package.json ./
COPY package-lock.json ./
RUN npm ci

# =====================================================================================

FROM node:18-alpine AS builder
WORKDIR /home/app

COPY --from=dependencies /home/app/node_modules ./node_modules
COPY . .

ENV NODE_ENV="production"

RUN npm run build

# =====================================================================================

FROM node:18-alpine AS runner
WORKDIR /home/app

COPY --from=builder /home/app/build ./build

RUN npm install -g serve

EXPOSE 3000
ENV PORT 3000

CMD ["serve", "-s", "build", "-l", "3000"]
This Dockerfile has three stages:
dependenciesstage which copies over the package.json file and installs the dependenciesbuilderstage which uses the dependencies from the previous stage to build the imagerunnerstage which takes thebuilderstage output and serves the application
By using the multi-stage build we’ll reduce the image size by roughly 40% and greatly speed up image builds.
.dockerignore
Our project contains some files we don’t need in the production build eg. node_modules, .git, and so on. To exclude them from the image we can use a .dockerignore file.
Create a .dockerignore file in the project root with the following contents:
.idea/
.git/

/node_modules
/.next/
/out/
/build

.env*.local
.vercel
Feel free to modify it according to your needs.
Build and Test
Before pushing your images to the cloud it’s a good idea to test them locally. To do that you’ll need Docker Engine/Docker Desktop installed. First, check your Docker version by running:
$ docker --version

Docker version 20.10.22, build 3a2c30b
Next, build and tag the react-pomodoro image:
$ docker build -t react-pomodoro:1.0 .Then use the newly built image to spin up a container:
$ docker run -p 3000:3000 -d react-pomodoro:1.0Arguments explanation:
-pshort for--portbinds the port3000to3000.-dshort for--detachedruns the container in detached mode (outside of the terminal)react-pomodoro:1.0specifies which image you want to use
Check the running containers:
$ docker psYour app is now running in a container locally. Make sure it works by navigating to http://localhost:3000 in your favorite web browser.
GitHub Repository
To deploy an app to Back4app Containers you first need to push your source code to GitHub. You can follow these steps:
- Create an account on GitHub.
- Create a new GitHub repository.
- Navigate to your local project and initialize the repository via
git init. - VCS all the source code via
git add .(you can use a .gitignore file to ignore files). - Add the remote origin via
git remote add origin <remote_url>. - Commit the code via
git commit -m "initial commit". - Push the code via
git push origin master.
If you’ve never worked with Git feel free to check out this video).
Deploy App
To deploy an app to Back4app Containers, you will first need to create an account.
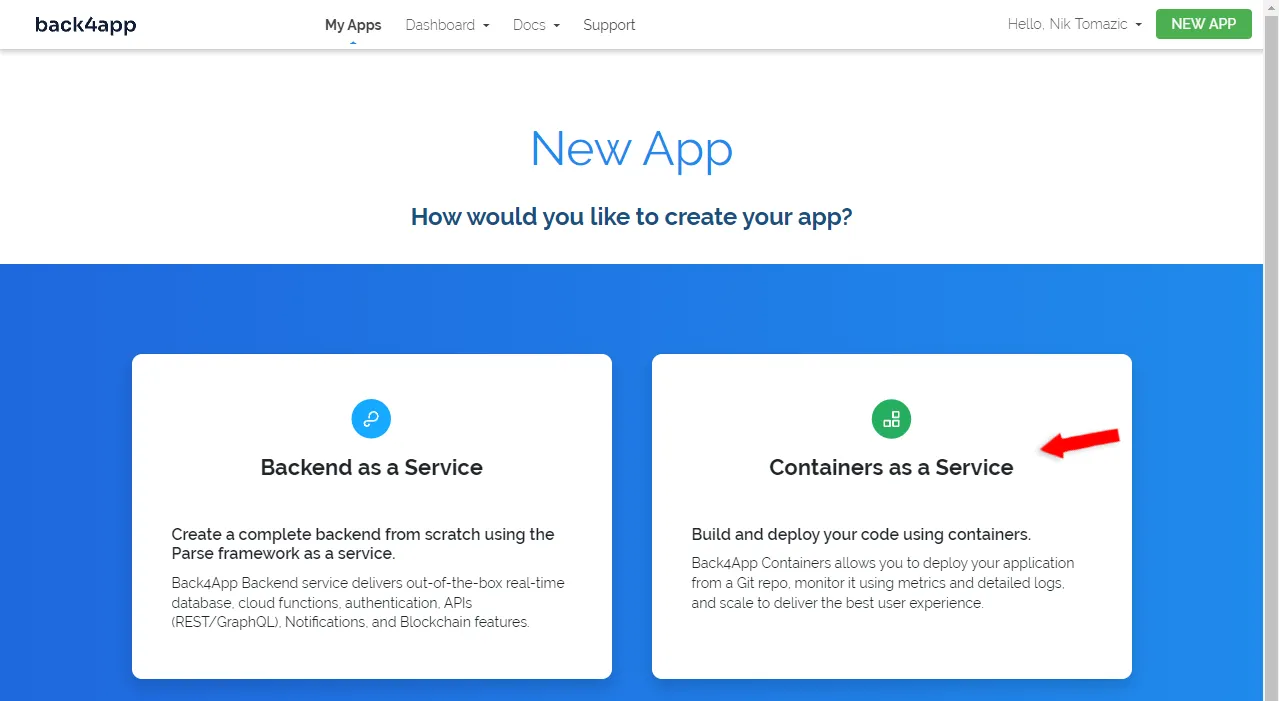
Once you log in to your Back4app account, you will be redirected to your app dashboard. Click on the “Build new app” button to start creating your app.
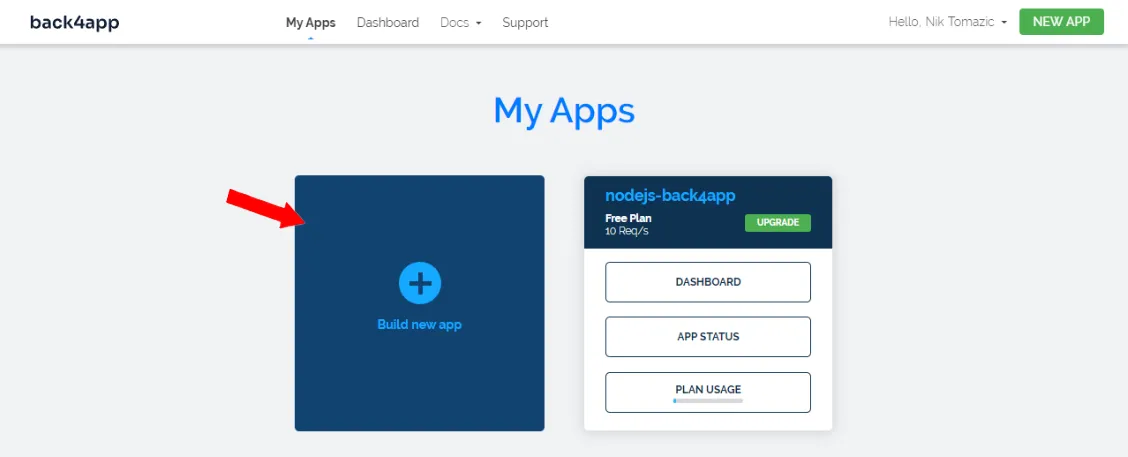
Back4app offers both BaaS (Backend as a Service) and CaaS (Containers as a Service) solutions. Since we are deploying a container, select “CaaS”.
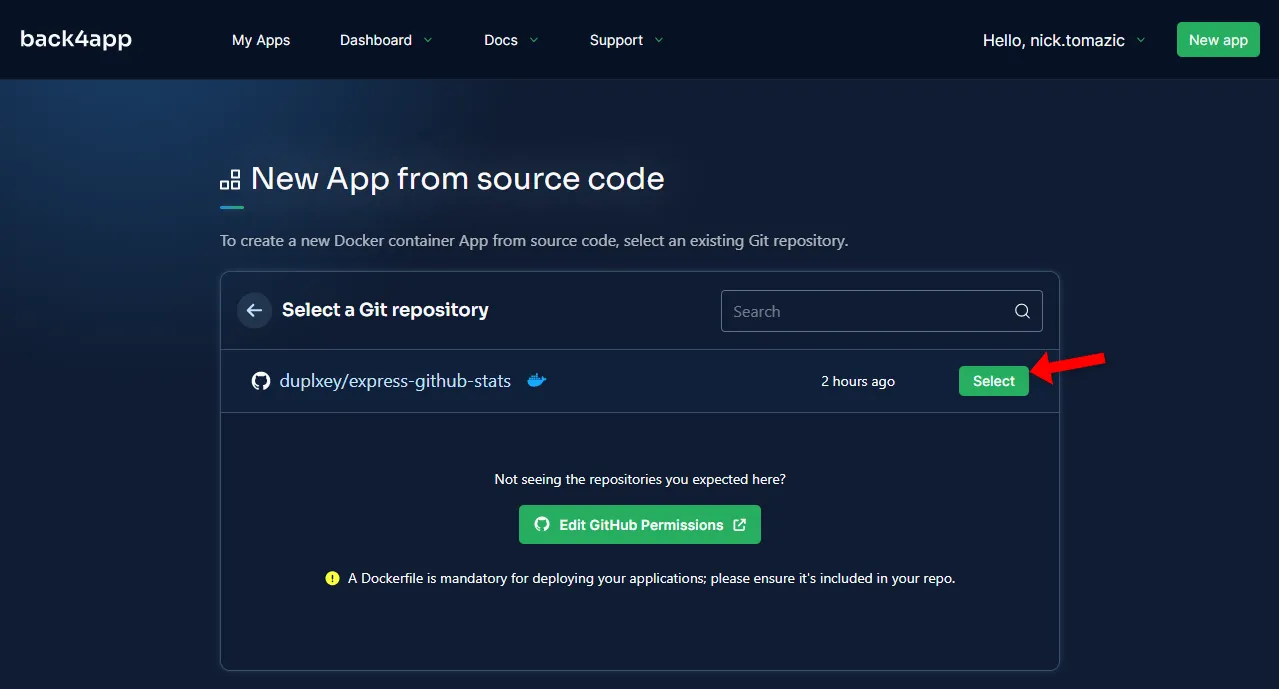
Next, you will need to link your GitHub account with Back4app and import the repository that you have previously created.
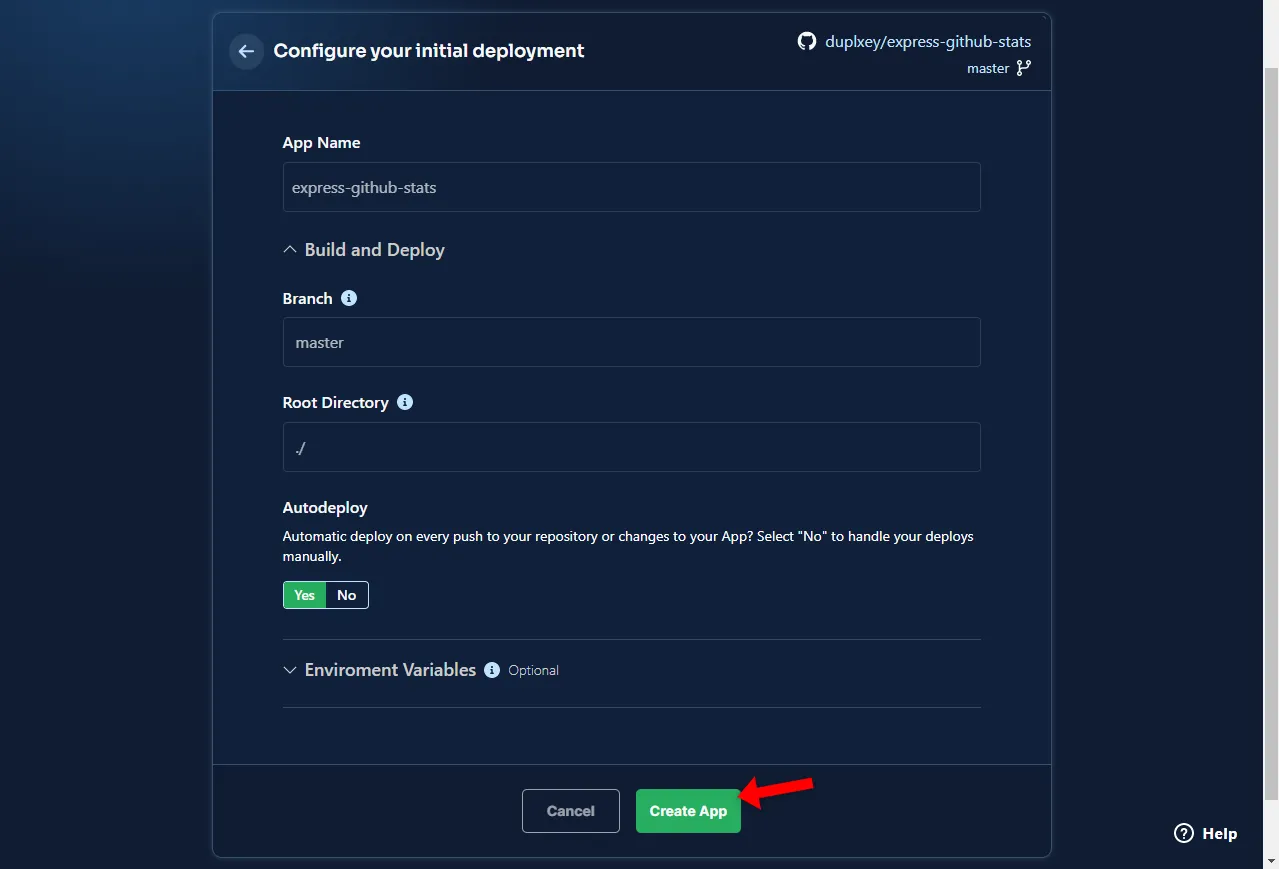
Back4app Containers allows for advanced configuration, but for our simple app, we only need to provide the app name. Once you have entered the app name, click “Deploy” to start the deployment process.
Wait approximately 5 minutes for your app to deploy. Once the deployment is complete. Click on the green link left side of the screen to open the app in your browser.
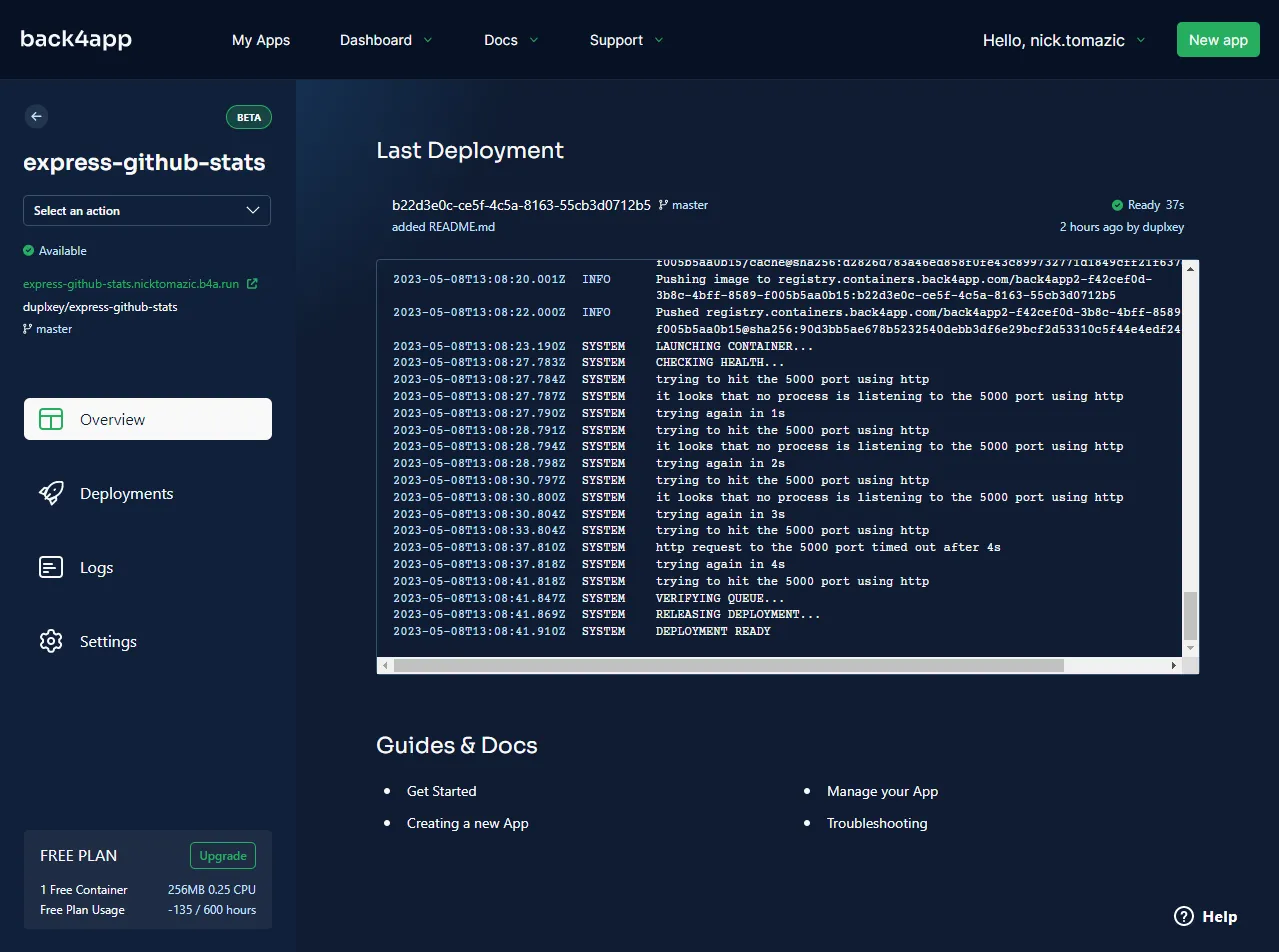
That’s it! Your app is now successfully deployed and accessible through the provided link. Additionally, you might notice that your app is accessible via HTTPS since Back4app automatically issued a free SSL certificate for your app.
Conclusion
React is one of the best open-source front-end JavaScript libraries for building user interfaces. In this article, you’ve learned about its advantages, disadvantages, and how to build your own React application. On top of that, you now know how to host a React app on Back4app Containers.
The final source code can be found on GitHub.
FAQ
What is React?
React is a free and open-source JavaScript library for building interactive user interfaces. It was created by Meta in 2013 and is currently one of the most popular UI libraries. It can be used for building web applications, native applications, browser extensions & more!
What are the advantages of React?
– Performance
– Component-based Architecture
– Easy to Learn and Easy to Use
– Cross-platform
– Huge Community
What are the disadvantages of React?
– High Pace of Development
– Relying on 3rd-party Libraries
– Lack of Conventions
– SEO
– Logic in Views
How to host a React application?
1. Build a React application.
2. Dockerize the app using a Dockerfile.
3. Push the source code to GitHub.
4. Create an account on Back4app Containers.
5. Configure the environment and click “Deploy”.


