How to Deploy a Webservice?
This article will discuss webservices, their advantages, web services deployment options, and how they compare to APIs.
On top of that, you’ll learn how to deploy an e-commerce web service to the cloud without writing any custom code!
Contents
Key Takeaways
- Understanding the Role of Web Services: Web services are a key component of modern digital infrastructure, offering significant advantages such as interoperability, platform independence, scalability, and security.
- Exploring Deployment Options: Deploying web services can be approached in several ways, including Conventional Hosting, Platform as a Service (PaaS), Containers as a Service (CaaS), and Backend as a Service (BaaS).
- Guidance on Deploying a Web Service to the Cloud: The article provides a comprehensive guide on deploying an e-commerce web service using a no-code BaaS platform.
What is a Web Service?
A web service is software available over the internet, typically over Hypertext Transfer Protocol (HTTP). The data served by a web service is in a standardized format such as XML, JSON, SOAP, or YAML.
Web services are used for machine-to-machine communication rather than being consumed by the end customer directly.
For example, your mobile device uses a weather web service to fetch weather information and then displays it in a nice format.
There are multiple types of web services such as Representational State Transfer (REST), GraphQL, and gRPC.
A typical web service lifecycle looks like this:
- A web service listens on some server at a specific port.
- A client sends a request to the web service at that port.
- The web service performs the request and returns a response. Before processing the response the server can also authenticate and authorize the request.
- The client processes the response.
Web services are known for their platform and language independence, reusability, scalability, flexibility, and being loosely coupled. These days, they’re used by almost every IT company.
Web Service vs. API
Web service and API are similar terms, but they shouldn’t be used interchangeably.
In simple terms, a web service is an API that is available strictly over the internet. This means that all web services are APIs, while not all APIs are web services.
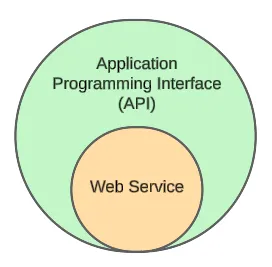
APIs apart from being web services can also perform other stuff. For example, operating system interactions, local application communication, and application integrations.
Two examples of non-web-service APIs are Python file system API and JavaScript DOM API.
Web Service Advantages
Web services are a fundamental aspect of modern digital infrastructure, offering numerous advantages. Let’s talk about them!
Interoperability
One of the key advantages of web services is their ability to facilitate interoperability between different systems and applications.
By adhering to standardized protocols such as HTTP and XML, web services enable flawless communication between different software components, regardless of the underlying technology stack.
Platform Independence
Another great thing about web services is that they’re entirely platform-independent. They can be implemented in any programming language and run on any operating system, including Windows, Linux, and MacOS.
As mentioned in the previous section, they can also be consumed on any platform.
Simple & Efficient
Web services are easy to understand and implement. Most of the time, they don’t even have their own state. Instead, they use a database or utilize another software component.
They offer a straightforward approach to accessing functionality over a network. This simplicity helps with consistency in interactions, making it easier to understand and use the services across different platforms and technologies.
Scalability
Web services are highly scalable. They can accommodate any traffic by vertical scaling, i.e. adding additional resources to a server node, or horizontal scaling, i.e. spawning additional server nodes.
This can help you considerably cut costs by ensuring no computing resources go to waste.
Reusability
The best thing about web services is that they’re highly reusable. Instead of integrating the same code into multiple applications, they can all utilize a single instance of a web service.
Reusability results in a smaller and more maintainable codebase, better centralization, and allows you to save resources.
Security
Web services can leverage authentication, authorization, encryption, and other security measures. Most web services are protected using SSL/TSL encryption.
All of this ensures confidentiality (ensuring only the sender and the receiver can read the message) and integrity (the message isn’t modified in transit).
Web Service Deployment Options
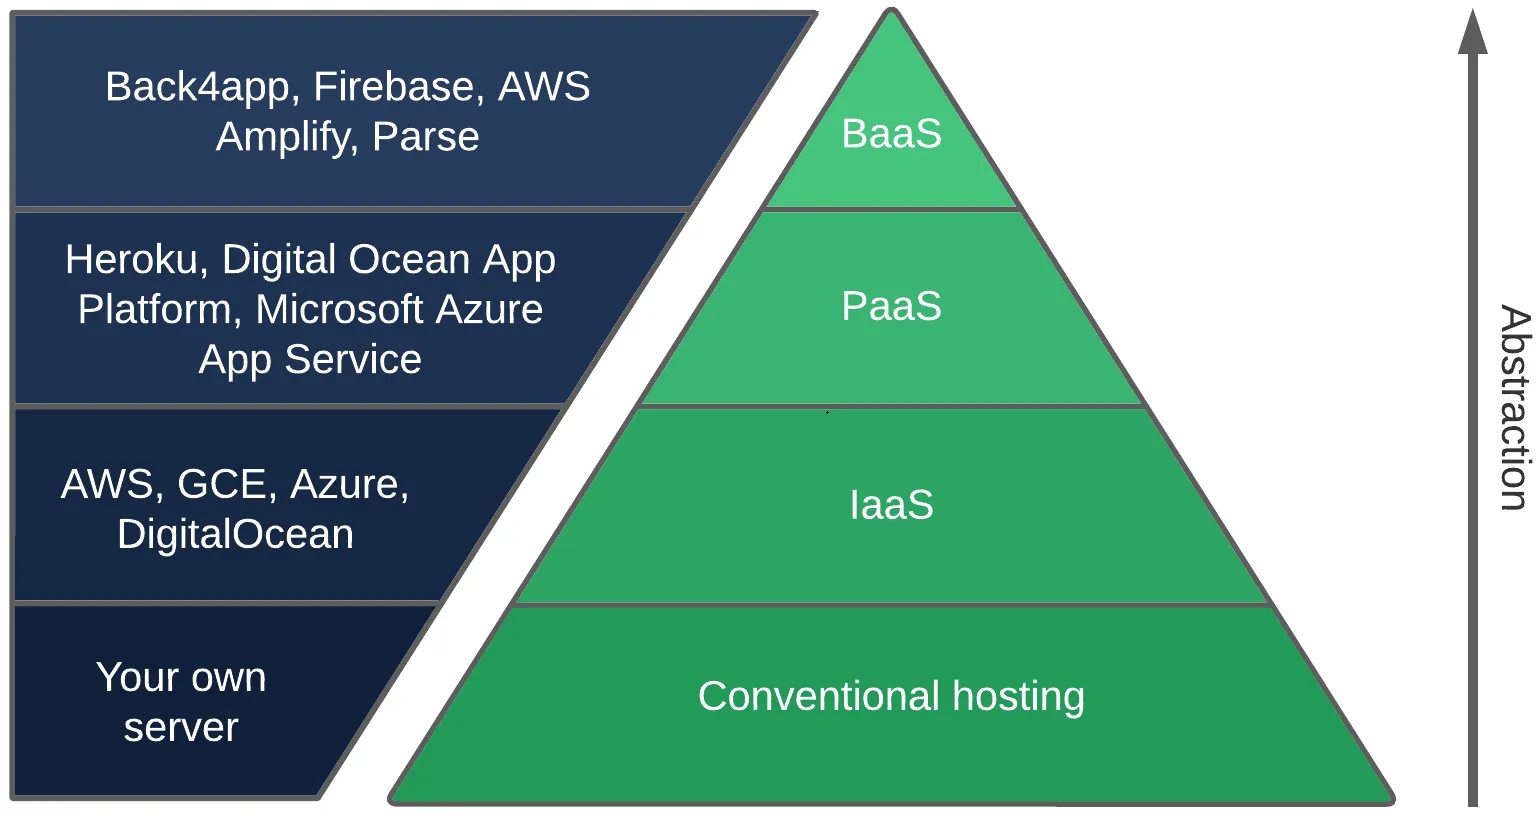
Web services can either be self-hosted or deployed to the cloud. The most popular cloud options for deploying web services are:
- Platform as a Service (PaaS)
- Containers as a Service (CaaS)
- Backend as a Service (BaaS)
Each cloud model has pros and cons that should be considered when deploying your project. The most important factors to take into account are ease of use, budget, performance, and features.
Conventional Hosting
Conventional hosting is a traditional approach to hosting websites and applications. The servers can either be self-hosted or provided by hosting companies.
With traditional hosting, you typically rent server space on a monthly or yearly basis.
Key features of conventional hosting include:
- Server Space — various server space plans based on your application needs
- Website Management Tools — user-friendly tools for website managing, e.g. cPanel
- Email Hosting — email hosting services that allow you to associate a domain with them
- FTP Access — server files can be accessed via FTP or secure FTP (SFTP)
One of the main advantages of conventional hosting is its affordability, especially for small websites and businesses.
However, it lacks scalability and flexibility compared to cloud-based solutions. Conventional hosting is also more challenging to set up.
Platform as a Service (PaaS)
Platform as a Service (PaaS) enables customers to create, administer, and distribute applications in a cloud setting.
Furthermore, PaaS companies provide a variety of prebuilt tools for application creation, customization, and testing.
Compared to IaaS, PaaS is more straightforward to use and requires less experience in system administration.
Moreover, you can benefit from load balancers, managed databases, and automatic backups. In comparison to IaaS, PaaS has less freedom and control and has a higher risk of vendor lock-in.
Containers as a Service (CaaS)
Containers as a Service (CaaS) is another popular cloud computing model. CaaS makes developing, executing, deploying, and maintaining containerized software simple. It is frequently combined with Docker and Docker Compose.
Most CaaS platforms provide:
- Docker Engine
- Container registry
- Scaling capabilities
The main perk of containerized software is that it can be deployed anywhere. There’s no vendor lock-in, meaning you can freely switch from one cloud provider to another. This is specifically useful for web services.
Backend as a Service (BaaS)
Backend as a Service (BaaS) is a cloud computing model that takes care of your infrastructure and automates the backend portion of development.
Furthermore, it offers capabilities like real-time database, file storage, social media integrations, email and push notifications, and more.
As a result, developers can concentrate on creating the front end without worrying about the infrastructure and backend.
The frontend is often constructed using the BaaS vendor’s proprietary APIs and SDKs. By utilizing BaaS, you can simplify the codebase and make it more maintainable.
BaaS provides all the advantages of IaaS and PaaS while providing a backend abstraction layer. Using BaaS, teams cut time to market and save money on engineering and workforce.
How to Deploy a Web Service?
This article section’ll provide a step-by-step guide on deploying a web service to the Back4app platform. We’ll use Back4app’s no-code BaaS solution.
If you’re interested in custom-code solutions, check out the following articles:
- Deploy a Flask Web Service to Back4app Containers
- Deploy a Node.js Web Service to Back4app Containers
- Deploy a PHP Web Service to Back4app Containers
- Deploy a FastAPI Web Service to Back4app Containers
What is Back4app?
Back4app is one of the most popular Backend as a Service (BaaS) solutions.
By using it, you’ll be able to significantly accelerate your development process and focus on the elementary aspects of your app — such as the business logic and the frontend, while Back4app will handle the rest.
Back4app provides no-code and custom-code deployment. It is straightforward to use and practically has no learning curve. It is appropriate for beginners as well as more experienced developers.
The great thing about Back4app is that it automatically generates RESTful and GraphQL APIs based on your database classes.
On top of that, it provides SDKs for almost every popular programming language or framework, such as React, Android, iOS, and more!
Back4app Core Features
- Spreadsheet-like databases
- User management & authentication
- Automatic API generation
- Cloud Code functions & scheduling
- Real-time data
To follow the article, you’ll need a free Back4app account. If you don’t have it you can create one.
Project Introduction
Throughout the article, we’ll be building a simple e-commerce web API.
The API will provide product, product category, and purchase management functionalities. It’ll allow us to perform create, read, update, and delete (CRUD) operations on each database class.
On top of that, we’ll use Cloud Code to implement custom functions for calculating e-commerce statistics, such as total sales and most popular products.
Lastly, we’ll test the API using the built-in Back4app REST and GraphQL Console.
Create App
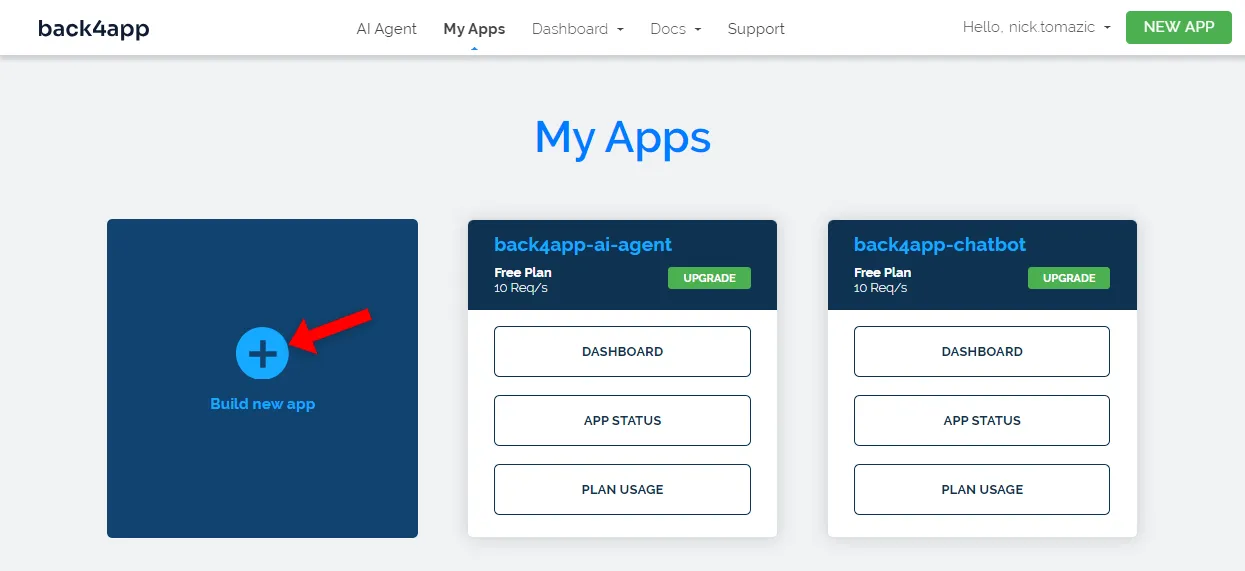
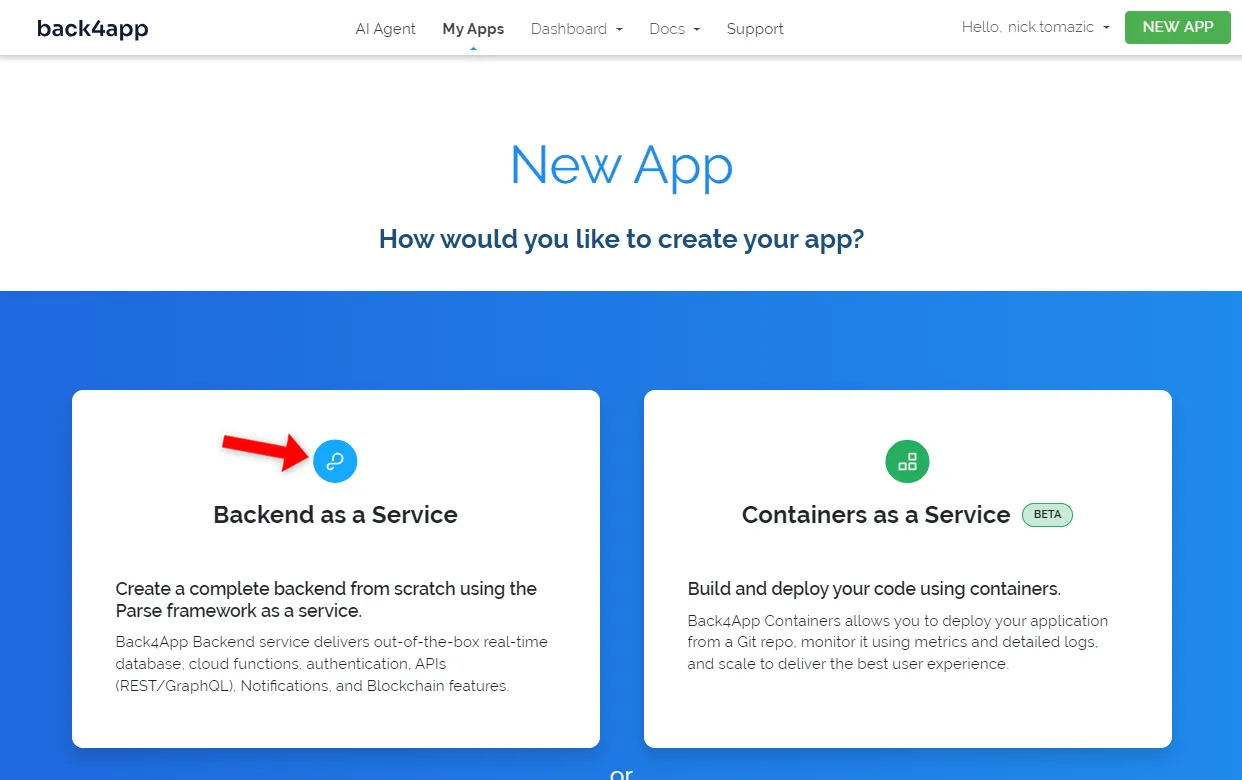
To work with Back4app, you’ll first have to create an app. To do that, authenticate yourself using your Back4app account and click “Build new app” on the app dashboard.
The Back4app platform allows you to deploy two types of apps:
- Backend as a Service (BaaS)
- Containers as a Service (CaaS)
Both cloud computing models allow you to deploy web services.
The main difference is that BaaS is a fully-fledged backend, while CaaS enables you to deploy containerized web services.
In other words, BaaS is a mostly no-code solution, while CaaS is a custom code solution.
We’ll go with Backend as a Service (BaaS).
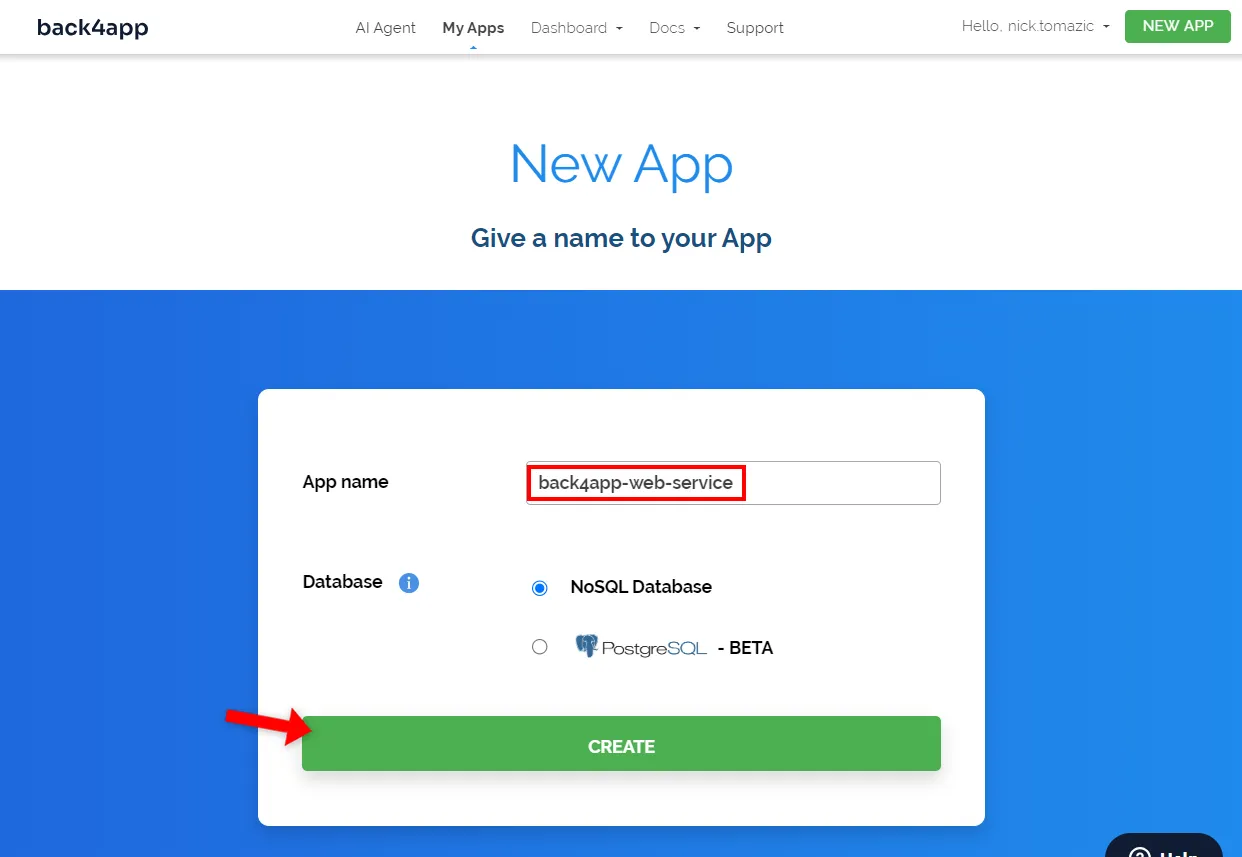
When creating a Back4app application, you can choose between a NoSQL or SQL database. For our use case, this doesn’t matter, so we’ll stick with NoSQL.
Give your app a good name, and click “Create”.
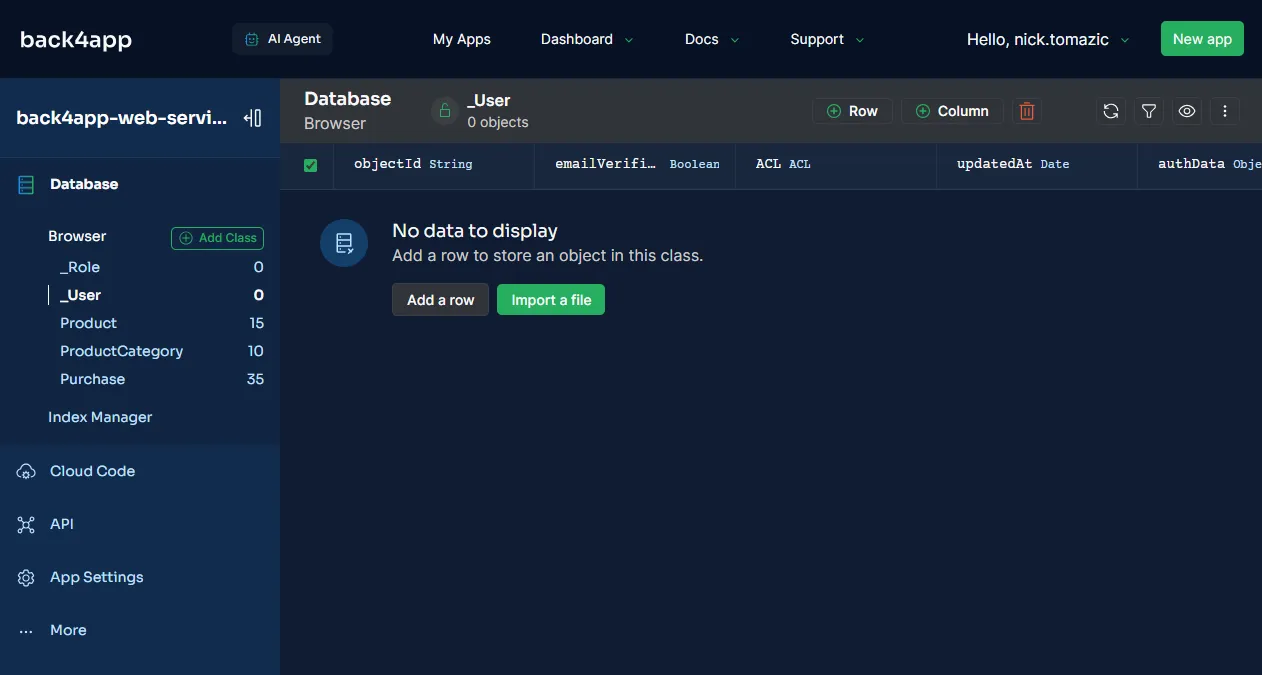
Wait for Back4app to take care of everything, including the database, application layer, scaling, setting up user management, etc. It’ll take roughly 2 minutes.
Once done, you’ll be redirected to your database view.
Design the Database
Moving along, let’s take care of the database.
By default, a Back4app app comes with a _Role and a _User database class. These two classes are used for user management and authentication.
These topics are out of the scope of this tutorial, but you can check our other articles to learn about them.
To create our e-commerce web API, we’ll create the following database structure:
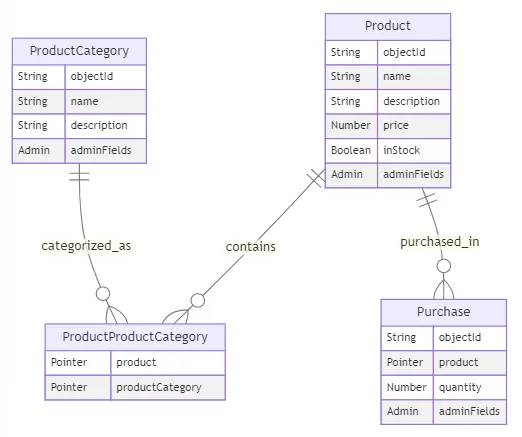
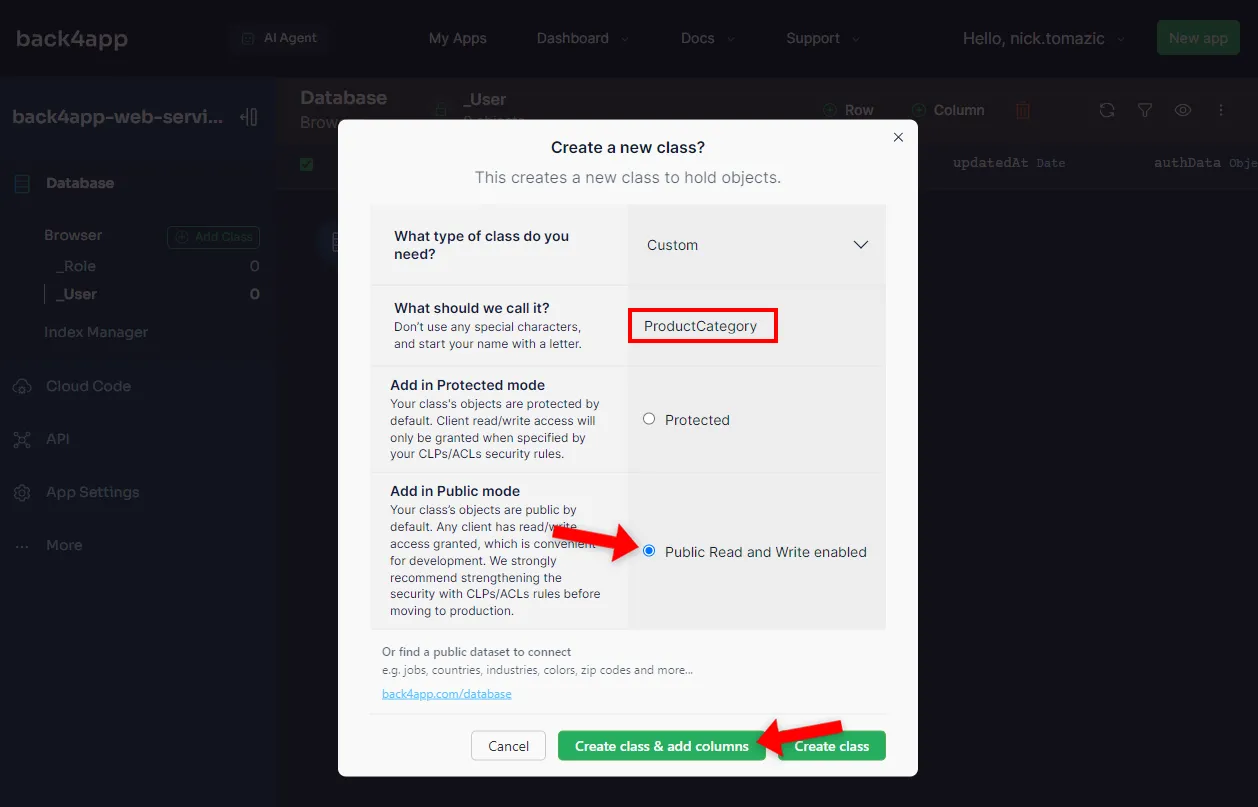
We’ll start by creating the ProductCategory class.
Click “Add Class” on the sidebar to create a new database class. Name it “ProductCategory”, enable “Public Read and Write”, and click “Create class & add columns”.
Add the following columns to it:
+-----------------------------+-------------+---------------+----------+
| Type                        | Name        | Default value | Required |
+-----------------------------+-------------+---------------+----------+
| String                      | name        | <leave blank> | yes      |
+-----------------------------+-------------+---------------+----------+
| String                      | description | <leave blank> | no       |
+-----------------------------+-------------+---------------+----------+
Next, perform the same steps to create a Product class:
+-----------------------------+-------------+---------------+----------+
| Type                        | Name        | Default value | Required |
+-----------------------------+-------------+---------------+----------+
| String                      | name        | <leave blank> | yes      |
+-----------------------------+-------------+---------------+----------+
| String                      | description | <leave blank> | no       |
+-----------------------------+-------------+---------------+----------+
| Relation -> ProductCategory | categories  | true          | yes      |
+-----------------------------+-------------+---------------+----------+
| Number                      | price       | 0.0           | yes      |
+-----------------------------+-------------+---------------+----------+
| Boolean                     | inStock     | true          | yes      |
+-----------------------------+-------------+---------------+----------+
Lastly, take care of the Purchase class:
+-----------------------------+-------------+---------------+----------+
| Type                        | Name        | Default value | Required |
+-----------------------------+-------------+---------------+----------+
| Pointer -> Product          | product     | <leave blank> | yes      |
+-----------------------------+-------------+---------------+----------+
| Number                      | quantity    | 1             | yes      |
+-----------------------------+-------------+---------------+----------+
Outstanding, you’ve successfully created the database structure.
As you can see, the Pointer data type handles the 1:n (one to many) relationships, and Relation data type handles the n:m (many to many) relationships.
The last thing you must do is populate the database with a few product categories, products, and purchases. This will allow us to test the web service later to ensure everything works as expected.
To populate the database, you can either:
- Create a few product categories, products, and purchases by yourself
- Import these database exports from GitHub (“More > Import > Class Data”)
Web Service Usage
To connect to the web service, Back4app allows for multiple approaches:
- Auto-generated RESTful API
- Auto-generated GraphQL API
- Parse SDK
Let’s look at each of them!
REST API
Representational state transfer (REST) is an HTTP-based protocol that leverages HTTP methods, such as OPTIONS, GET, POST, DELETE, and so on.
Most APIs you interact with these days are REST-based. It supports multiple data formats, but JSON is the most commonly used one.
REST is an effective, highly scalable, and platform-independent protocol. It can be used with any programming language or framework.
Its main cons are data over-fetching or under-fetching, no real-time subscriptions, and no API versioning system.
To test the REST API, select “API > Console > REST” and perform the following query:
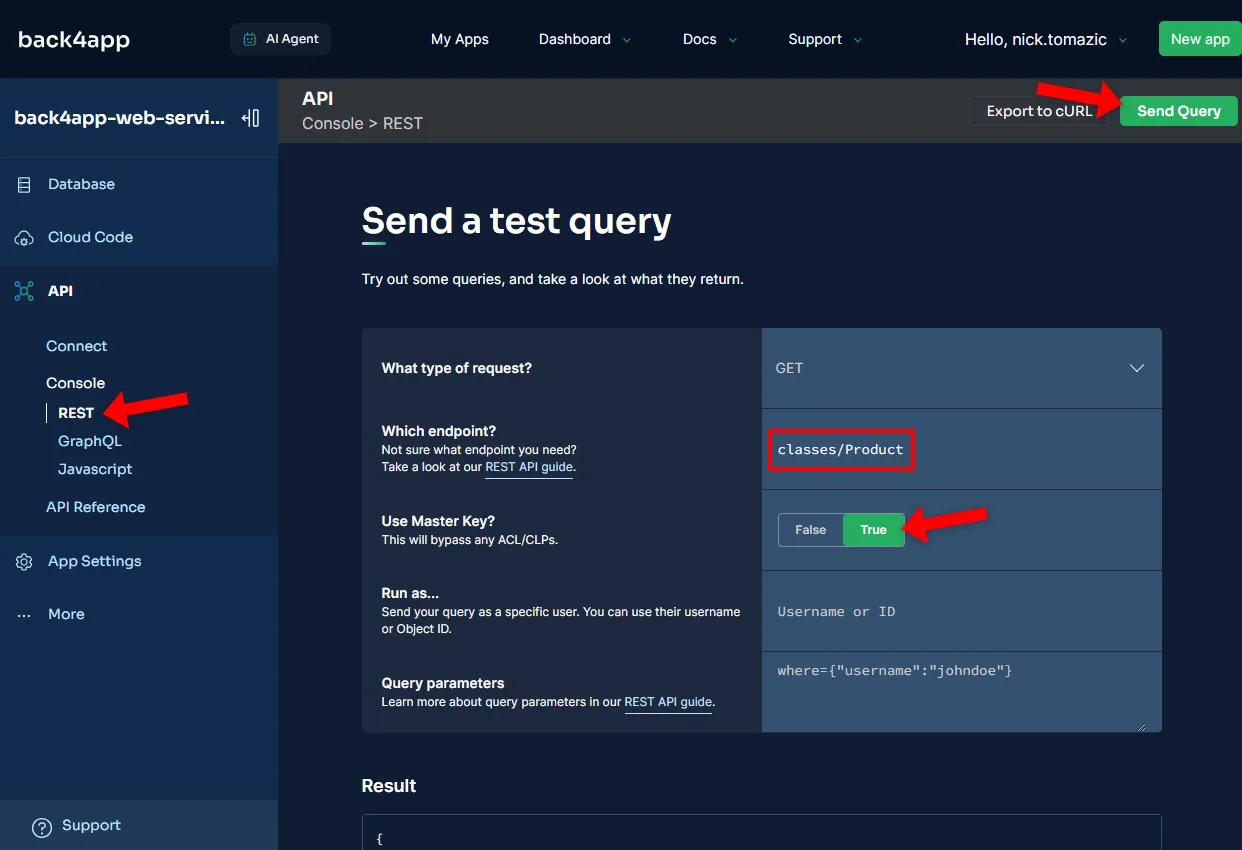
This query should yield the following response:
To learn more, check out How to Build a REST API?
GraphQL API
GraphQL is a server-side runtime and query language used to create application programming interfaces (APIs).
GraphQL allows clients to request specific data from the API instead of relying on the backend to supply a predetermined data set.
Its advantages include flexibility, maintainability, and GraphQL extensions. On the other hand, the downsides are complexity, a steeper learning curve, and a lack of standardization.
To test the GraphQL API, select “API > Console > GraphQL” and perform the following query:
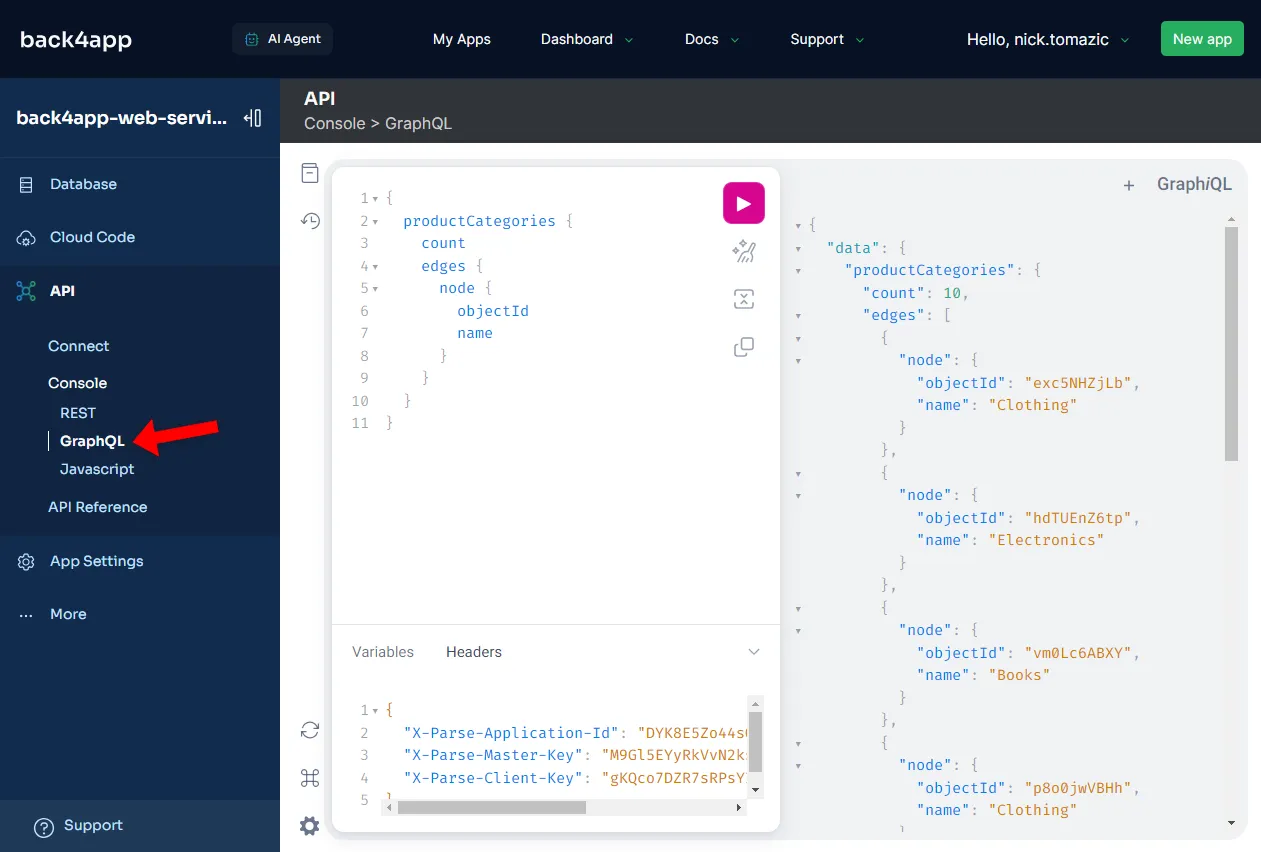
To learn more, check out How to Build a GraphQL API?
Parse SDK
Parse SDK is the recommended approach if your frontend is built in a programming language or framework that Parse SDK natively supports.
These include React Native, Flutter, Android, iOS, JavaScript, IONIC, and Xamarin.
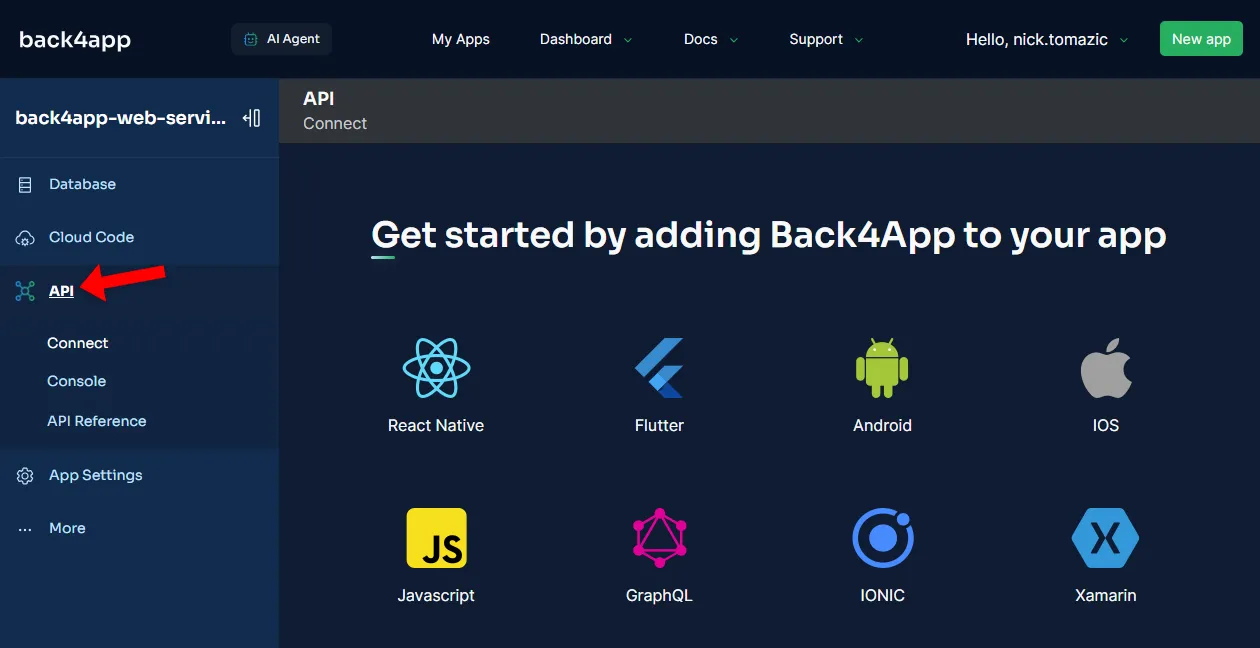
Parse software development kit (SDK) provides classes and functions for data retrieval, manipulation, user authentication, real-time data, Cloud Code functions, and more.
Example data retrieval code in JavaScript looks like this:
API Documentation
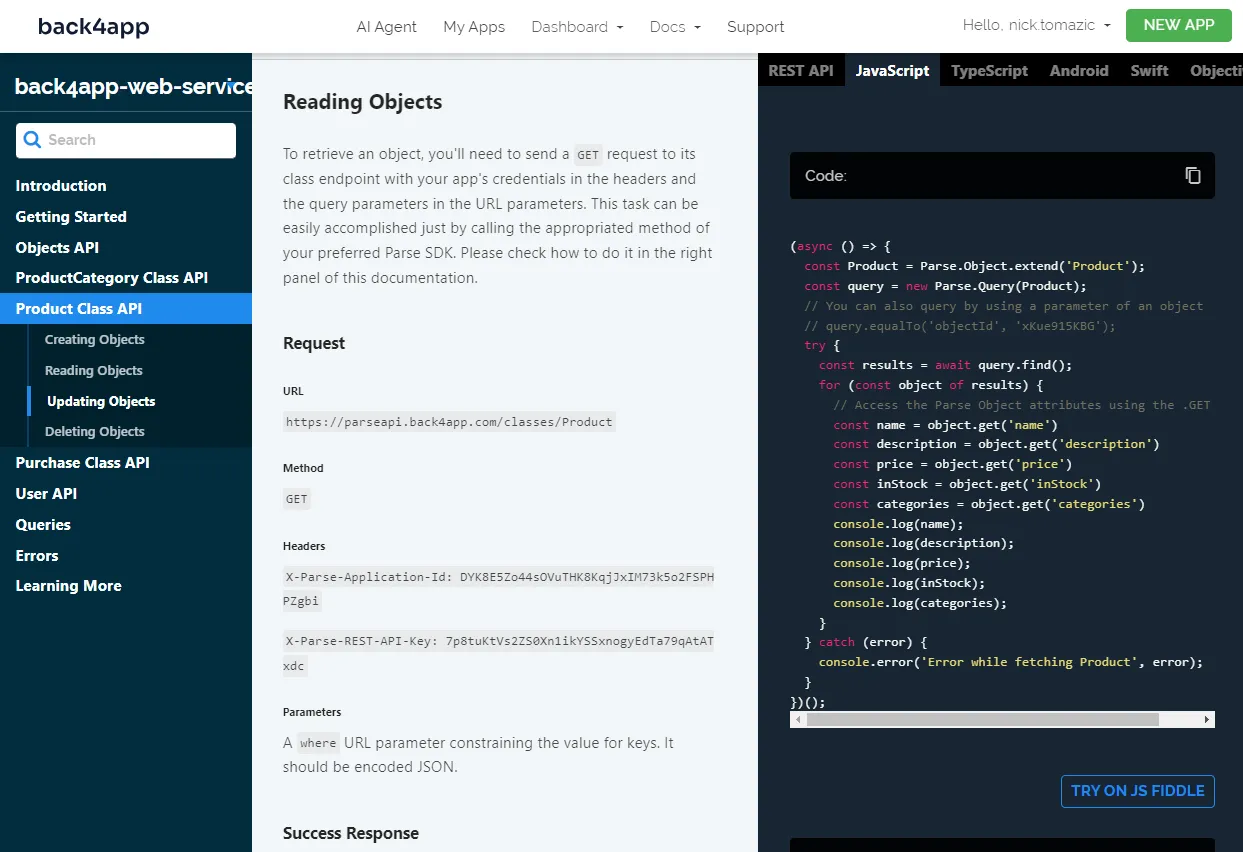
Another great thing about Back4app is that it automatically generates documentation for all your database classes.
The documentation includes model descriptions, practical examples, instructions on how to handle errors, and more.
Select “API > API Reference” on the sidebar to view the docs.
Cloud Code
The auto-generated APIs are great, but you can’t do everything with them. For example, if you wish to perform complex queries, aggregate data, or execute custom code, you must utilise Cloud Code functions.
Cloud Code functions are Back4app’s Functions as a Service (FaaS) offering. They allow you to define custom JavaScript functions, which you can trigger via the API or schedule on a fixed-time basis.
Create Cloud Code Functions
Let’s create two Cloud Code functions for calculating e-commerce statistics:
totalRevenue()will calculate the total revenue by aggregating the purchasestopTenPopularProducts()will return the most popular products based on purchases
First, navigate to “Cloud Code > Functions & Web Hosting” on the sidebar.
You’ll notice that the screen is split into two panels. The directory structure is on the left; you can input your code on the right.
The default directories are:
- cloud used for Cloud Code functions and other code
- public directory automatically served by Back4app (static assets, CSS, HTML)
Navigate to main.js.
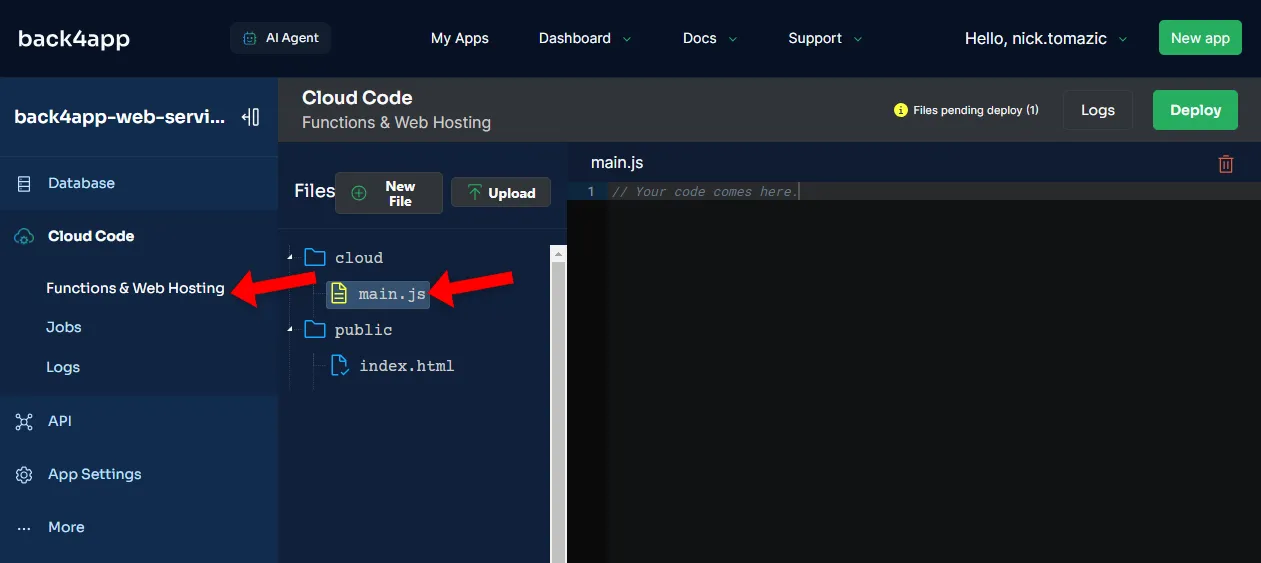
Then, put the following code inside:
Lastly, click “Deploy” to deploy the functions to the cloud.
The code above was generated using Back4app Agent — an AutoGPT for developers. The agent is tightly integrated with Back4app and Back4app Containers. It allows you to create apps, modify app settings, generate custom code, and more.
Test Cloud Code Functions
In this last section, we’ll test the just-implemented Cloud Code functions.
First, select “API > Console > JavaScript” on the sidebar and then paste in the following code:
To run it, click “Run” at the top right of the screen.
You should get the following responses:
// `totalRevenue` output

{
  "result": 9385.389999999994
}
To run the other function replace totalRevenue with topTenPopularProducts.
// `topTenPopularProducts` output

{
  "result": [
    {"objectId": "SA5mUfq9Ll", "name": "Science Fiction Novel", "count": 3},
    {"objectId": "fV0DFPFlnz", "name": "Yoga Mat", "count": 3},
    {"objectId": "gA4zn19Udo", "name": "Smartphone", "count": 2},
    {"objectId": "UKeOHJkJ7l", "name": "Winter Jacket", "count": 2},
    {"objectId": "8PodlEps2R", "name": "Espresso Machine", "count": 2},
    {"objectId": "S15WrDgrpk", "name": "Hair Dryer", "count": 2},
    {"objectId": "8O2D1egX51", "name": "4K Television", "count": 1},
    {"objectId": "RriSWMDg48", "name": "Face Cream", "count": 1},
    {"objectId": "Cq3Hqww69Q", "name": "Blender", "count": 1}
  ]
}
Conclusion
In conclusion, you’ve learned about web services, their advantages, deployment options, and how they compare to APIs. You should now also be able to deploy your own web service to Back4app BaaS.
For additional article resources check out back4app-web-service repo.


