How to build an app using a Backend as a Service?
In this article, we’ll be discussing the process of building a mobile app using BaaS as the backend platform. Mobile apps are becoming increasingly popular as a way to interact with customers and create a user-friendly experience when accessing content.
Many businesses rely on their mobile apps to provide an engaging and interactive customer platform, and a backend as a service (BaaS) can be used to power the mobile app. BaaS provides a powerful set of tools for developers to create a mobile app with minimal effort and time.
Contents
- 1 Backend backend platform
- 2 Creating a Back4App App
- 3 Connecting your Application to Back4app
- 4 Saving Data to Back4app
- 5 Fetching Data from Back4app
- 6 Updating Data on Back4app
- 7 Deleting Data on Back4app
- 8 Conclusion
- 9 FAQ
- 10 How do I create a new app on Back4app?
- 11 How do I install the Parse JavaScript SDK in my app?
- 12 How do I configure the SDK with my Back4app app ID and server URL?
- 13 My App is not Connecting to Back4app. What should I do?
Backend backend platform
Back4App is a cloud platform that allows developers to build and host web applications. It provides a variety of features, including a friendly user interface for managing web applications, a built-in database for storing data, and support for multiple programming languages.
The platform also offers a range of tools for developing and testing web applications, including a command line interface, SDKs, analytics, monitoring and performance optimization tools, and a built-in system for user authentication and authorization.
Deploying an application on Back4app can come with several benefits. First, Back4app offers a simple process for deploying web applications, saving you a lot of time.
It also includes a built-in database that can be used to store data for your app, eliminating the need to set up and manage a separate database.
Back4App also allows you to easily adjust the size of your app to handle an increase in traffic and has tools to monitor and improve the app’s performance.
Back4App also provides security measures to keep the app and its data safe and secure, allowing easy integration with other services. In this tutorial, you will learn how to deploy an app on the Back4app platform in a few steps.
Keep reading to learn how to build an app using a backend as a service.
Creating a Back4App App
Before you can create an app on Back4app, you need to have a Back4app account. If you do not have a Back4app account, you can create one by following the steps below.
- Navigate to the Back4app website.
- Next, click the Sign up button on the top-right corner of the landing page.
- Finally, fill out the sign-up form and submit it.
After successfully creating your Back4app account, log into your Back4app account and click the NEW APP button on the top right corner.
Clicking this button will take you to a form that requires you to input an app name. Input your app name and click the CREATE button.
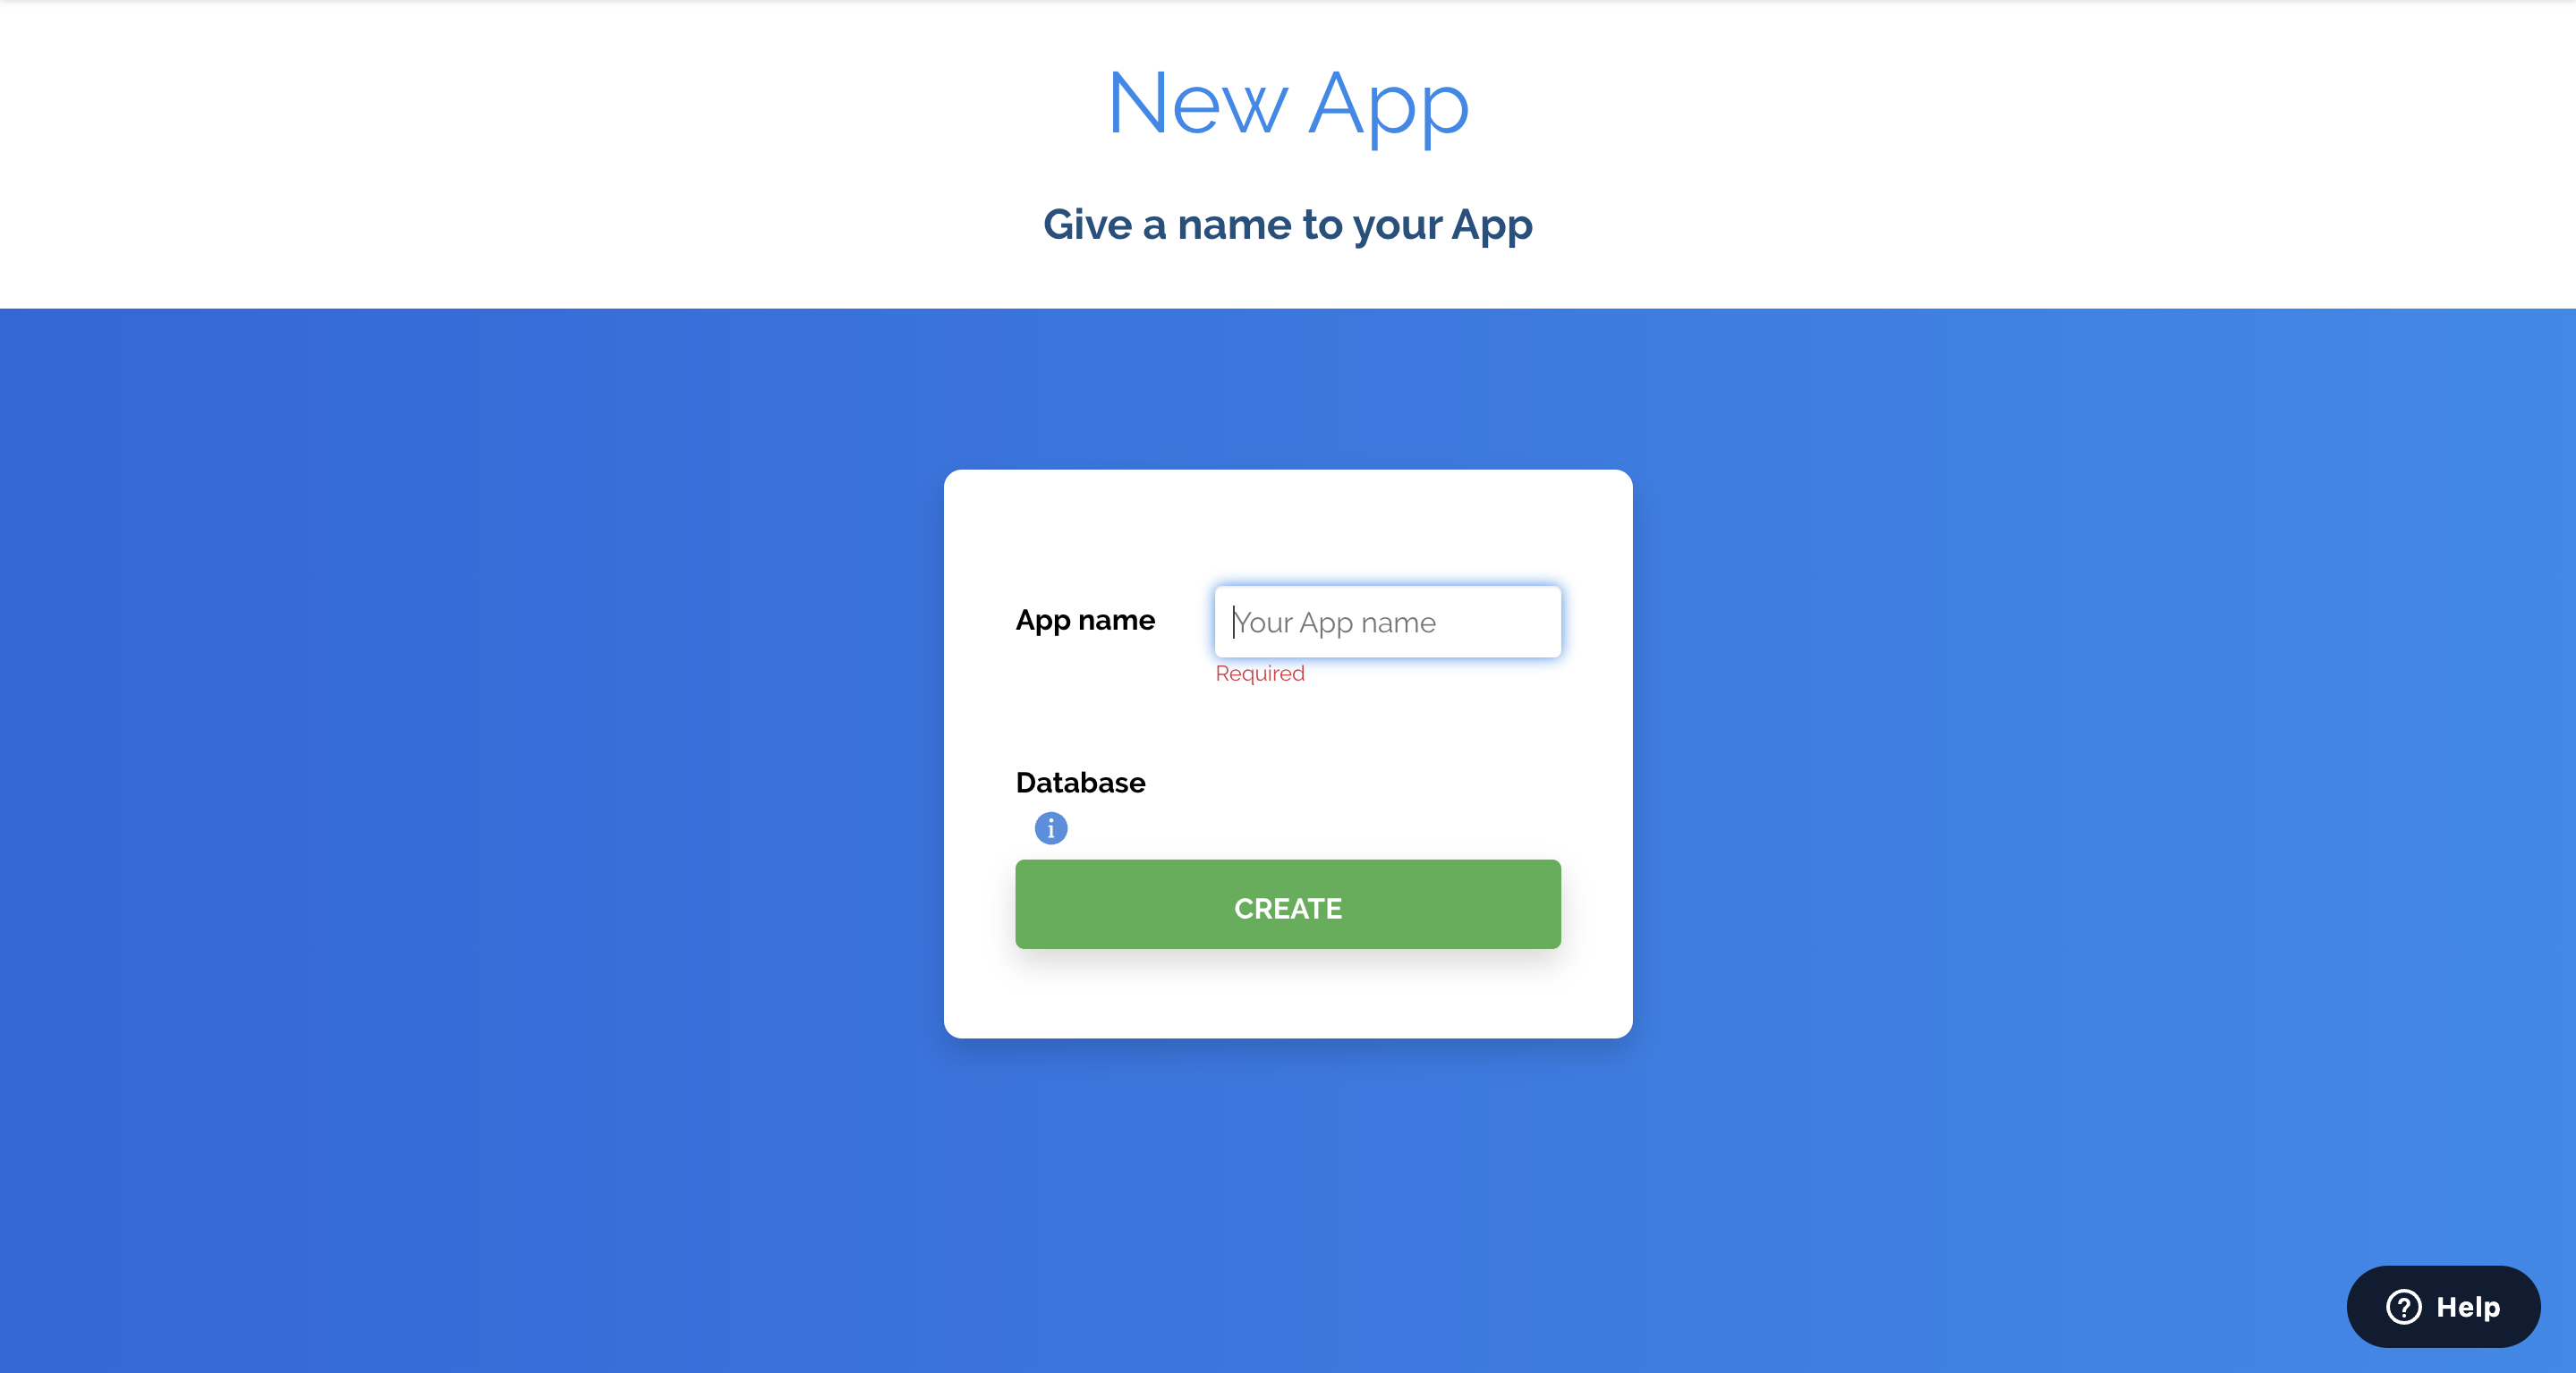
Clicking the create button will scaffold your new application and take you to your application’s dashboard.
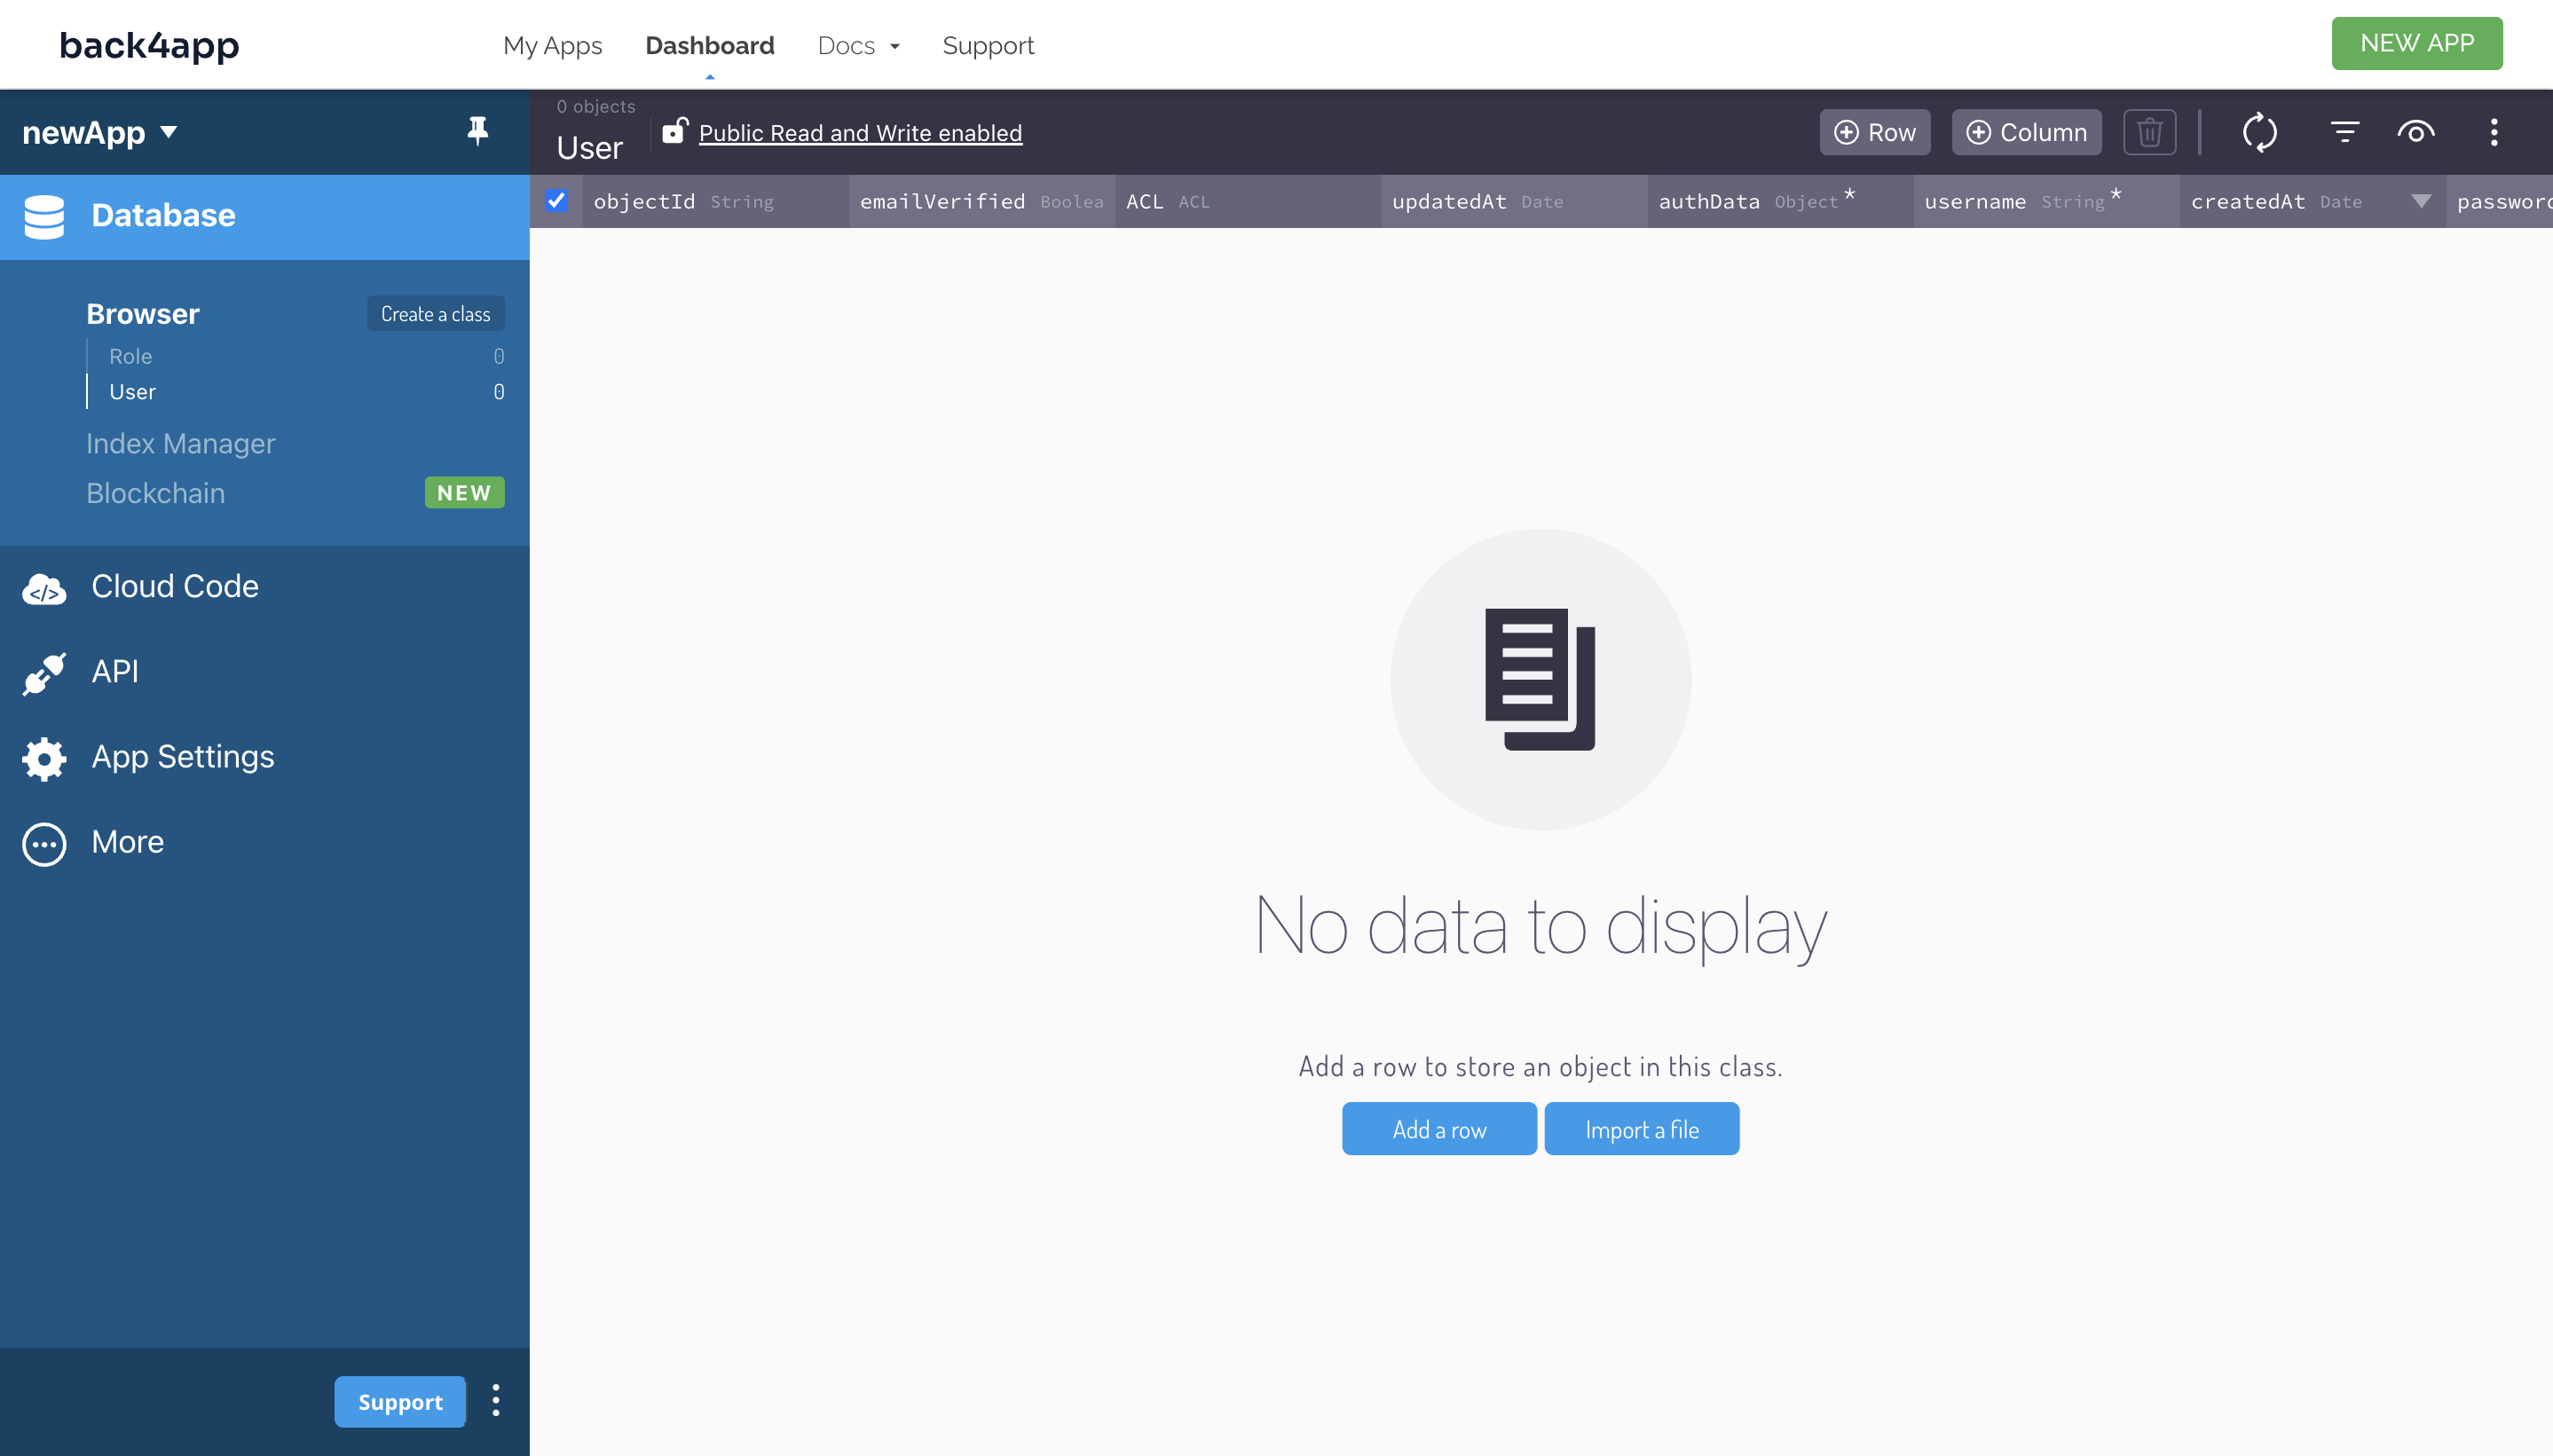
Now you have created a new application on Back4app. Next, you install a required dependency and connect your application to Back4app.
Keep reading to learn how to create an app using a backend as a service.
Connecting your Application to Back4app
Back4app, as a BaaS platform, is built on top of the Parse server, so to integrate your app with Back4app servers, you need to install the Parse JavaScript SDK.
Run the following command to install the Parse JavaScript SDK using npm:
npm install parse
Alternatively, you can install the SDK using the yarn package manager by running the command below:
yarn add parse
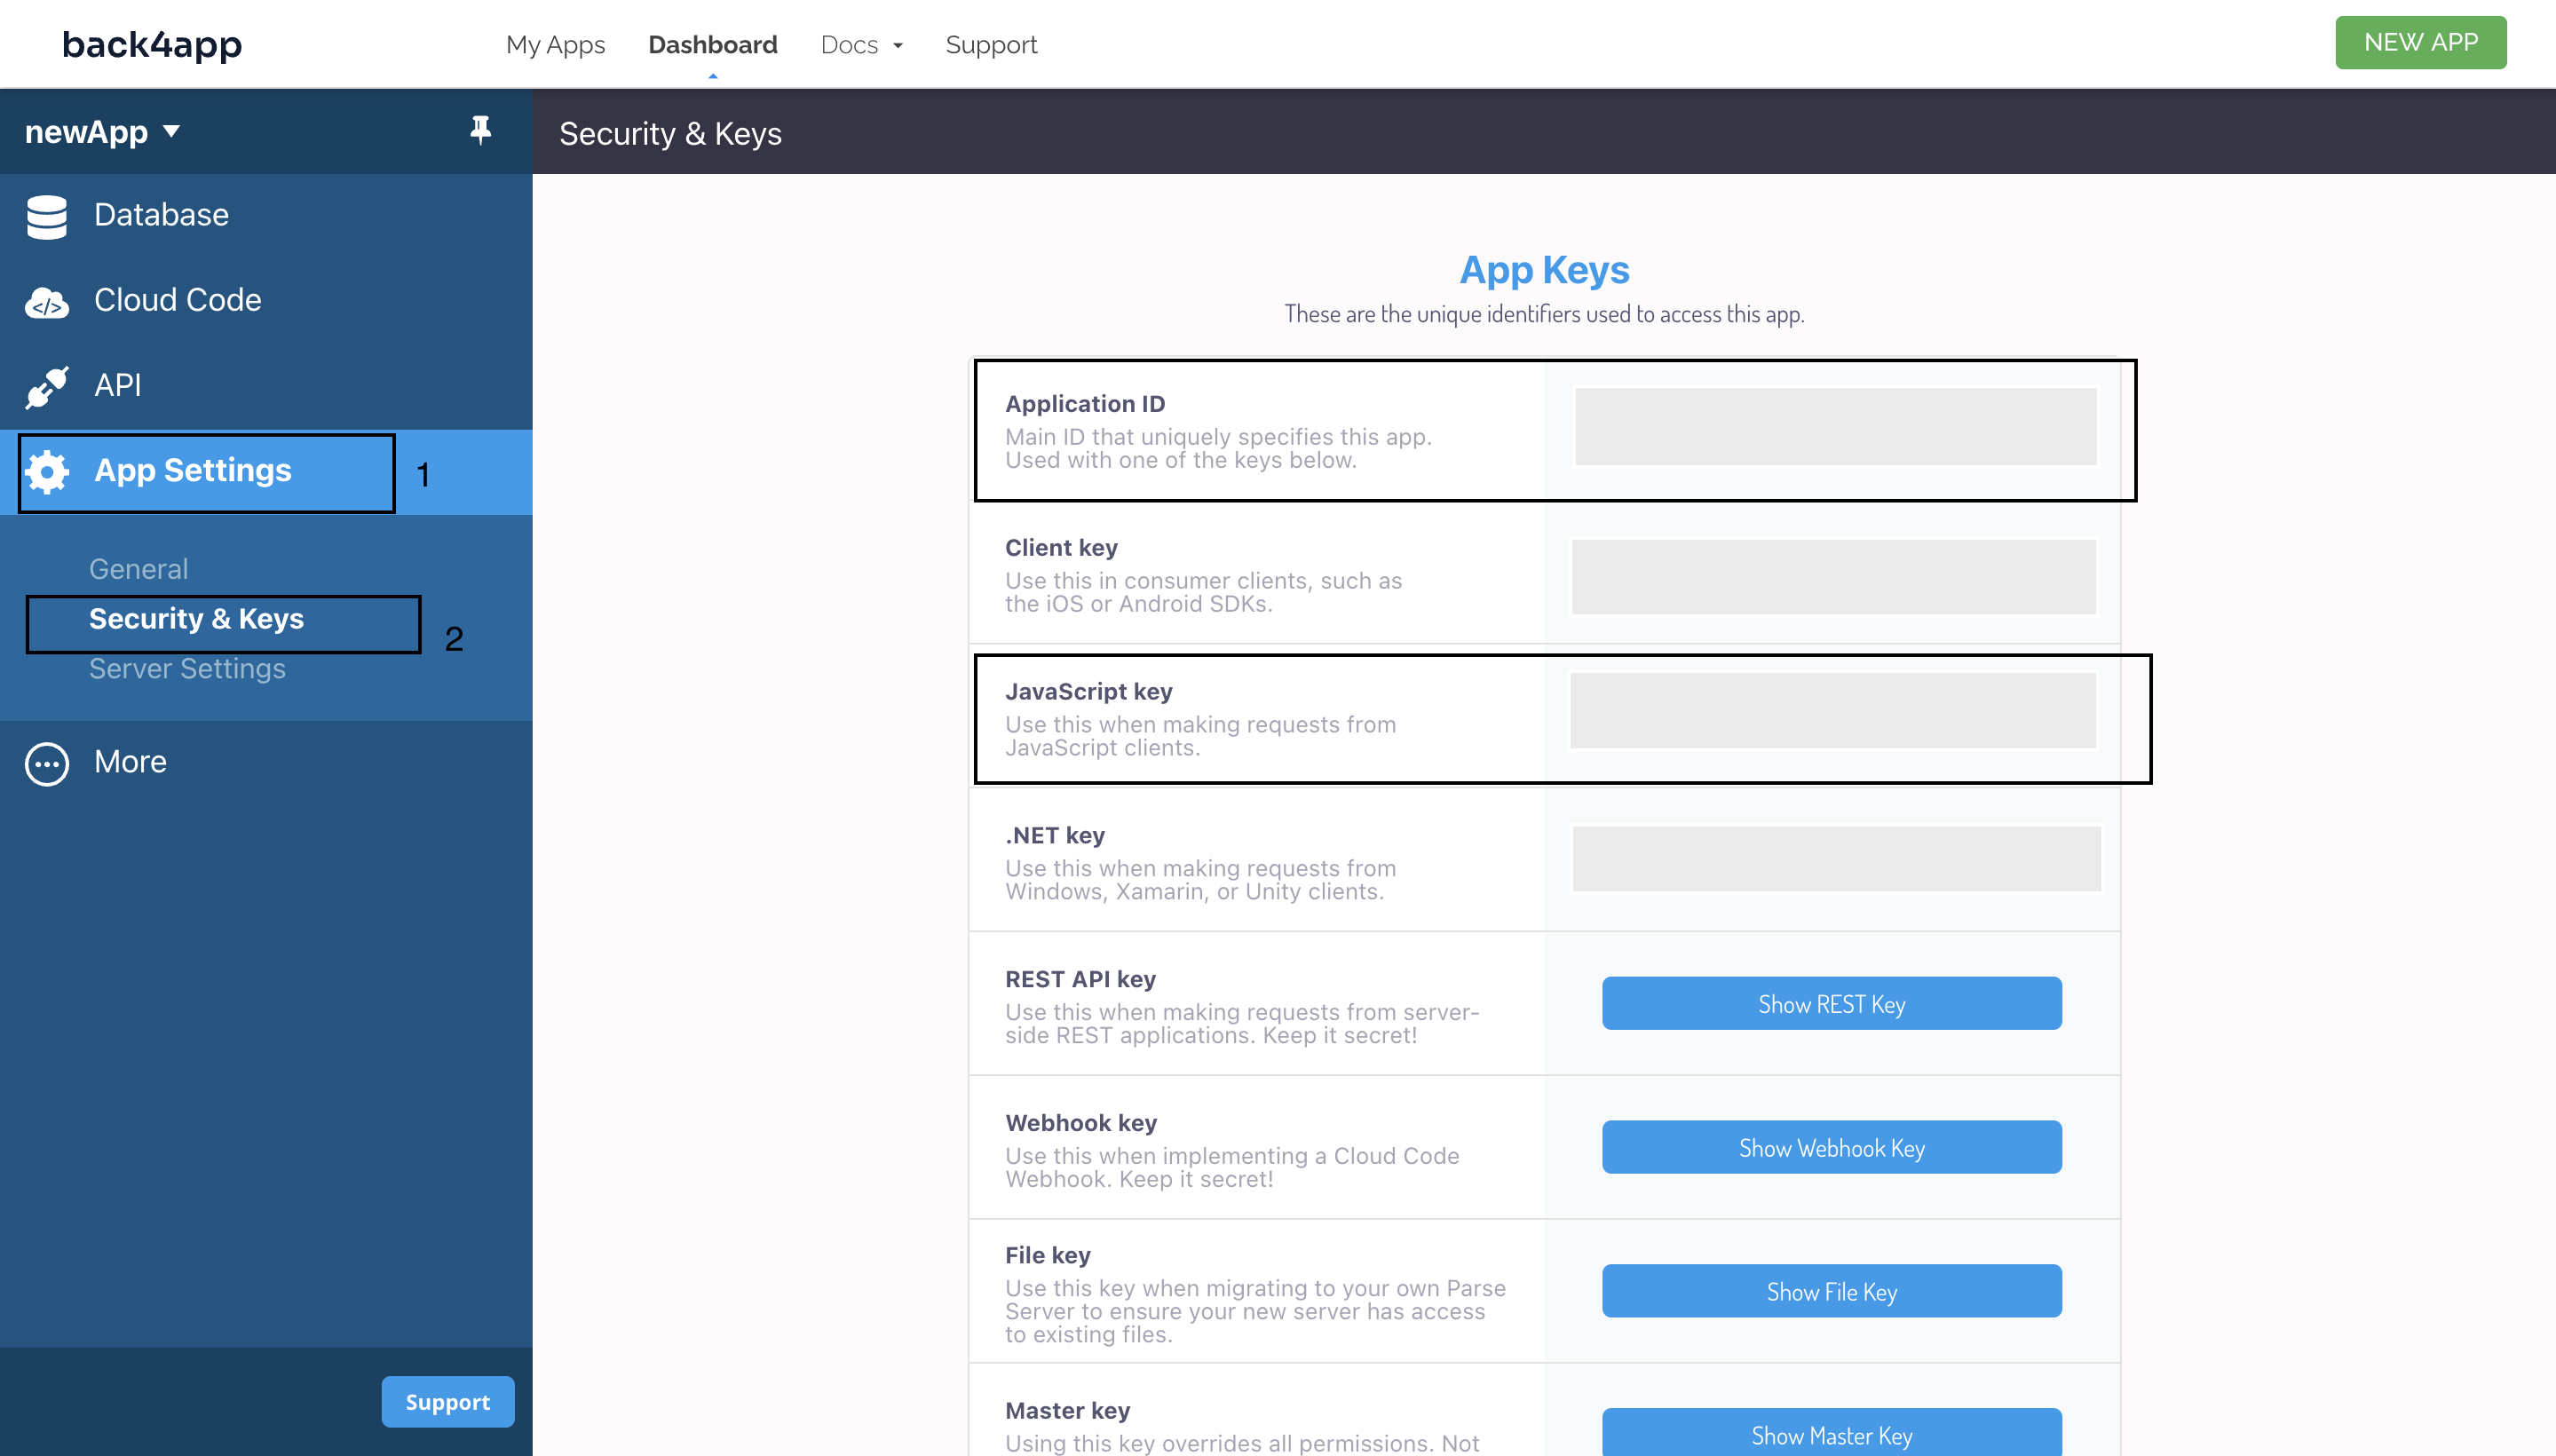
Next, you’ll need to get certain application credentials. You will need them to connect your app to Back4app. The application credentials you need are the Application ID and Javascript KEY.
The Application ID is the main ID that uniquely identifies your app. The Javascript KEY is the ID you use when making requests from a JavaScript client.
To retrieve these credentials, select App Settings on your app’s dashboard, then select Security & Keys. This will take you to a page with various App keys, copy the Application ID and Javascript KEY, and store them securely.
Next, import the minified version of Parse from parse in your application’s entry file (app.js).
Like so:
//app.js
import Parse from "parse/dist/parse.min.js";
Next, call the initialize method on Parse. This method takes your Application ID and Javascript KEY as arguments.
For example:
//app.js
Parse.initialize(PARSE_APPLICATION_ID, PARSE_JAVASCRIPT_KEY);
Calling the initialize method and passing your Application ID and Javascript KEY as arguments will initialize the parse SDK.
Next, set the serverURL property on Parse to https://parseapi.back4app.com/.
For example:
Parse.serverURL = "<https://parseapi.back4app.com/>";
Your app has been initialized and can securely connect to Back4app. Next, you will save some data to the platform. Keep reading to learn how to create an app using a BaaS.
Saving Data to Back4app
To save data to Back4App using the JavaScript Parse SDK, which provides various methods to interact with the Back4app platform, you have to create a Parse object instance and define the attributes you want your instance to possess.
For this tutorial, assume you’re trying to connect a Todo application to Back4app.
The code block below provides an example of how you can save data to Back4app using the JavaScript Parse SDK:
function addTodo() {
  try {
    // Creating a new Parse Object instance
    const Todo = new Parse.Object("Todo");

    // Defining Object attributes
    Todo.set("title", "First Todo");
    Todo.set("completed", false);

    //Saving object to Back4app
    Todo.save().then(() => {
      console.log("New todo added successfully");
    });
  } catch (error) {
    console.log(error);
  }
}
In the addTodo function above, a new Parse Object of class Todo was created using the Parse.Object() constructor. The Parse.Object() constructor takes a class name as an argument.
Then, the attributes of Todo were set by calling the set method on it. The set method takes a key and a value as arguments. In this case, the Todo class has two attributes, title and completed, which were set to “First Todo” and false, respectively.
Finally, the Todo class was saved to Back4app by calling the save method on the Todo class. The save() method is asynchronous; therefore, it returns a promise that resolves if the save is successful or rejects if it fails.
After you save data to Back4app, you can view the data on your application dashboard by clicking on your class name.
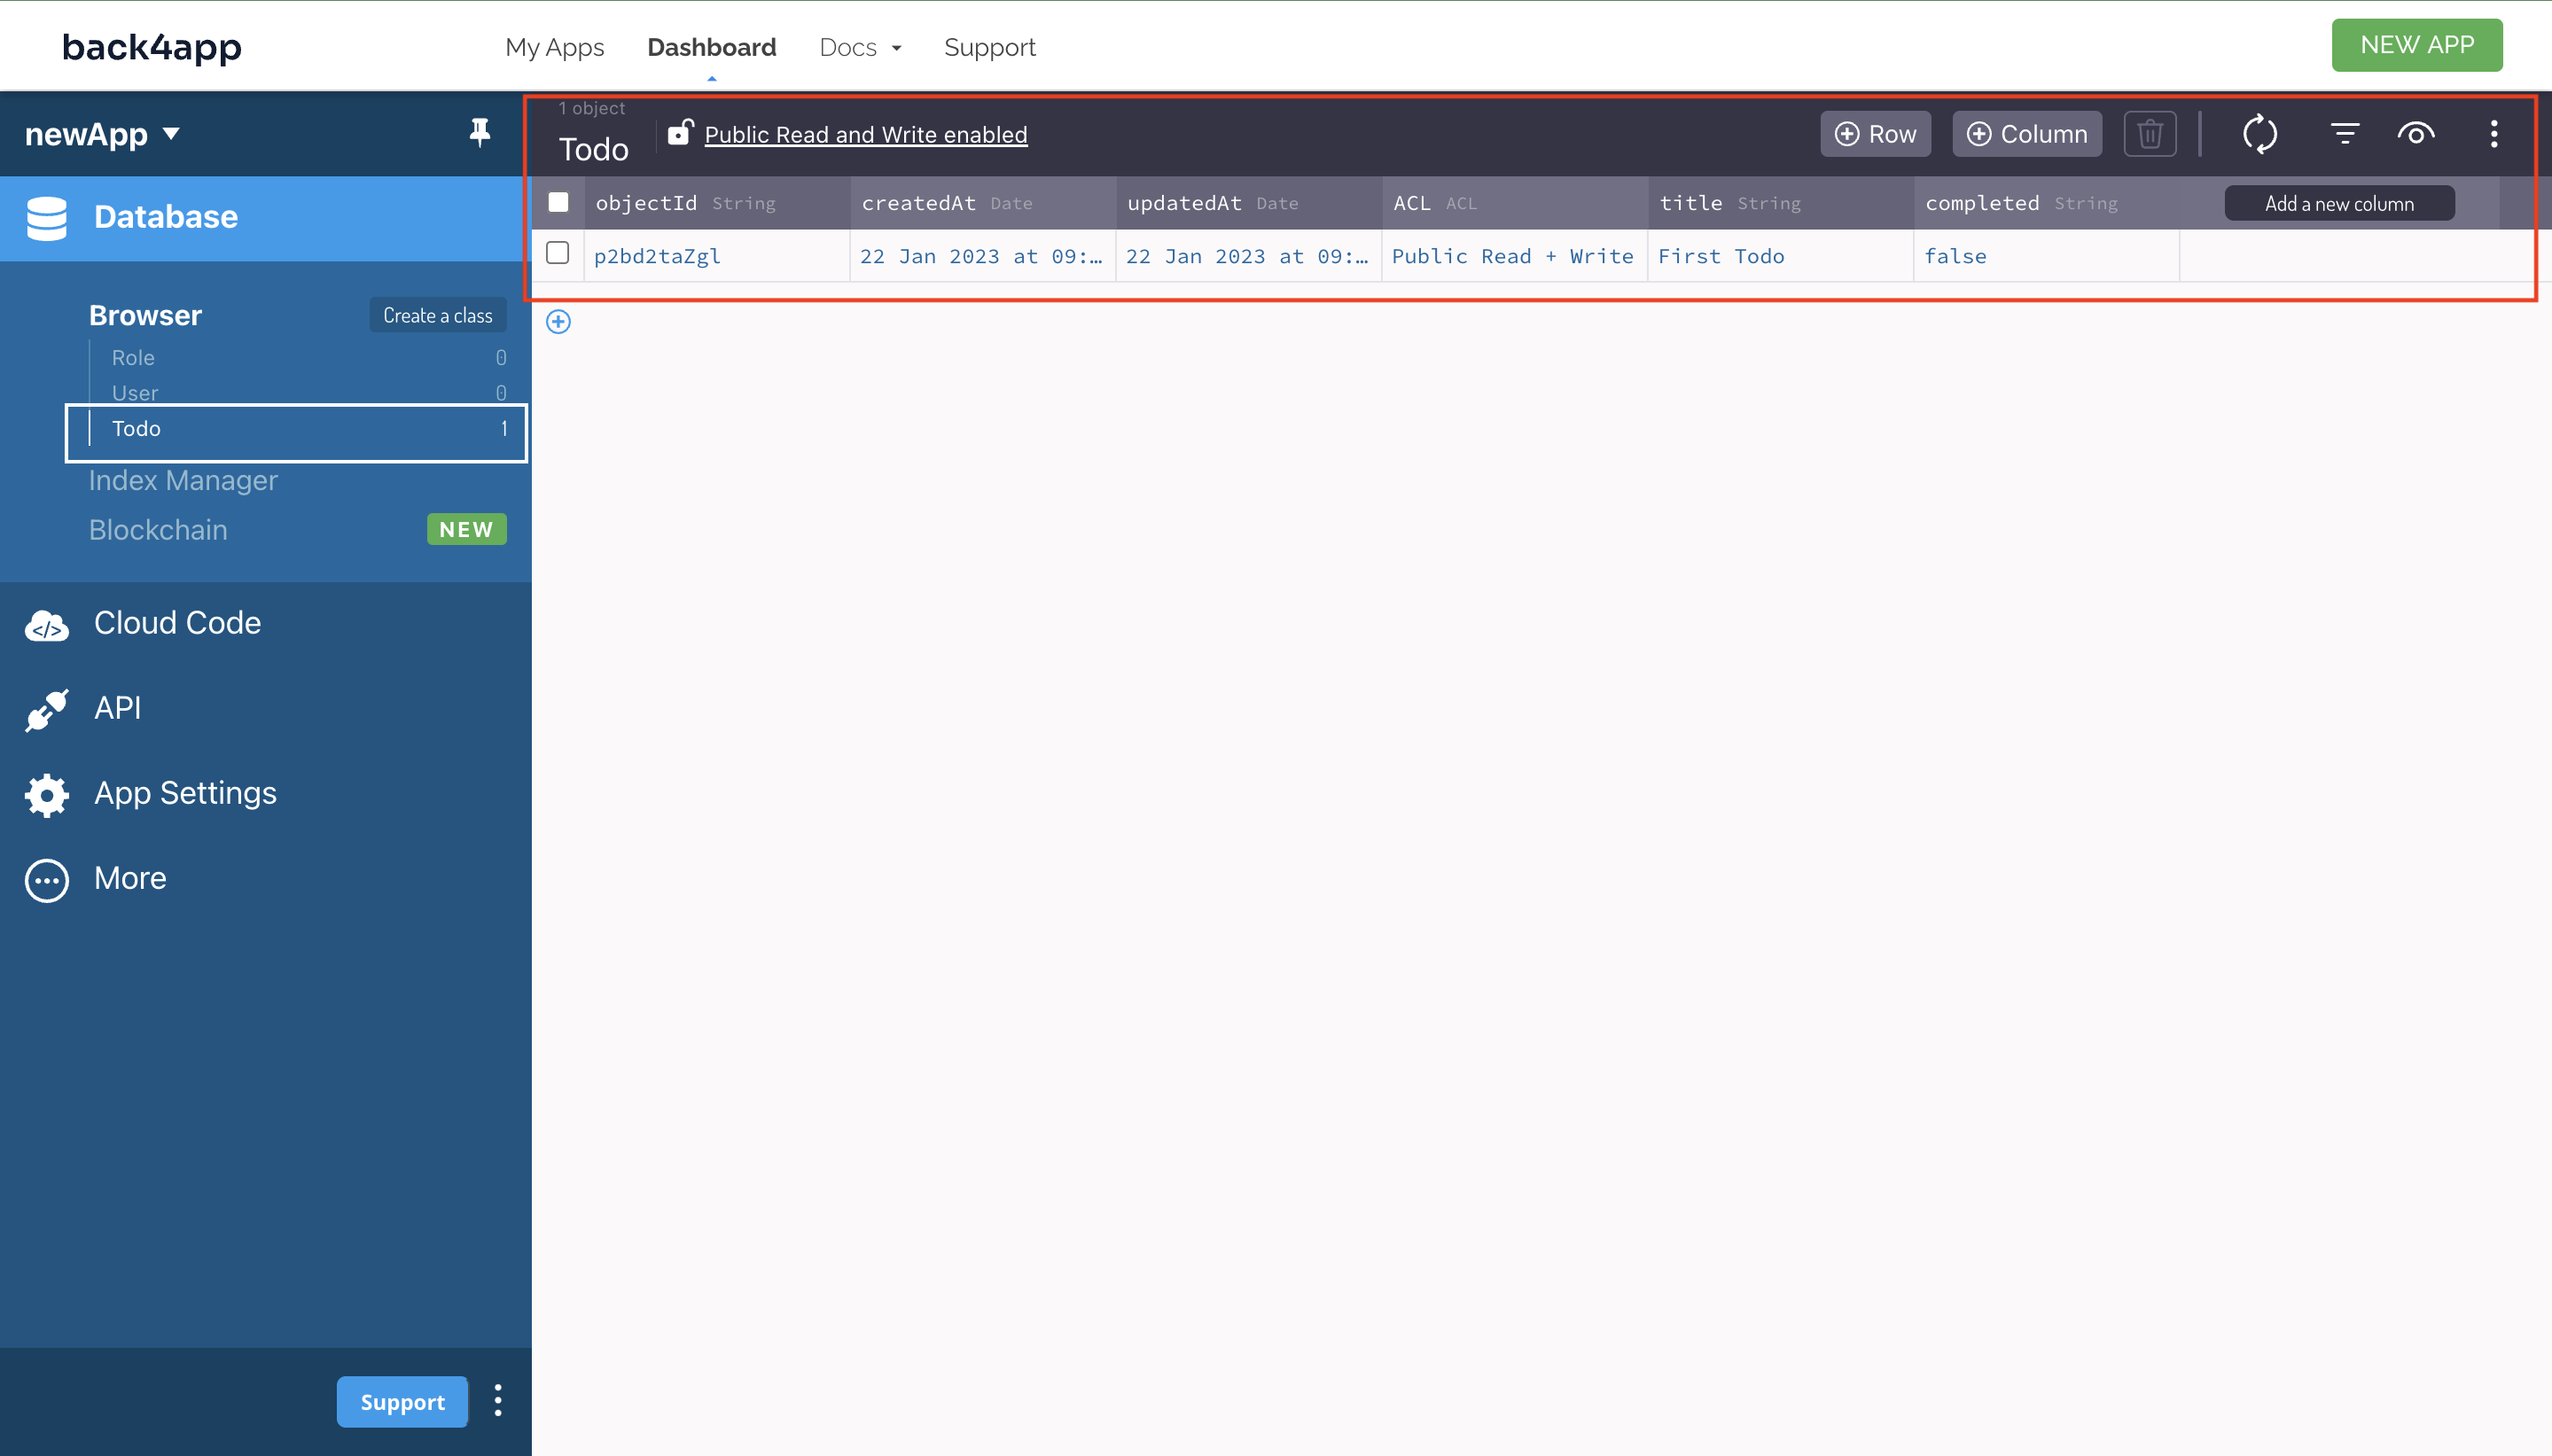
Now you can securely save data to Back4app. Next, you will learn how to fetch saved data from Back4app.
Fetching Data from Back4app
To fetch data from Back4app, you have to create a parse query for the class you want to fetch data from, for example, the Todo class discussed above. Then, you filter the data based on specified criteria using methods provided by the JavaScript parse SDK.
The code block below provides an example of how you can Fetch data from Back4app using the JavaScript Parse SDK:
async function fetchTodo() {
  try {
    //Creating a parse query for the Todo class
    const query = new Parse.Query("Todo");

    //Using the equalTo filter to look for todo that matches the given title.
    query.equalTo("title", "First Todo");

     //Running the query
    const Todo = await query.first();

    //Accessing static attributes
    const todoId = Todo.id;
    const todoUpdateAt = Todo.updatedAt;
    const todoCreatedAt = Todo.createdAt;

    //Accessing set attributes
    const todoTitle = Todo.get("title");
    const todoCompleted = Todo.get("completed");

    //Logging values
    console.log(todoId, todoCreatedAt, todoUpdateAt, todoTitle, todoCompleted);
  } catch (error) {
    console.log(error);
  }
}
In the fetchTodo function above, a new query for the Todo class using the Parse.Query() constructor. The query object is used to retrieve data from Back4App.
Then, the equalTo() method, which takes a key and a value as arguments, was used to filter the query, ensuring that it returns the todo with the title, “First Todo”.
Depending on your needs, you can use several other filters, such as the notEqualTo method or the greaterThan method, which also takes key-value pairs as arguments to filter your query.
Next, the query was run using the first() method, which returns the first result that matches the filter. The first() method returns a promise that resolves with the matching object if it is found or rejects with an error if it is not.
Alternatively, you can run the query using the find() method, which returns an array of results that match the filter.
After the query is executed and the Todo object is returned, you can access the static attributes of the object, such as id, createdAt, and updatedAt. These static attributes are set by the Parse SDK and cannot be retrieved using the get method or modified using the set method.
You can also access the set attributes, such as title, completed using the get() method. The get method takes the key of an attribute as an argument and returns the value of the attribute.
Updating Data on Back4app
Updating data on Back4app is very similar to saving data on Back4app. To update data on Back4app, set some new data on your Parse object instance and call the save method.
The Parse SDK automatically determines which data has changed, so only modified fields will be sent to Back4app.
The code block below provides an example of how you can update data from Back4app using the JavaScript Parse SDK:
async function updateTodo() {
  try {
    // Creating a Parse Object instance
    const Todo = new Parse.Object("Todo");

    // Defining Object attributes
    Todo.set("title", "Unmodified Todo");
    Todo.set("completed", false);

    // Updating Object attributes
    Todo.save().then((todo) => {
      todo.set("title", "modified Todo");

      return todo.save().then(() => {
        console.log("Todo updated");
      });
    });
  } catch (error) {
    console.log(error);
  }
}
In the updateTodo function above, after the initial attributes were saved to the Todo class using the save method.
The save method’s resolved object is passed as a parameter to the callback function, where it is updated by calling the set() method on the object and passing the new value for the “title” property.
After updating the object, the save() method is called again on the object, which sends the updated data to the Back4App backend to be stored.
The save() method returns a promise that resolves with the updated object if the save is successful or rejects with an error if the save fails.
Deleting Data on Back4app
You can delete data on back4app by calling the destroy method on the class instance.
For example:
Todo.destroy().then(() => {
      console.log("Object deleted successfully");
    });
Alternatively, you can delete a single field from an object by calling the unset method on a Parse class instance.
For example:
Todo.unset("Title");
The unset method takes a key as an argument and deletes the field from Back4app.
Conclusion
In conclusion, using a BaaS Backend as a Service is an excellent way to create a great applications without the need for in-depth knowledge of server-side technology.
It provides the necessary tools and resources to quickly build out the backend components of any app, with features such as authentication and analytics already taken care of.
Deploying an app on Back4app is a straightforward process you can complete by following the steps discussed in this tutorial.
Back4app provides a robust and scalable backend-as-a-service platform that allows you to add backend functionality to your apps easily.
With Back4app, you can focus on creating a great user experience and leave the backend management to Back4app.
FAQ
How do I create a new app on Back4app?
To create a new app on Back4app, log in to your account on the platform and click on the “New App” button. Then, provide a name for your app and select a region for your server.
How do I install the Parse JavaScript SDK in my app?
To install the Parse JavaScript SDK in your app, you can use npm by running the command “npm install parse” in your project’s root directory.
How do I configure the SDK with my Back4app app ID and server URL?
To configure the SDK with your Back4app app ID and server URL, you can use the Parse.initialize() method in your app and pass in your app ID and server URL as arguments.
My App is not Connecting to Back4app. What should I do?
Verify that the credentials you supplied as arguments to the Parse.initialize() method are correct. Then, follow the steps outlined above.


