How to build and deploy a Python application?
Python is a free and open-source programming language that has many applications. It was created by Guido Van Rossum in 1991 and has since then evolved into one of the most popular programming languages.
In this article, we’ll talk about Python, its advantages, disadvantages, use cases, and deployment options. On top of that, we’ll demonstrate how to build, dockerize and deploy a simple Python application to Back4app Containers.
Keep reading to learn more how to build and deploy a Python project.
Contents
- 1 Python Overview
- 2 Advantages of Python
- 3 Limitations of Python
- 4 Python Deployment Options
- 5 Python Deployment Process
- 6 Conclusion
- 7 FAQ
- 8 What is Python?
- 9 What are the advantages of Python?
- 10 What are the disadvantages of Python?
- 11 What are the deployment options for Python apps?
- 12 How to deploy a Python app?
Python Overview
Python is a high-level general-purpose programming language. It is interpreted, dynamically typed, and can be used for scripting as well as programming. Developers usually describe Python as a language with “batteries included” due to its extensive standard library.
The language first appeared in 1991 and has since then become one of the most popular and loved programming languages due to its simple and readable syntax. The main design principles of Python are covered in The Zen of Python written by Tim Peters.
Python has a huge community of developers and ready-to-use packages. These days Python is used pretty much anywhere — in server administration, scientific computing, machine learning, building RESTful APIs, and so on. Python could be considered one of the essential skills of a modern developer.
Advantages of Python
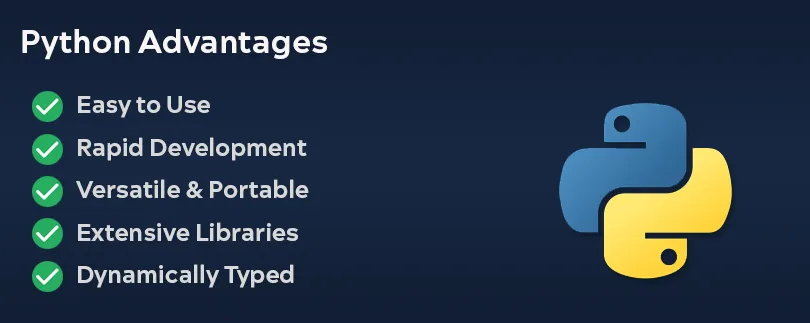
Easy to Use
Python is one of the easiest languages to use and learn. Its learning curve is almost non-existent because its main design philosophy emphasizes simplicity and code readability. Python is also favored in education because it’s a great tool for learning basic programming concepts.
Rapid Development
Another great perk of Python is that it allows for rapid development. It’s a great language for prototyping and getting work done fast. By using Python you don’t have to worry about complex syntax, memory allocation et cetera, instead, you can focus on your app.
Versatile
Python is one of the most versatile programming languages. It is used in a wide range of industries and fields. Some of the fields Python is used in include accounting, scientific research, data science, web development, game development, and automation.
Portable
Python is a portable language since it’s interpreted (like Java) and not compiled (like C++). This means that the code written on one platform can be easily transferred to another platform. That makes Python a popular choice for developers who need to support multiple platforms, including Windows, macOS, Linux, and Android.
Extensive Libraries
The Python programming language is backed by a huge community of developers. There’s a library for almost anything you can imagine. Some of the most popular libraries include:
- Web Development (Django, Flask, FastAPI)
- Machine Learning and Data Science (TensorFlow, PyTorch)
- Computer Vision (OpenCV, Pillow, Scikit-image)
- Scientific Computing (NumPy, SciPy)
- Graphical User Interface (Qt, GTK)
And that barely scratches the surface. If you want to see a full list of awesome Python packages take a look at awesome-python on GitHub.
Dynamically Typed
Python is a dynamically typed language meaning that you don’t have to declare the data type when creating variables. The variable type is only assigned when the code is being executed.
As great as it is, dynamically typed languages can sometimes be a double-edged sword. They’re usually more error-prone and have a lower level of memory control compared to statically typed languages.
Extensible
If your project requirements include heavy-computation tasks you can write them in faster languages such as C or C++ and then invoke them from your Python code.
To learn more about invoking C/C++ from Python check out this great article.
Limitations of Python
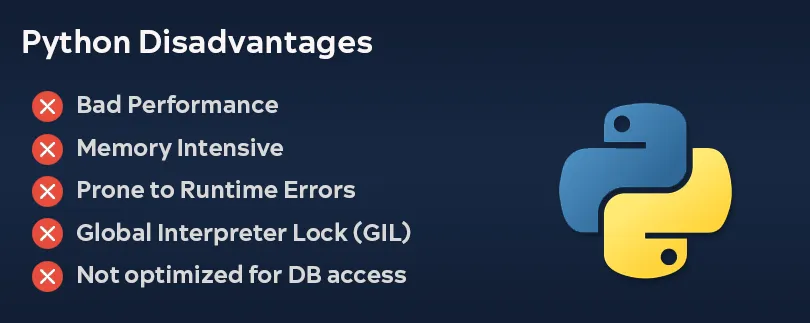
Bad Performance
Python is relatively slow compared to other programming languages. The two factors that hinder its performance the most are Python being an interpreted language and dynamically typed. If your project requirements include heavy computing or multi-threading Python might not be the most appropriate tool. You’ll be much better off using C, C++, or some other compiled language.
Memory Intensive
Python programs compared to programs written in statically-typed languages usually consume more memory and provide a lower level of control over memory. This can be a bit problematic if your apps need to be memory efficient.
Prone to Runtime Errors
Python being an interpreted language is more prone to runtime errors. Since there’s no compilation process bugs can’t be discovered in compile time. On top of that Python is dynamically typed meaning that developers can change the type of a variable at any time. This can sometimes lead to errors and requires the developers to be mindful of variable types.
Global Interpreter Lock (GIL)
The Global Interpreter Lock (GIL) in Python is a mechanism that ensures only one thread executes Python bytecode at a time. While this simplifies the implementation of the language and provides some performance benefits for certain types of programs, it also limits the ability to fully utilize multi-core processors in CPU-bound applications.
Not Optimized for Database Access
Working with databases in Python applications can be more challenging due to the lack of powerful and user-friendly interfaces like the Java Database Connectivity (JDBC). While Python can still be used for database operations that involve simple read-and-write tasks, it may not be the most suitable option for applications that need to work with large and complex databases.
Python Deployment Options
Python applications can be deployed to several cloud platforms. In general, we can split them into the following three categories:
- Infrastructure as a Service (IaaS)
- Platform as a Service (PaaS)
- Containers as a Service (CaaS)
IaaS is the least abstracted and CaaS is the most abstracted. There’s also conventional hosting, but I’m pretty sure you’re already familiar with that.
Infrastructure as a Service (IaaS)
Infrastructure as a Service or IaaS is a cloud computing model in which a 3rd-party vendor offers virtualized computing resources such as servers, storage, operating systems, and networking over the internet. The provided resources can then be managed via advanced dashboards or high-level APIs, giving customers full control over their entire infrastructure.
The main benefits of IaaS are scalability, cost saving, increased support, performance, and security. The payment structure adopted by most IaaS providers is based on a pay-as-you-go system, where you only incur charges for the resources you utilize.
IaaS is the most flexible cloud computing model and remains the most popular option since its release in the early 2010s. The biggest downside of it is that the customer is fully responsible for their applications, operating systems, and data.
The most popular IaaS examples are:
- Microsoft Azure
- Amazon Web Services (AWS)
- Google Cloud Platform (GCP)
- Oracle Cloud Infrastructure (OCI)
- DigitalOcean
Platform as a Service (PaaS)
Platform as a Service (PaaS) is a cloud computing service that provides users with a cloud environment to create, manage, and deliver applications. PaaS offers pre-built tools for app development, customization, and testing. With PaaS, users can concentrate on their app, as the service provider takes care of the underlying infrastructure, including servers, operating systems, software, backups, and more.
PaaS benefits include faster speed to market, increased security, cost-effectiveness, scalability, high availability, and generally require less code. However, there are a few downsides. The main three downsides are lack of flexibility, lack of control, and risk of vendor lock-in. Nonetheless, PaaS still enables users to build apps more quickly and with less management overhead.
PaaS vendors include:
- Heroku
- Fly.io
- Render
- DigitalOcean App Platform
- Microsoft Azure App Service
Containers as a Service (CaaS)
Containers as a Service (CaaS) is a cloud computing model that allows organizations to upload, run, scale, and manage their containers through the use of container virtualization technology. CaaS vendors abstract away much of the required work, such as the infrastructure, operating systems, software, containerization engines & more.
The great thing about containers is that once your app is containerized you can deploy it pretty much anywhere and it’s guaranteed to behave the same way. If the need arises you can move from one CaaS vendor to another. CaaS customers are typically billed per container (based on the container specifications).
CaaS is generally more expensive compared to IaaS and PaaS, offers a lower level of flexibility and control, and requires some initial work eg. dockerizing the application and so on. Nevertheless, it is one of the easier cloud computing models to use once your app is containerized.
Some of the best CaaS providers include:
- Back4app Containers
- Amazon Elastic Container Service (ECS)
- Google Kubernetes Engine (GKE)
- Red Hat OpenShift
- Rancher
To learn more about containers check out What are Containers in Cloud Computing?
Python Deployment Process
In this section of the tutorial, we’ll demonstrate how to build and deploy a simple Python application step by step. The web app will be implemented using the Flask framework and deployed to Back4app Containers.
Prerequisites
- Experience with Python and Flask
- Basic understanding of Docker
- Python version 3.8 or later and Docker Desktop installed
What is Back4app Containers?
Back4app Containers is a free and open-source platform that enables you to deploy and scale apps using globally distributed containers.
With Back4app Containers, you can focus on building your software and getting it shipped quickly, without having to worry about DevOps.
The platform is tightly integrated with GitHub and comes equipped with a built-in CI/CD system. By using Back4app Containers you’ll can get your app online in a matter of minutes.
Why use Back4app Containers?
- Integrates well with GitHub
- Scaling & zero-downtime deployments
- Extremely easy to use
- Excellent customer support
Project Introduction
In this article, we’ll build and deploy a simple RESTful API that is going to serve as a TODO list. The web API is going to allow users to perform basic CRUD operations — such as adding tasks, deleting tasks, marking them as done, and so on.
We’ll first work on the source code and later deploy it to a Back4app Flask Container. The web application will be implemented using the Flask web framework.
Feel free to skip the “Code App” section and follow along with your own Python project.
Code App
Init Project
Start by creating a dedicated directory for the Flask app and navigating to it:
$ mkdir flask-todo
$ cd flask-todo
Create a virtual environment and activate it:
$ python3 -m venv venv && source venv/bin/activateNext, install Flask via pip:
$ (venv) pip install Flask==2.2.2To make sure everything works let’s replace app.py contents with the following:
# app.py

from flask import Flask

app = Flask(__name__)


@app.route('/')
def index_view():
    return {
        'detail': 'Hello world'
    }
This code initializes Flask and creates a simple endpoint that returns a message.
Start the server with:
$ (venv) flask runLastly, navigate to http://localhost:5000/ in your favorite browser. You should see a message saying Hello world.
Database
Moving along, let’s take care of the database.
Instead of executing raw SQL, we’ll use Flask-SQLAlchemy — a simple Flask ORM. To install it run:
$ (venv) pip install Flask-SQLAlchemyNext, replace the contents of app.py with the following:
# app.py

from datetime import datetime

from flask import Flask, jsonify, request
from flask_sqlalchemy import SQLAlchemy

db = SQLAlchemy()
app = Flask(__name__)
app.config['SECRET_KEY'] = '5b3ef5s80gl3b217c20fb37044fe4k33'
app.config['SQLALCHEMY_TRACK_MODIFICATIONS'] = False
app.config["SQLALCHEMY_DATABASE_URI"] = "sqlite:///default.db"
db.init_app(app)


class Task(db.Model):
    id = db.Column(db.Integer, primary_key=True)
    name = db.Column(db.String(128), nullable=False)
    description = db.Column(db.String(256), nullable=False)

    is_done = db.Column(db.Boolean, default=False)
    created_at = db.Column(db.DateTime, default=datetime.now(), nullable=True)
    updated_at = db.Column(db.DateTime, default=None, nullable=True)

    def as_dict(self):
        return {c.name: getattr(self, c.name) for c in self.__table__.columns}

    def __repr__(self):
        return f'<Task {self.title}>'


@app.route('/')
def index_view():
    return {
        'name': 'flask-todo',
        'description': 'a simple todo app written in flask',
        'version': 1,
    }
This code configures Flask and defines a new model named Task. The task model has a name, description, is_done, and some other variables such as created_at and updated_at that we’ll update dynamically.
Next, create a Python script named init_db.py that initializes and populates the SQLite database:
# init_db.py

from app import db, app
from app import Task

with app.app_context():
    db.create_all()

    if Task.query.count() == 0:
        tasks = [
            Task(name='Backup the database', description='Make sure to backup the database with all the tables.'),
            Task(name='Setup 2FA', description='Setup the two factor authentication to secure your account.'),
            Task(name='Malware scan', description='Perform a malware scan.'),
        ]

        for task in tasks:
            db.session.add(task)

        db.session.commit()
Run the script from the command line:
$ (venv) python init_db.pyYou’ll notice that a new directory named instance has been created. Within the directory, there’s going to be default.db which is the default database.
API
The Flask app will have the following URLs:
/api/returns the list of all the tasks/api/<task_id>/displays or deletes a specific task/api/create/creates a new task/api/toggle/<task_id>/toggles a specific task’sis_donepropety
To implement them append the following to the end of app.py:
# app.py

@app.route('/api/')
def list_view():
    json = [task.as_dict() for task in Task.query.all()]
    return jsonify(json)


@app.route('/api/<int:task_id>/', methods=['GET', 'DELETE'])
def detail_view(task_id):
    task = db.get_or_404(Task, task_id)

    if request.method == 'DELETE':
        db.session.delete(task)
        db.session.commit()

        return {
            'detail': 'Task has been successfully deleted.'
        }
    else:
        return task.as_dict()


@app.route('/api/create/', methods=['POST'])
def create_view():
    name = request.form.get('name')
    description = request.form.get('name')

    if name is None or description is None:
        return {
            'detail': 'Please provide the name and the description.'
        }, 400

    task = Task(name=name, description=description)
    db.session.add(task)
    db.session.commit()

    return task.as_dict()


@app.route('/api/toggle/<int:task_id>/')
def toggle_view(task_id):
    task = db.get_or_404(Task, task_id)

    if task.is_done:
        task.is_done = False
    else:
        task.is_done = True

    task.updated_at = datetime.now()
    db.session.commit()

    return task.as_dict()
This code is pretty self-explanatory. We defined the required routes and implemented the required logic. Every time we want to make changes to the database we have to commit() them.
Great that’s it for the Flask app. In the next sections, we’ll prepare our project for deployment.
Gunicorn
Flask’s web server is not recommended in production as it is designed to handle one request at a time and may not be able to handle large amounts of traffic. Due to that let’s swap it with Gunicorn — a production-ready Python WSGI server.
First, install it via pip:
$ (venv) pip install gunicorn==20.1.0After the successful installation you can start the server like so:
$ (venv) gunicorn -w 2 -b 0.0.0.0:5000 app:app

[INFO] Starting gunicorn 20.1.0
[INFO] Listening at: http://0.0.0.0:5000 (1)
[INFO] Using worker: sync
[INFO] Booting worker with pid: 3
[INFO] Booting worker with pid: 4
Keep in mind that this command only works on UNIX-based operating systems.
This will start two Gunicorn workers and expose your app on port 5000. To access your app open your favorite web browser and navigate to http://localhost:5000.
requirements.txt
The last thing we need to do before Dockerizing our app is to create a requirements.txt file. The requirements.txt file is used to specify the project’s dependencies.
Generate it by running the following command:
$ (venv) pip freeze > requirements.txtOthers (including Docker containers) can then utilize the requirements.txt file like so:
$ (venv) pip install -r requirements.txtDockerize App
To dockerize the app we’ll use a Dockerfile. Dockerfiles are used to define the instructions for building Docker images. They allow you to set the base image, working directory, environment variables, execute commands, and more.
.dockerignore
Before working on the Dockerfile, let’s create a .dockerignore file. A .dockerignore file is used to specify what folders and files should be omitted from the image.
.git/
.idea/
instance/
__pycache__/
Make sure to modify the .dockerignore based on your needs.
Dockerfile
Create a new file in the project root named Dockerfile with the following contents:
# syntax=docker/dockerfile:1.4
FROM --platform=$BUILDPLATFORM python:3.10-alpine

WORKDIR /app

# set environment variables
ENV PYTHONDONTWRITEBYTECODE 1
ENV PYTHONUNBUFFERED 1

# install the requirements
COPY requirements.txt /app
RUN --mount=type=cache,target=/root/.cache/pip \
    pip3 install -r requirements.txt

COPY . .

# initialize the database (create DB, tables, populate)
RUN python init_db.py

EXPOSE 5000/tcp

CMD ["gunicorn", "-w", "2", "-b", "0.0.0.0:5000", "app:app"]
This Dockerfile utilizes python:3.10-alpine as the base image. It then sets the working directory, installs the requirements, copies over the project, initializes the database, and lastly starts the Gunicorn server at port 5000.
To learn more about Dockerfiles check out the Dockerfile reference.
Test
To make sure the Dockerfile works we can build and run it locally. To build the image run:
$ docker build -t flask-todo:1.0 .If you list the images you should see a new image:
$ docker images

REPOSITORY        TAG       IMAGE ID       CREATED       SIZE
flask-todo        1.0       7ege66240eb1   3 hours ago   109MB
Lastly, use the image to spin up a new Docker container:
$ docker run -it -p 5000:5000 flask-todo:1.0

[2023-02-02 20:08:57 +0000] [1] [INFO] Starting gunicorn 20.1.0
[2023-02-02 20:08:57 +0000] [1] [INFO] Listening at: http://0.0.0.0:5000 (1)
[2023-02-02 20:08:57 +0000] [1] [INFO] Using worker: sync
[2023-02-02 20:08:57 +0000] [7] [INFO] Booting worker with pid: 3
[2023-02-02 20:08:57 +0000] [8] [INFO] Booting worker with pid: 4
You can use
-dto start the Docker container in detached mode. Meaning that the container runs in the background of your terminal and doesn’t receive input or display output.
Great, your app is now running in a container. Navigate to http://localhost:5000 in your favorite web browser to see your web application in action.
{
    "name": "flask-todo",
    "description": "a simple todo app written in flask",
    "version": 1
}
Push to GitHub
The following steps will require you to have a GitHub account. If you don’t have one yet go ahead and sign up otherwise login. Additionally, make sure you have Git installed and configured.
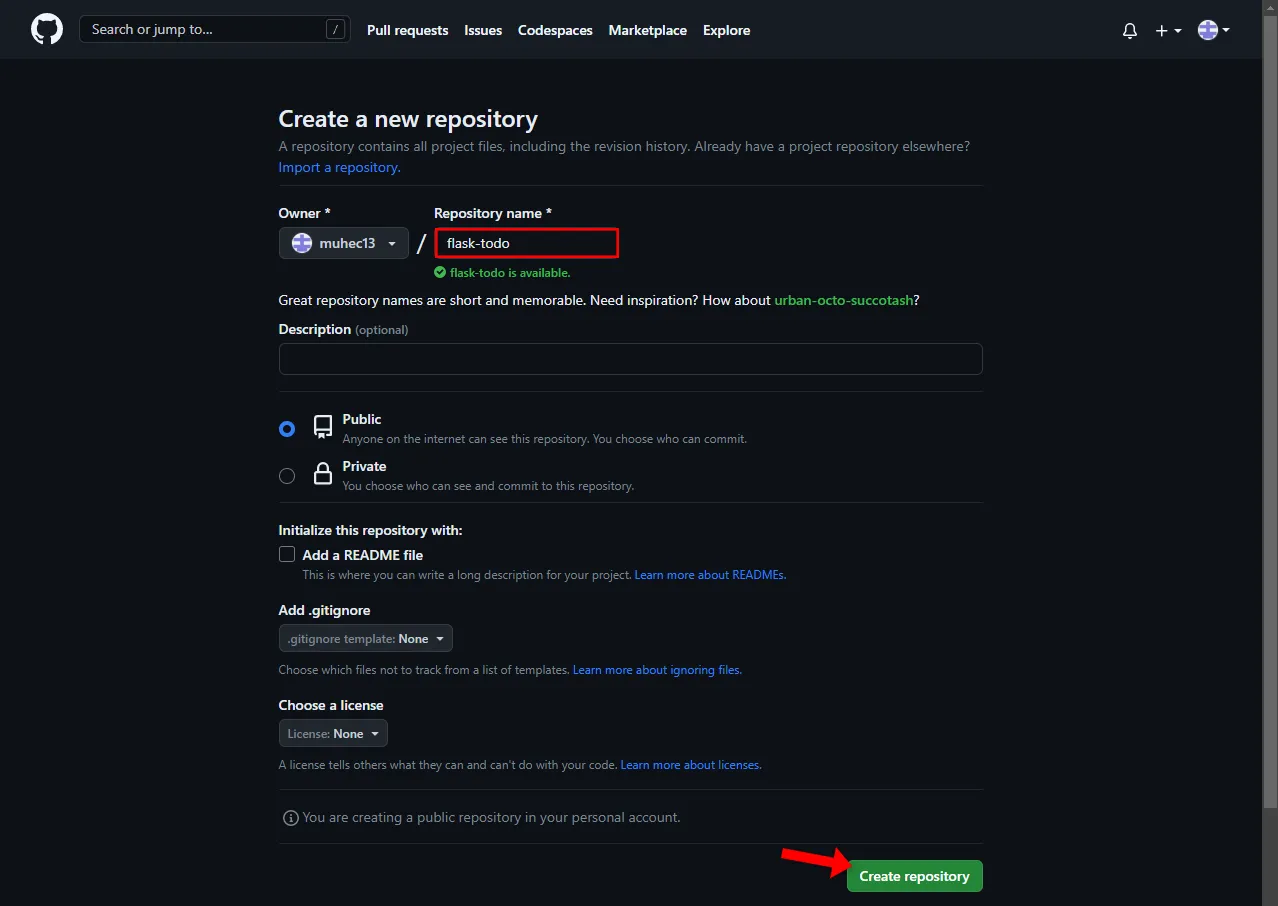
Once you’ve logged into GitHub use the “plus” button at the top right of the screen to open the dropdown. Next, select “New repository”:
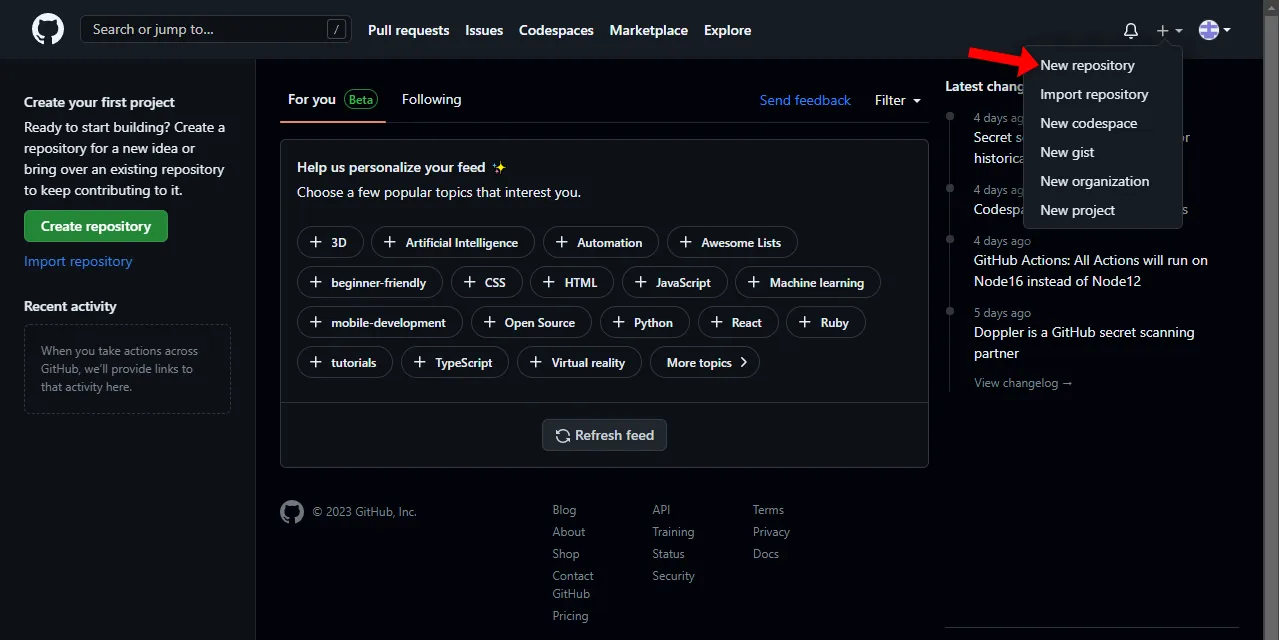
Pick a custom name for your repository. I’ll go with “flask-todo”, then click “Create repository”:
Once your repository is created take note of the remote URL:
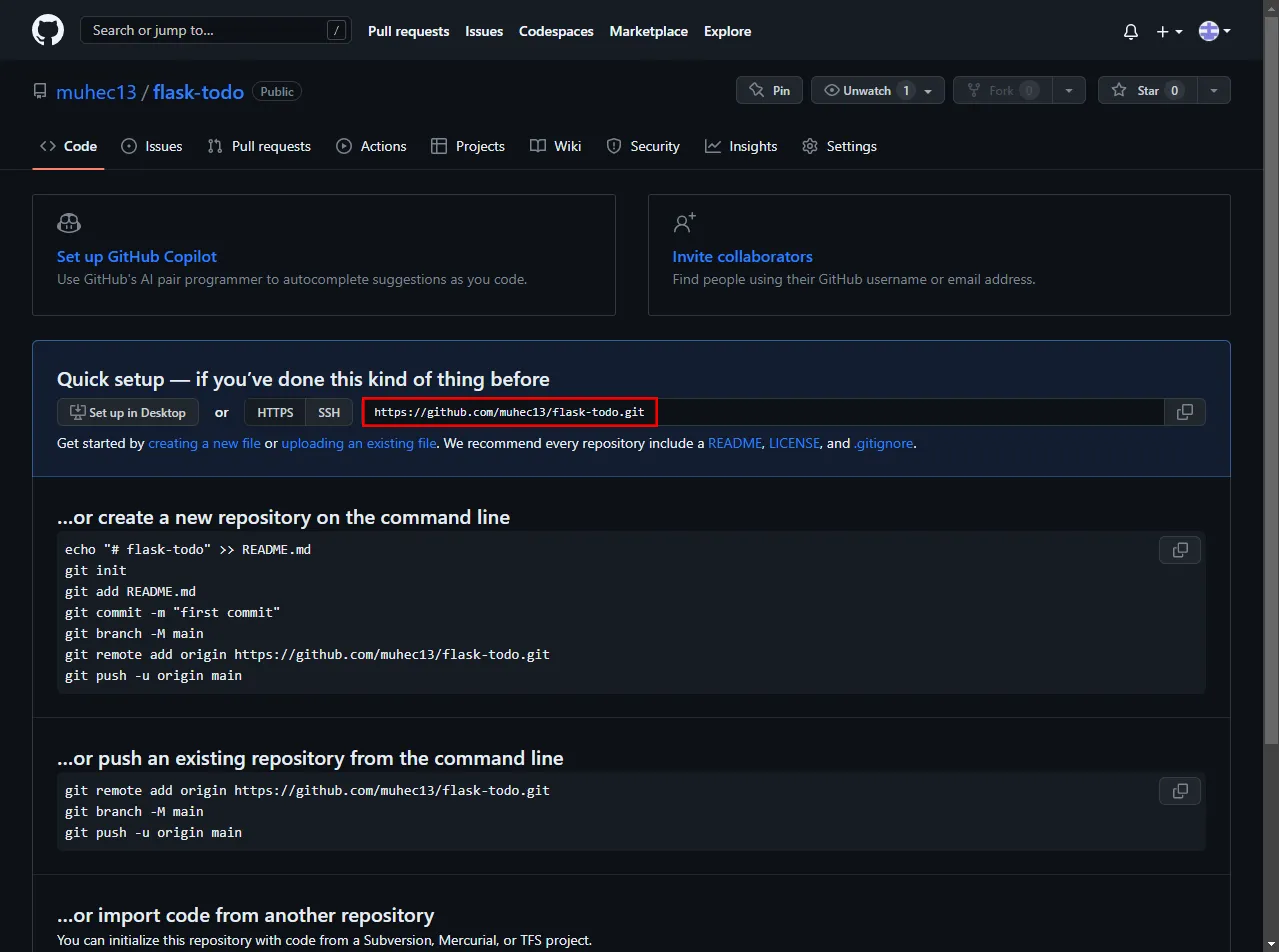
Now, let’s navigate back to our local project and push the code.
Since we have some files we don’t want to push to Git, create a .gitignore file in the project root. I’ll add the following to it, but feel free to modify it according to your needs:
instance/*
!instance/.gitignore
.webassets-cache
.env

__pycache__/
*.py[cod]
*$py.class
Next, open the command line and run the following commands:
$ git init
$ git remote add origin <your_remote_url>
$ git add .
$ git commit -m "init"
$ git push origin master
This will initialize a new Git repository, add the remote origin, VCS all the files, and create the initial commit. Lastly, it’ll push the source code to the GitHub repository.
Great, that should be it. If you now navigate to your repository in your browser you should be able to see that all the files were committed.
Deploy App
The following steps will require you to have a Back4app account. If you already have one log in otherwise go ahead and sign up for the free account.
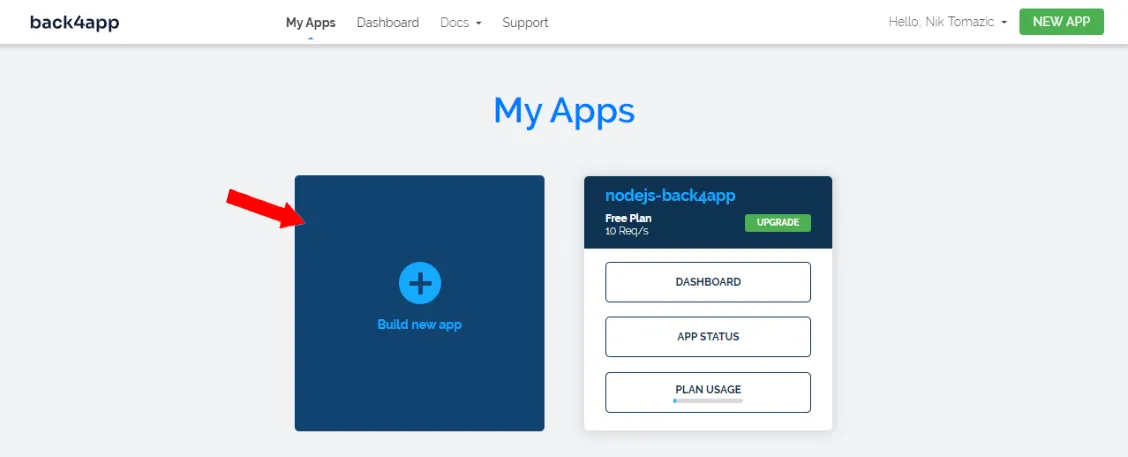
Once you log in you’ll get redirected to your app’s dashboard. Click on the “Build new app” button to start the app creation process.
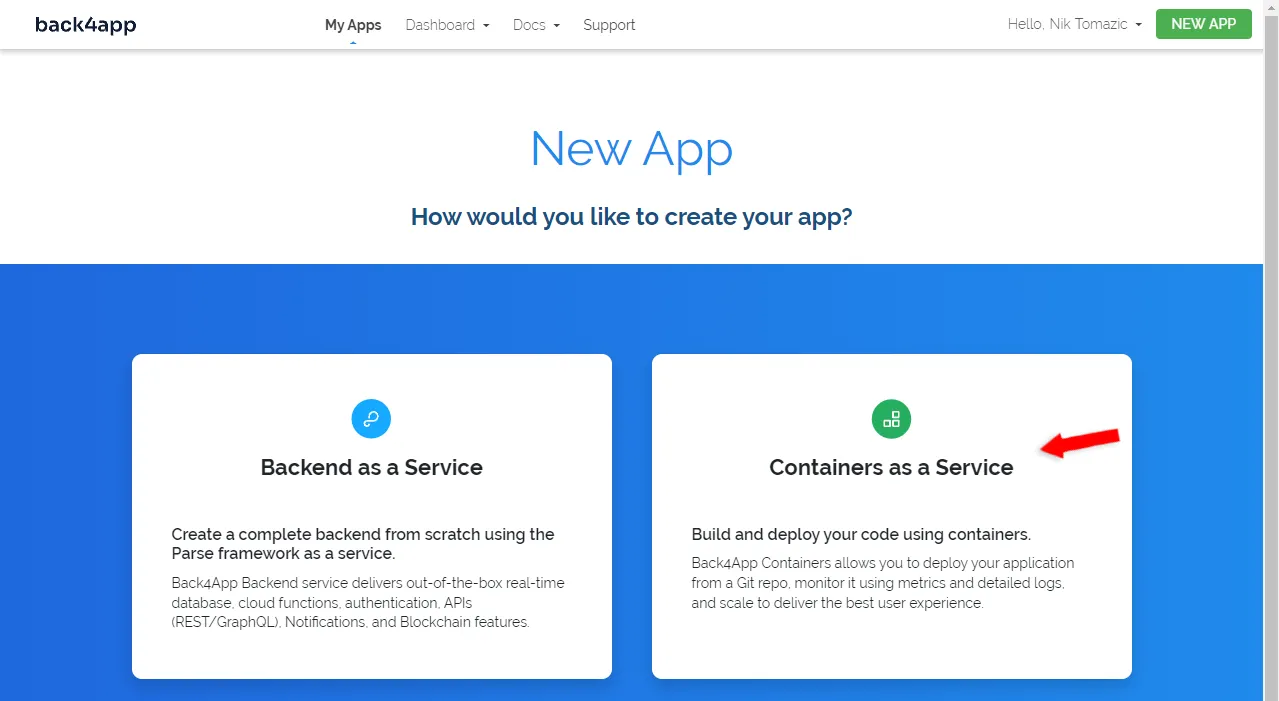
Back4app allows you to build and deploy two types of apps, Backend as a Service (BaaS) and Containers as a Service (CaaS). Since we want to deploy a dockerized app we’ll go with “Container as a Service”.
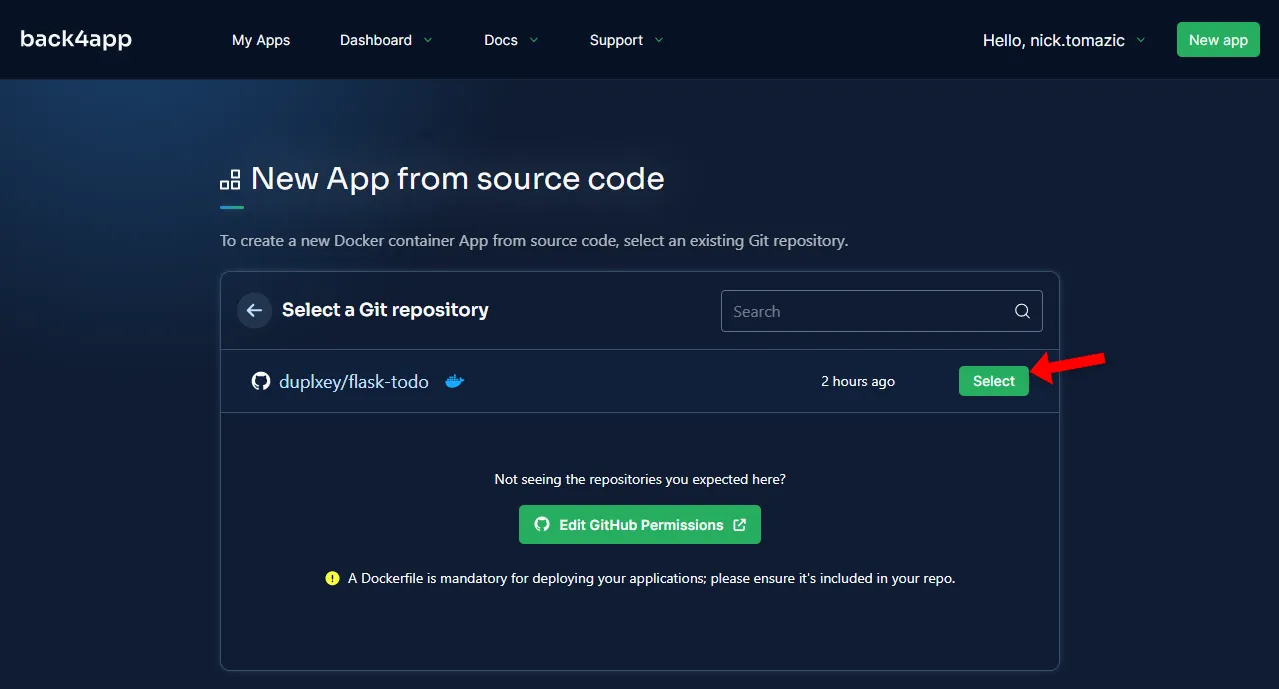
Next, go ahead and connect your GitHub with your Back4app account. Make sure to give Back4app permissions to the repository we’ve created in the previous step. Then click on the green “Select” button to select it.
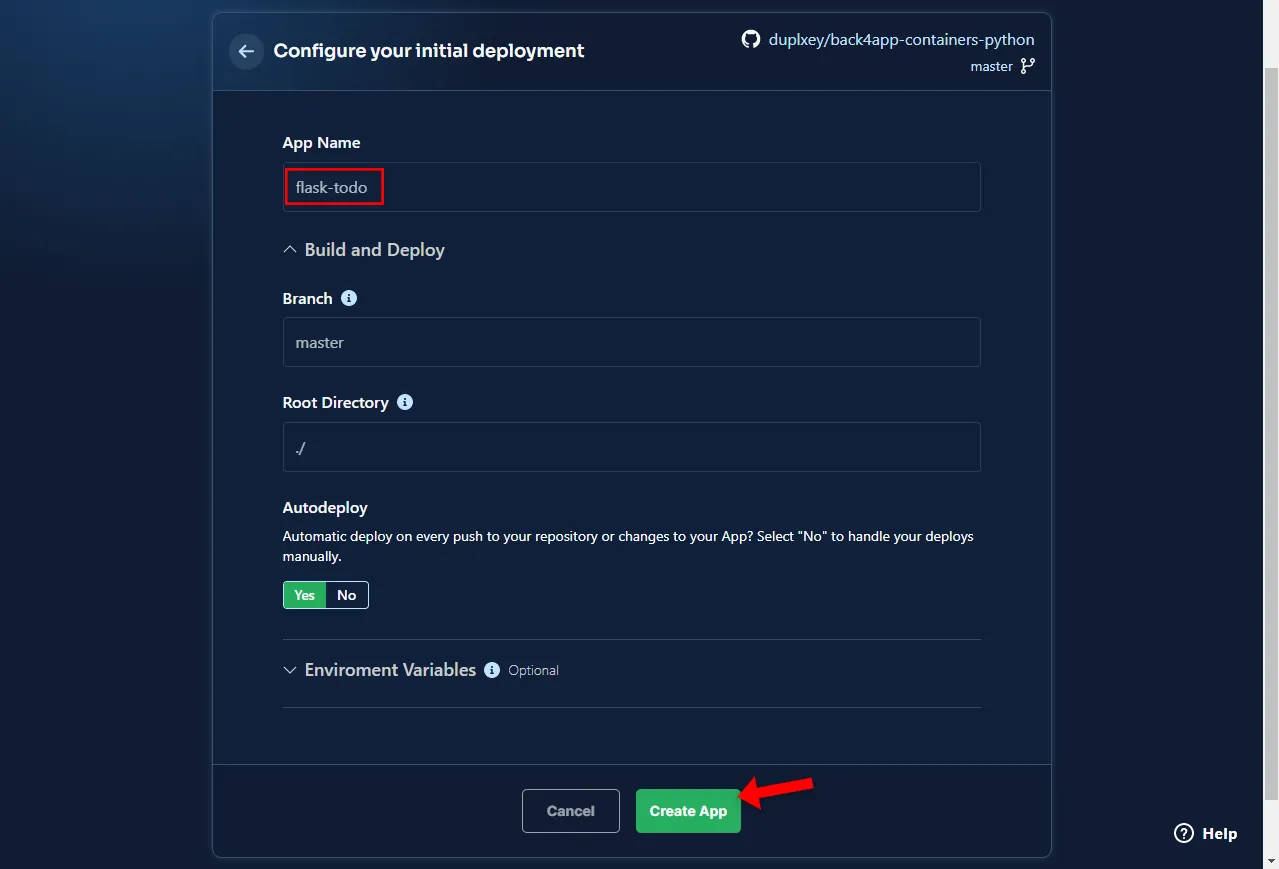
Back4app Containers allows you to configure the deployment process. You can set the default branch, root directory, enable/disable auto-deploy, and set environment variables. We don’t need any of that so let’s just name our app and click “Create app”.
Back4app is going to take a few moments to build the container, upload it to the container registry and run the container. Once your container is ready the status is going to change to “Ready” and you’ll be able to see a green URL on the left side of the screen.
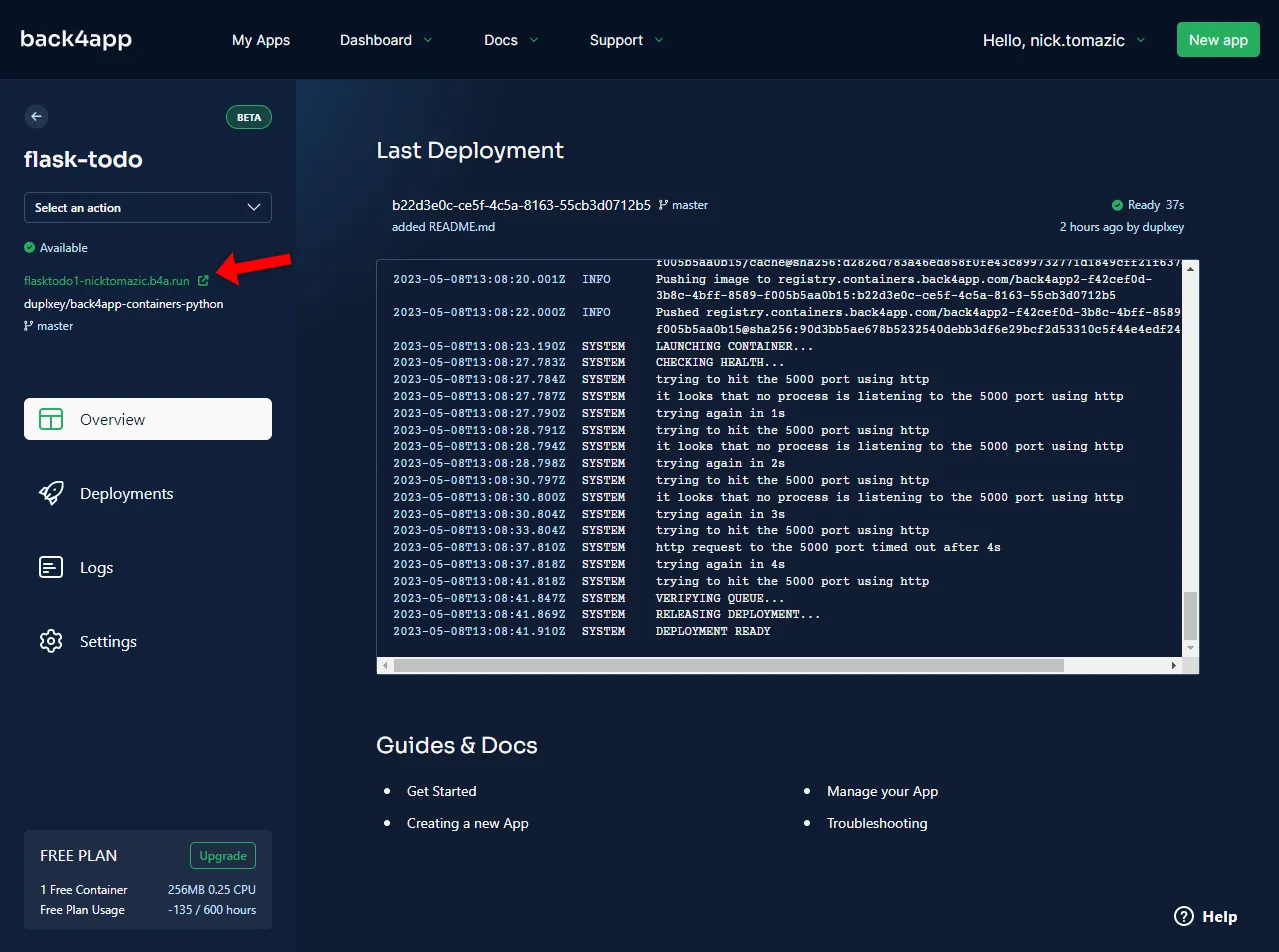
Clicking on the URL will open the web app in your browser. You’ll notice that Back4app automatically issued an SSL certificate for your app and allow you to host a Python app for free.
Conclusion
In this article, you’ve learned about Python, its advantages, disadvantages, and deployment options. You’ve also successfully deployed a simple Python RESTful API. You should now be able to build your simple APIs and deploy them to Back4app Containers.
The final source code can be found on GitHub.
Future steps
- At the moment all the data gets cleared with each redeploy. This is because the database is included in the Docker image. Consider switching to a managed database instance.
- Look into multi-stage builds to speed up the deployment process.
FAQ
What is Python?
Python is a high-level, general-purpose programming language. It is dynamically typed, supports object-oriented programming, and is often described as a language with “batteries included”. It is used in many fields including accounting, machine learning, web development, and so on.
What are the advantages of Python?
– Easy to use
– Rapid development
– Versatile & portable
– Extensive libraries
– Dynamically typed
What are the disadvantages of Python?
– Bad performance
– Memory intensive
– Prone to runtime errors
– Global interpreter lock (GIL)
– Not optimized for DB access
What are the deployment options for Python apps?
There are multiple deployment options for Python. Generally speaking we can categorize them into IaaS (like Google Cloud, AWS, Azure), PaaS (like Heroku, Fly.io, Platform.sh), and CaaS (like Back4app Containers, AWS ECS).
How to deploy a Python app?
1. Code your app.
2. Dockerize your app with a Dockerfile.
3. Build your Docker image and test it locally.
4. Pick a CaaS like Back4app Containers and push your code to it.
5. Wait for the service to deploy and that’s it!


