Cloud Deployment – How to deploy an app?
The use of cloud services is expeditiously growing among businesses. Indeed, a majority of companies are switching from on-premises solutions to cloud deployment models because of their engaging features.
However, it is still complicated for many of them to understand cloud deployment, its pros, cons, and how they can deploy an app through different cloud platforms.
So, this article will share a detailed guide about cloud deployment with all of its models, advantages, and limitations. It will also discuss how to deploy an application through leading cloud service providers.
Contents
- 1 What is Cloud Deployment?
- 2 What are the Benefits of Cloud Deployment?
- 3 What are the Challenges of Cloud Deployment?
- 4 How to deploy an application on a cloud computing platform?
- 5 Cloud Computing Deployment Models
- 6 How to Deploy an Application to the Cloud?
- 7 Back4App
- 8 Heroku
- 9 Firebase
- 10 AWS
- 11 Conclusion
- 12 FAQ
- 13 What is cloud deployment?
- 14 What are the benefits of cloud deployment?
- 15 What are some of the best cloud providers?
What is Cloud Deployment?
The procedure that enables the cloud computing models, including PaaS, SaaS, and IaaS, to perform as keys to permit the users to approach data refers to cloud deployment.
In this process, these cloud computing models are connected to the cloud, and developers can deploy applications using any of these types.
Moreover, cloud deployment is also responsible for executing all configuration and installation phases before the launch of the end product.
What are the Benefits of Cloud Deployment?
This guide divides the cloud deployment benefits into the following two sections business benefits and technical benefits:
Business Benefits
Cloud deployment offers a variety of benefits to businesses. Here are the major ones:
Cost Saving
Cloud deployment is cost-saving in numerous ways. Firstly, with cloud deployments, businesses don’t have to invest money in hardware and on-premises infrastructure. Secondly, it reduces the cost that companies have to pay for licensing, regular upgradation of hardware, and energy bills.
Similarly, organizations would also need more workforce or technical staff to deal with on-premises infrastructure. However, when businesses choose cloud service models, they don’t have to take care of such things. Additionally, cloud service models allow companies to decrease their capital expenditures.
Business Resiliency
The continuity of business is not disturbed when companies use cloud services compared to on-premises deployment models. Yes, cloud service providers promise business continuity and disaster recovery of applications in all kinds of situations.
So, continuous operations and availability of your application keep the business resilient. In this regard, cloud vendors depend on multiple global data centers.
Competitive Edge
Application deployment through the cloud is fast compared to conventional means. This benefit of cloud deployment also speeds up an app’s time to market. Indeed, rapid deployment and less time to market confer a competitive edge to businesses over their rivals.
Highly Scalable
Cloud Service Providers (CSPs) offer businesses three kinds of scalability properties. Yes, it enables enterprises to extend their resources horizontally and vertically. Similarly, the third type is autoscaling which has the ability to enhance resources according to the requirement of an application.
Increase Productivity
Cloud deployment models are also considered more productive because they need less place to handle the infrastructure. By the same token, these CSPs empower application users to improve app performance through cloud-based and self-serve options. These features definitely enhance the productivity of businesses.
Technical Benefits
Here are the core technical benefits of using cloud deployment:
Easy & Quick Deployments
It is seamless to deploy an application through the cloud because it enables the developers to set up an application over the internet. It can take a few minutes to make the system operational.
However, the total deployment duration depends on your cloud deployment model, service provider, and further requirements of your program.
Better Control
Although it is considered that the on-premises framework gives more control, but it is only in terms of local infrastructure.
Indeed, cloud deployment gives great control to developers on computing capacity. Team leaders can also allot different permissions to teammates according to their roles.
By the same token, you don’t have to stay in the office to access cloud platforms because it allows you to perform deployment anywhere in the world.
Security
Cloud service providers reduce the burden of application security on the development team. Yes, a majority of cloud platforms take responsibility for data and further app safety in this regard.
Furthermore, data could be easily recovered in case of server damage or incident with a data center because CSPs don’t rely on a single data center or server.
Easy to Estimate Cost & Resources
Another engaging benefit of cloud deployment is its measured service. You can visit the official website of any CSP and estimate the cost and required resources for your project within a few clicks only.
Also, pay-as-you-go plans and cloud calculators encourage developers and businesses to choose them over traditional app deployment means.
Customer Support
Around-the-clock customer support is another great advantage of cloud deployment or cloud services. Although CSP experts try their best to eliminate the chances of error, app crash, and glitches but if you still have any issues, you can contact customer service. However, customer support could vary from freemium to paid plans.
What are the Challenges of Cloud Deployment?
App deployment in the cloud also faces many challenges, and here are the significant ones:
Security & Privacy Issues
The crucial challenges that cloud deployment experiences are data confidentiality and security. Although leading CSPs are less vulnerable in this regard because they follow international data safety and privacy standards, but it is still risky.
Hereof, the core problems that you can face with cloud service providers could be unstable APIs, interfaces, and data theft. Especially when third parties are involved.
Lack of Experience
It is tough to find skilled development teams that are able to deploy applications in the cloud. Undoubtedly, cloud computing platforms are relatively new compared to conventional means like on-premises deployment.
Hence, finding and hiring software engineers with enough experience to line up applications using different cloud models is challenging.
Vendor Lock-In
Vendor lock-in is another significant drawback of using cloud platforms for businesses. Yes, it has been seen that cloud service providers want to restrict their clients, and Firebase is an example of it.
This hindrance also binds the companies to stay with the same cloud platform even if it increases the prices or shuts down the free-tier programs.
Limited Control Over Infrastructure
Even though it is a benefit of using cloud platforms that they take responsibility for infrastructure, but it is also a drawback when it comes to controlling. Indeed, businesses have less control over infrastructure, including servers, hardware, and further computing resources.
How to deploy an application on a cloud computing platform?
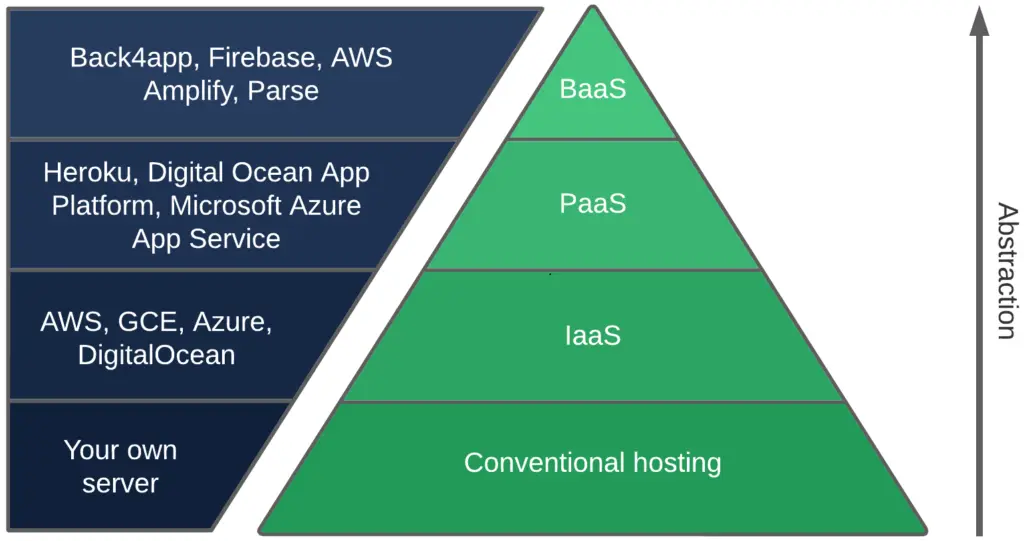
Here are the top cloud computing service models:
IaaS – Infrastructure as a Service
IaaS, or Infrastructure as a Service is a cloud service model that guarantees the supply of storage, servers, networking, compute, and security resources. This cloud computing model enables businesses to run their programs on rented and globally installed servers.
If we discuss the IaaS benefits, it lowers the on-premises infrastructure cost and provides spontaneous insights of the app’s performance. Besides, IaaS ensures business continuity with updated hardware and decreases capital expenditures.
AWS, Azure, Linode, IBM Cloud, and DigitalOcean are prominent IaaS vendors.
PaaS – Platform as a Service
Platform as a Service is another most used cloud computing model that provides users with a thorough environment to deploy and create an application in the cloud.
In this regard, PaaS doesn’t only offer resources like computing, servers, networking, and storage. But it also confers operating systems, database management, development, and further middleware tools.
By the same token, if we talk about PaaS advantages, it doesn’t only reduce the coding duration by providing supportive tools but also is cost-efficient.
Moreover, Platform as a Service provider saves the time that you have to consume for stack lineup and maintenance.
AWS Elastic Beanstalk, Heroku, Dokku, Engine Yard, and OpenShift are leading platforms in this regard.
BaaS – Backend as a Service
BaaS is another computing model that permits developers to outsource assistance for server-side operations and only emphasizes frontend development.
With Backend as a Service (BaaS) platforms, businesses only have to invest energies in client-side logic and core competencies. Surely, BaaS vendors take care of cloud storage, database management, hosting, authentication, and further backend tasks in this regard.
This cloud computing model helps companies and development teams get an edge over competitors with fast development, minimal cost, and less time to market. Cross-platform app creation and less need for backend engineers are also pros of using BaaS platforms.
Back4App, 8Base, Kuzzle, and Parse are reliable BaaS vendors hereof.
SaaS – Software as a Service
Software as a Service (SaaS) confers an all-in-one solution to utilize cloud applications and integrate them with other apps.
In other words, this cloud computing model includes all PaaS and IaaS resources with hosted applications. Additionally, SaaS vendors allow users to choose a pay-as-you-go policy despite purchasing the software at once.
With SaaS providers, businesses don’t have to install, run and update any hardware, software, and middleware resources. Remote work, data approach from anywhere, and high scalability are benefits of using SaaS platforms.
Slack, Dropbox, Salesforce, and Zoho are renowned SaaS companies.
Cloud Computing Deployment Models
Public Cloud
Public cloud deployment models allow anyone to approach cloud infrastructure and services. Businesses need the least investment to get such deployments because the public cloud doesn’t ask for upfront charges, and you can pick per-user services.
Yes, these deployment models are best for businesses that want a free tier or are willing to pay for only used instances, computing, networking, and storage resources.
Similarly, users don’t have to take care of hardware or infrastructural setup when they utilize this deployment model. However, the public cloud is not considered safe, but companies with minimal security concerns can choose the public cloud without any worry.
Google App Engine, Oracle Cloud, and Microsoft Azure are examples of public cloud models.
Private Cloud
The private cloud is an entirely different deployment model compared to the public cloud. Basically, a private cloud is designed for a single client where the user doesn’t have to share the hardware resources with anyone.
IT teams of client companies supervise the systems, so more control over infrastructure and cloud sources makes this model less vulnerable.
Hereof, the private cloud could be a trustworthy option for businesses that have data safety concerns. Howbeit, the private cloud needs more budget for maintenance, and it is also hard to scale hardware resources when companies choose this model.
Dell EMC, Virtual AWS Private Cloud (VPC), Oracle’s Private Cloud Appliance, and HPE Helion are examples of private cloud models.
Community Cloud
A cloud infrastructure that authorizes a group of companies to approach the resources and cloud services is known as a community cloud. These kinds of deployment models are typically designed for industries and communities that have common interests or concerns.
Compared to other models, organizations build and run such cloud frameworks independently. Or in a few cases, communities get third-party services in this regard. Cost efficiency, scalability, and high security are benefits of using a community cloud model.
Banks, trading companies, and government institutes use community cloud models to deploy their infrastructure safely.
On-Premises
A deployment model that enables businesses to set up in-house hardware, server, software, and middleware resources is known as on-premises. The IT experts of organizations are totally responsible for the lineup, management, and maintenance of such systems.
On-premises deployment models differ from cloud models but give businesses complete control over hardware and data. They also maintain high privacy and security.
However, only large enterprises can bear the cost of such infrastructures. Yes, hardware, electricity, and maintenance costs could be drawbacks of on-premises deployment.
Hybrid Cloud
The hybrid cloud model depends on assorted computing, networking, and storage environments that could be public, private, or on-premises. In other words, with hybrid models, users can simply choose any resource from their desired cloud deployment model.
The core advantage of a hybrid cloud is its flexibility to use. Similarly, it overcomes the deployment cost of cloud deployment because of the availability of different models. Also, such deployment types give businesses more control over data, and they can seamlessly customize the applications by using them.
Google Cloud, Amazon Web Services, Microsoft Azure, and NetApp are renowned hybrid cloud vendors.
How to Deploy an Application to the Cloud?
Below are the introductory steps to deploy applications to the cloud using four of the best cloud providers.
Back4App
Back4App is a low-code cloud service provider that facilitates users with a BaaS computing model. It holds 3.5 billion processed requests on a monthly basis and could be an ideal choice to build, deploy and host the backend of advanced applications. This BaaS vendor definitely allows you to deploy an app in the cloud within a few minutes.
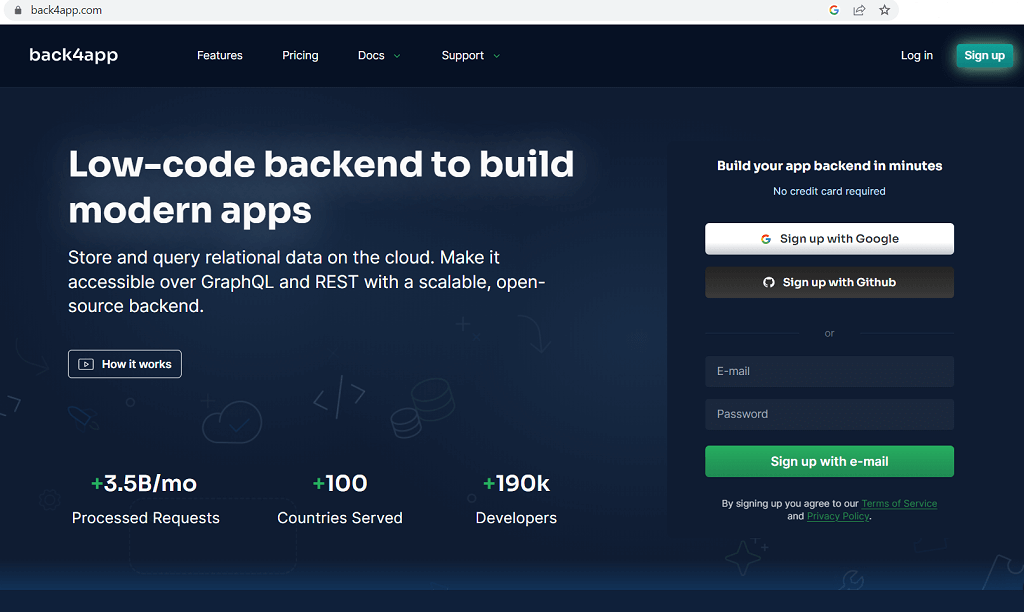
Firstly, you just have to visit the official site of Back4App and then click on the ‘Signup’ option available on the top right side. Luckily, Back4App doesn’t require a credit card to register, so you can sign up here through Google, GitHub or simply add your email and password. However, don’t forget to validate your email address right after the signup.
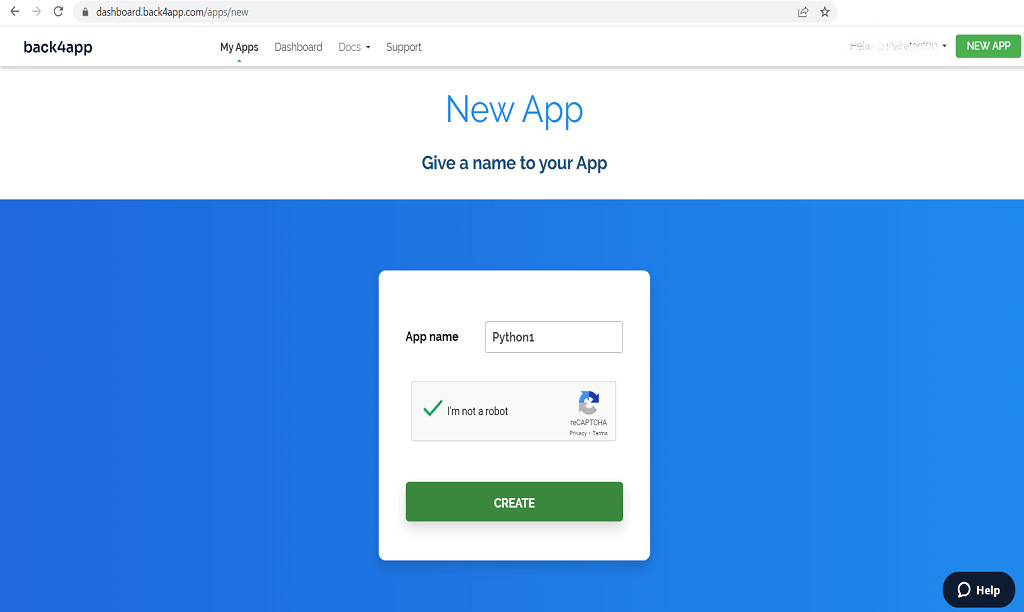
After signup, you will see a page under the ‘My Apps’ section, and you just have to press the ‘Build new app’ option. Withal, it leads you towards 2 pages of questions to improve your experience that you can definitely skip or choose appropriate options. It is your call. However, the actual journey starts when you write the name of your app and choose the ‘create’ button.
Now, you will have this ‘My Apps’ page.
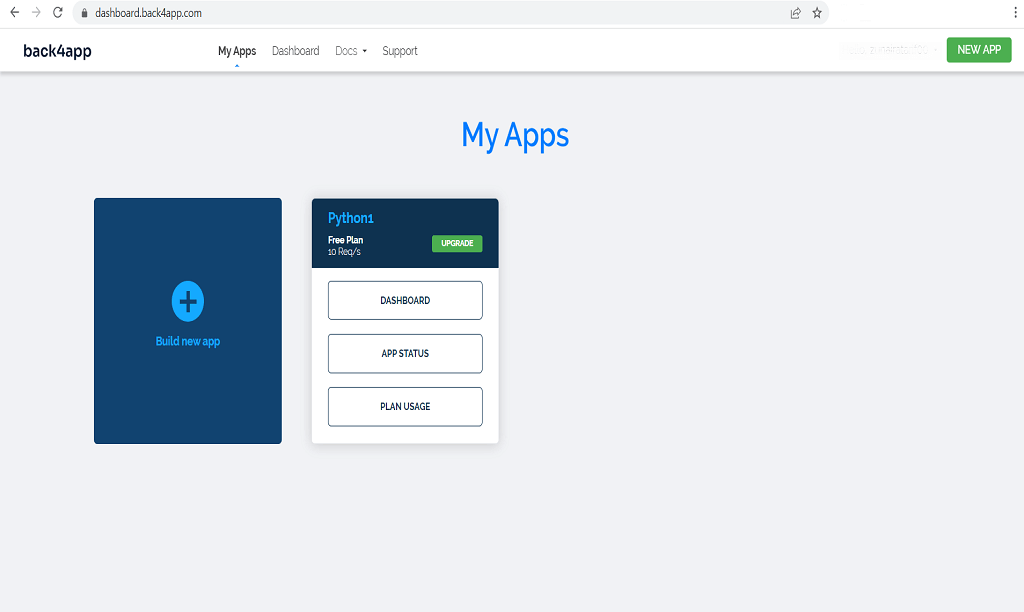
Now, the My Apps page will show you the following options, and we are going to discuss them step by step:
Database Browser
Back4App uses NoSQL in terms of the database with the powerful support of Parse Server. However, it is Database Browser that enables the developers to build, remove, upgrade, and data classes or objects.
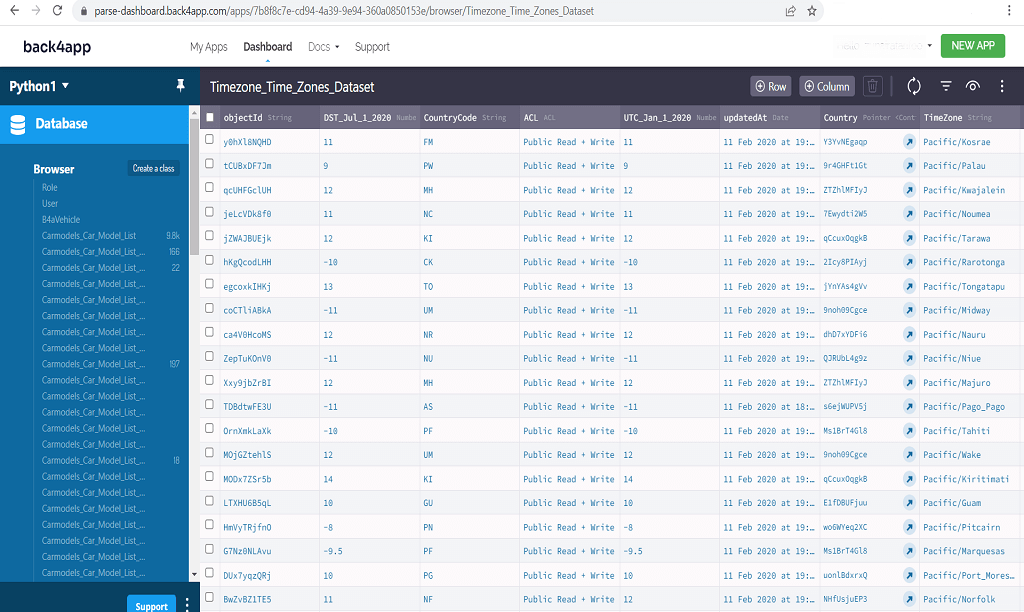
After approaching the ‘Database’ category under your app’s dashboard, you need to create a class. It is super easy to assign a name to a class, its type, and privacy mode. Later, it is seamless to add rows and columns to that class.
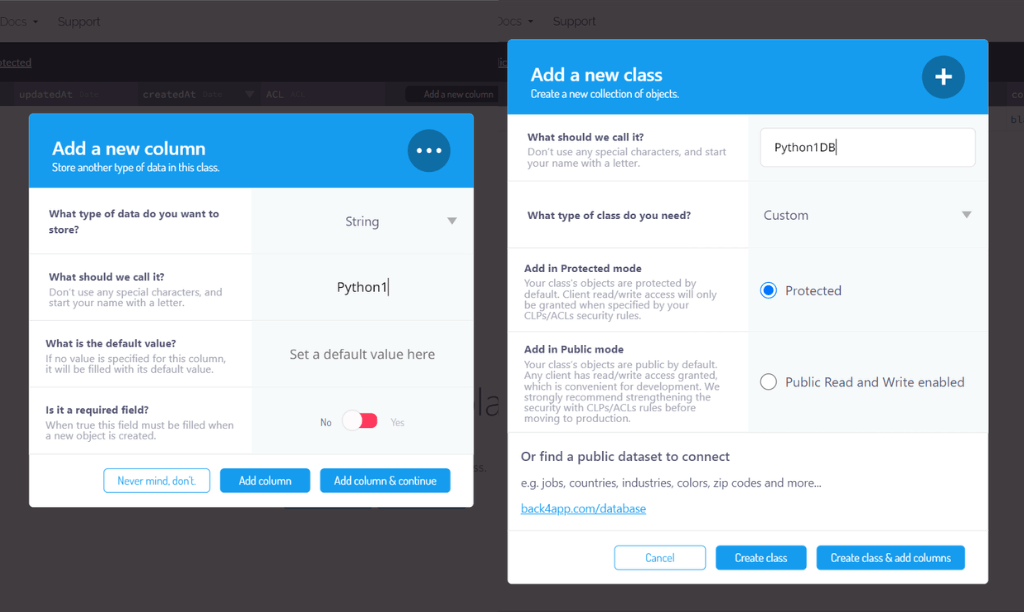
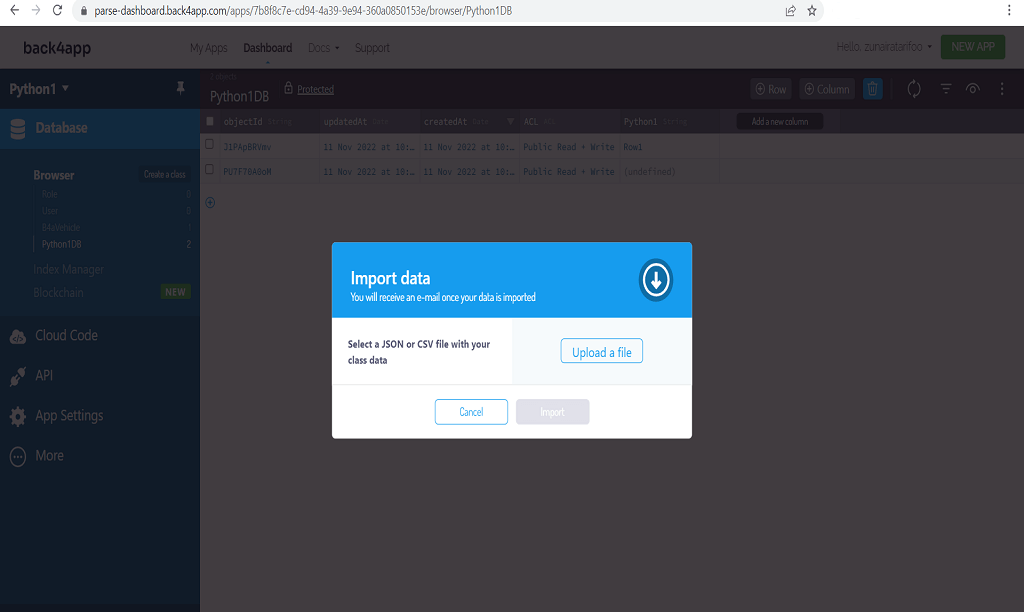
Furthermore, Back4App permits the developers to import class data or relation data through CSV or JSON file formats.
The spreadsheet-like interface of Back4App doesn’t only allow the developers to modify rows or columns anytime, but the import of binary attachments to columns is also possible. These binary attachments could be images and PDF files.
Database HUB
If the app you are going to deploy in the cloud needs a public dataset, then Database HUB will be very beneficial for you. Although you can utilize the ‘search databases’ option and find the right dataset but when you click on ‘see more databases’ this platform provides 820 results. So, the choices are yours whether you search manually or through a tool.
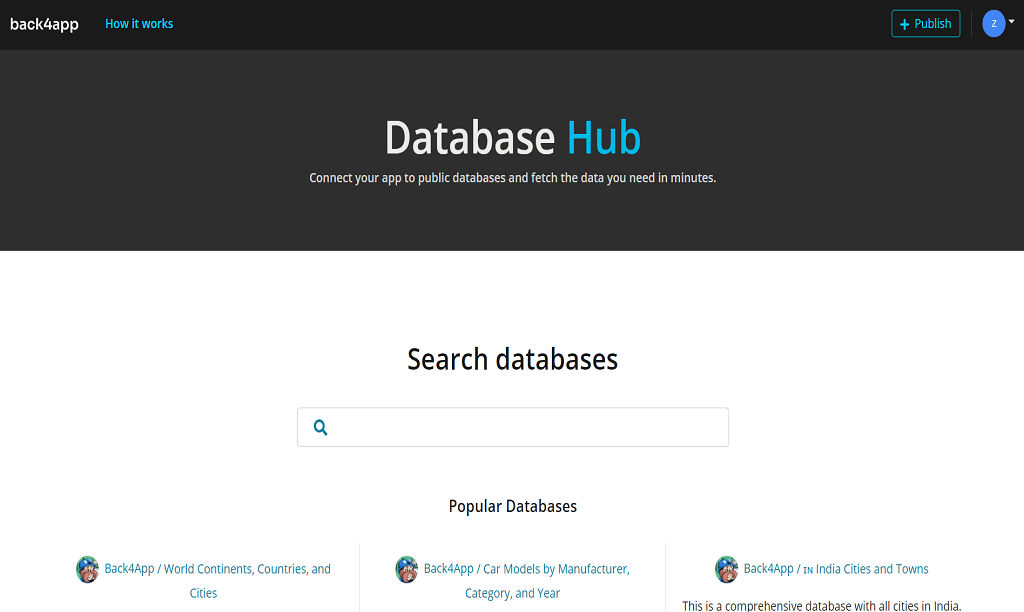
It is also smooth to benefit from Back4App’s datasets for free. Here are the steps:
- Select the dataset that you need.
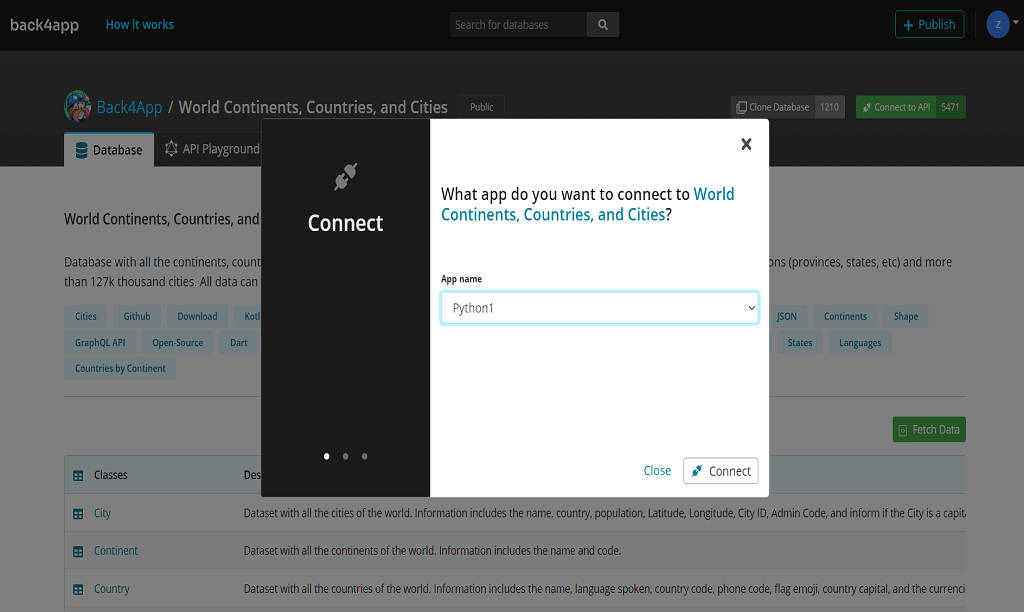
- Then, click the ‘connect to API’ button and select the app you want to link with this database.
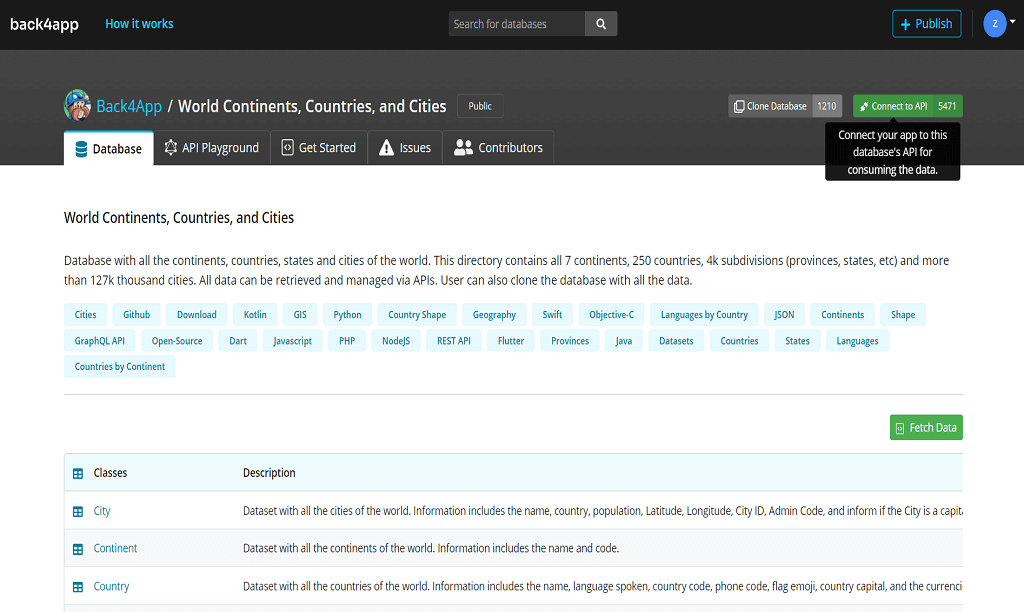
- Now, you need to choose the ‘Fetch Data’ option.
- And then pick the right platform according to the framework or language of your app.
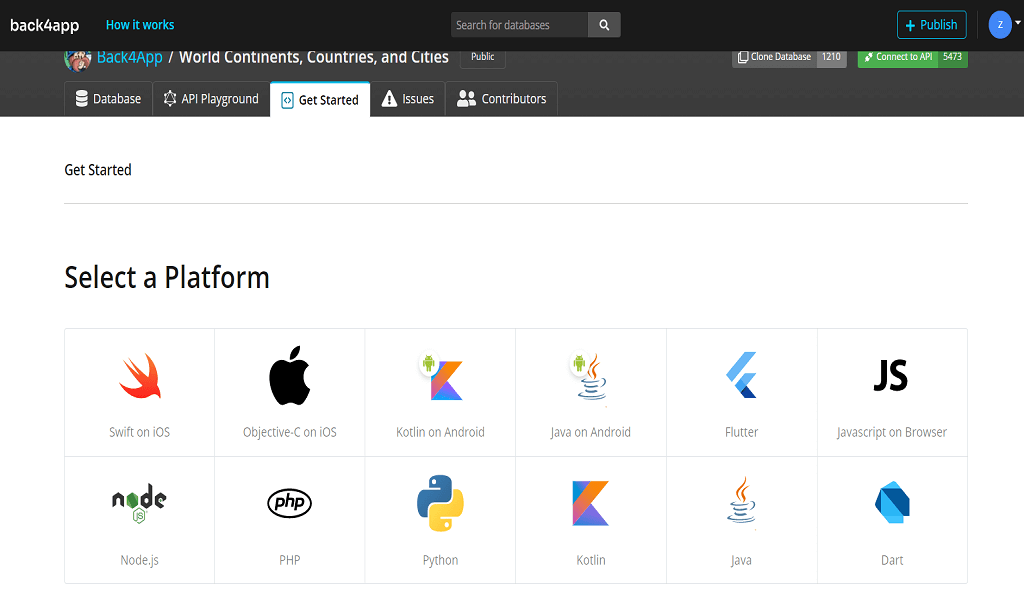
- After this final step, you will be able to see the selected dataset on your dashboard.
Authorization
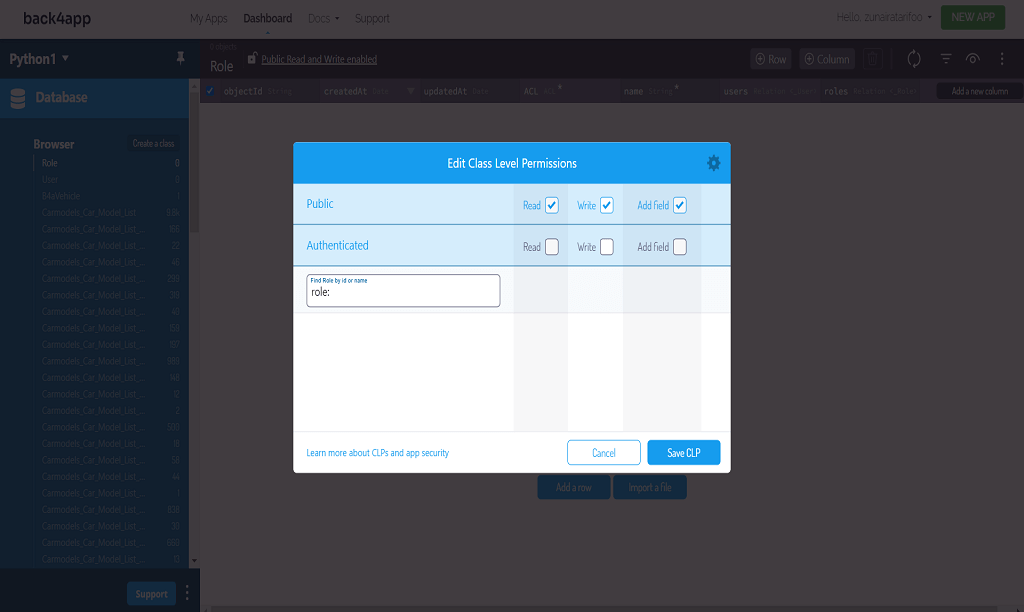
Back4App also provides strong authorization to improve security to deploy an app in the cloud. As we know, Back4App depends on Parse Server, so it grants two types of controls that are class-level permissions (CLP) and object-level access control. With CLP, you can confer table permissions and object-level for rows.
Similarly, you can also define the roles and permissions of teammates according to their job. On the contrary, access control lists (ACLs) safeguard the data from public reach.
Blockchain Storage
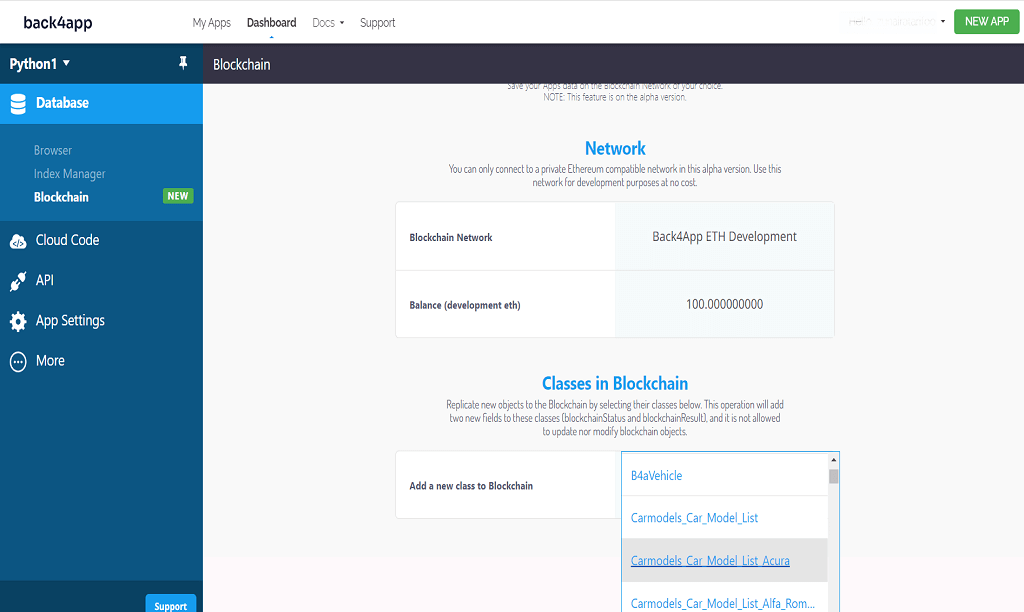
Back4App is not only a credible platform to deploy an app in the cloud but also facilitates the users with advanced data storing properties like Blockchain Storage. After opening the Blockchain tab, choosing a class from your app’s database is seamless. Then, give your approval to add the selected category to the blockchain. It provides you with private Ethereum resources for free.
Cloud Code Functions
Cloud Code enables an app to run JS-centric backend functions on Back4App spontaneously. In this regard, your JS script is installed on Back4App’s servers, and you can operate it in a fully managed environment. Also, Cloud Code could be used to request validators, triggers, and connections.
When users open the Cloud Code category on the dashboard, they find 2 options: Cloud and Public. You need to elect the ‘Cloud’ and then the ‘main.js’ option here. If you don’t want to upload a file, you can simply write the script in the main.js file. Otherwise, you can choose your already-coded file through the upload button.
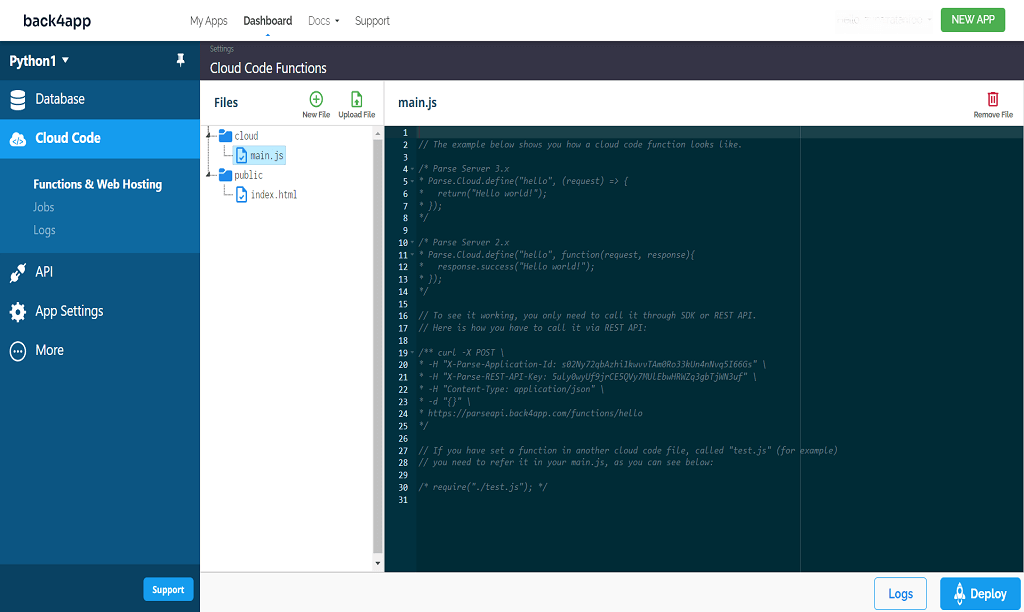
Now, it is time to press the deploy button, and it is successfully deploying your changes. By the way, Cloud Code doesn’t only support JS, but it is also applicable for iOS, Android, Flutter, .Net, Unity, and PHP projects.
The other functions that come under the Cloud Code section are the following:
Cloud Jobs – This function is the best choice for developers who deal with long-running scripts and don’t want to wait for answers. Cloud Jobs could be beneficial for deleting inactive users on your app or batch processing tasks.
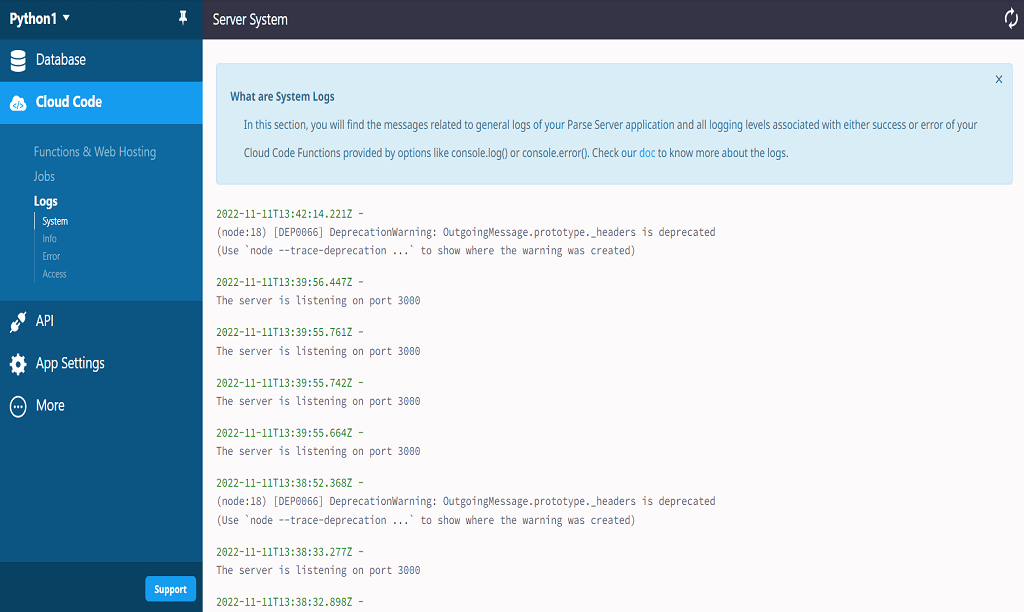
Server Logs – Logs can notify the coders about console.log(), general logs, logging errors, and console.error().
App Settings
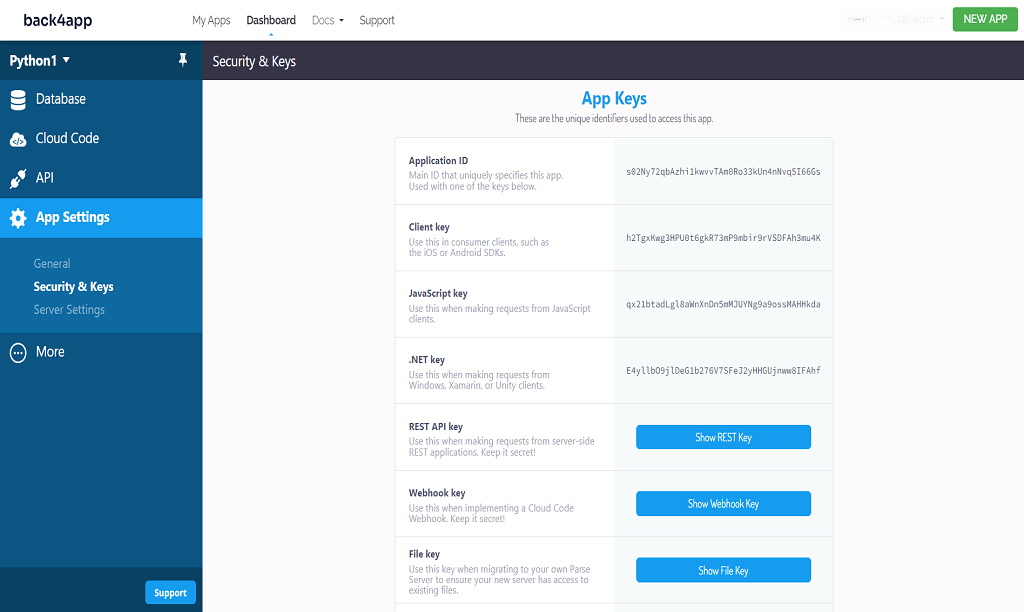
Although App Settings is considered an option for general settings but when you use Back4App, this category provides you with App Keys. Users can access these app keys with the application ID:
- Client Key
- JavaScript Key
- .Net Key
- REST API Key
- File Key
- Master Key
- Webhook Key
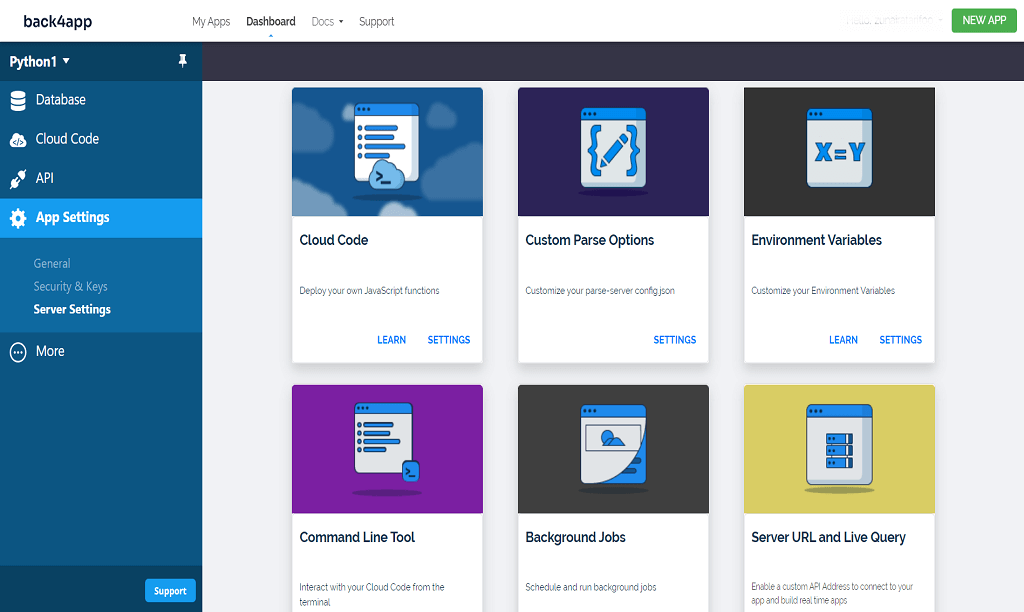
The critical section that assists in cloud deployment is Server Settings, also available under App Settings.
Back4App provides a user-friendly interface for server settings, and you can adopt learning or settings options. Custom Parse Options, Command Line Tools, and Live Query are prominent features here.
SDK & API Support
Back4App gives enough support to connect an application with its servers. In this situation, developers can benefit from Parse SDK or REST and GraphQL APIs according to the nature of the project.
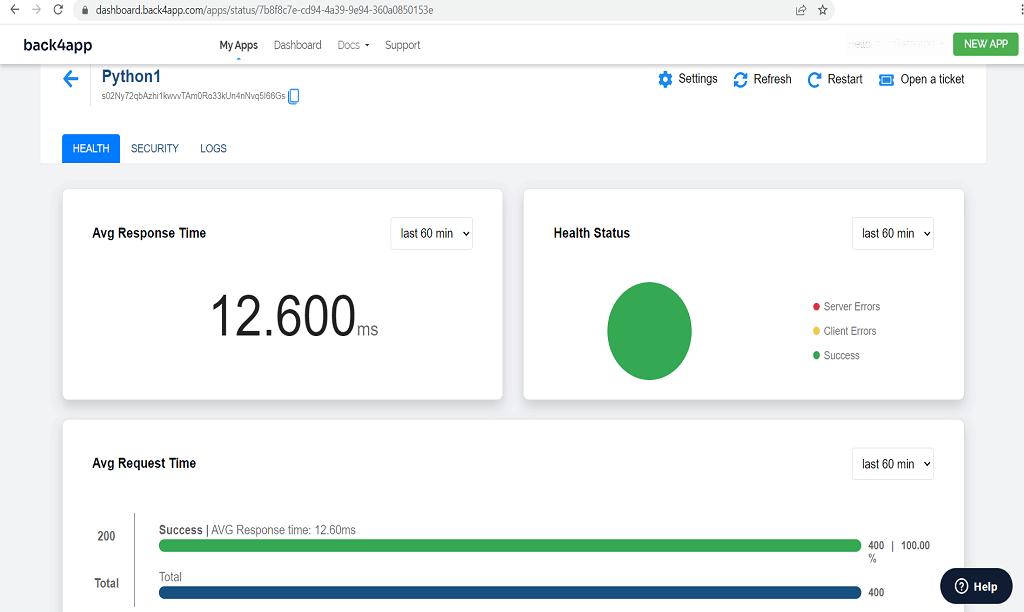
App Status
It might be a good idea to use Back4App to monitor the performance and health score of your application. You can inquire about the average response time, health status, server errors, and security and log issues through the App Status option. You can start this process by using the app key and ID.
Heroku
Heroku is a Platform as a Service (PaaS) provider that is known because of its container services among users. It is straightforward to deploy an application on Heroku by following simple steps only. In this regard, you first need to sign up, which is entirely free with Heroku.
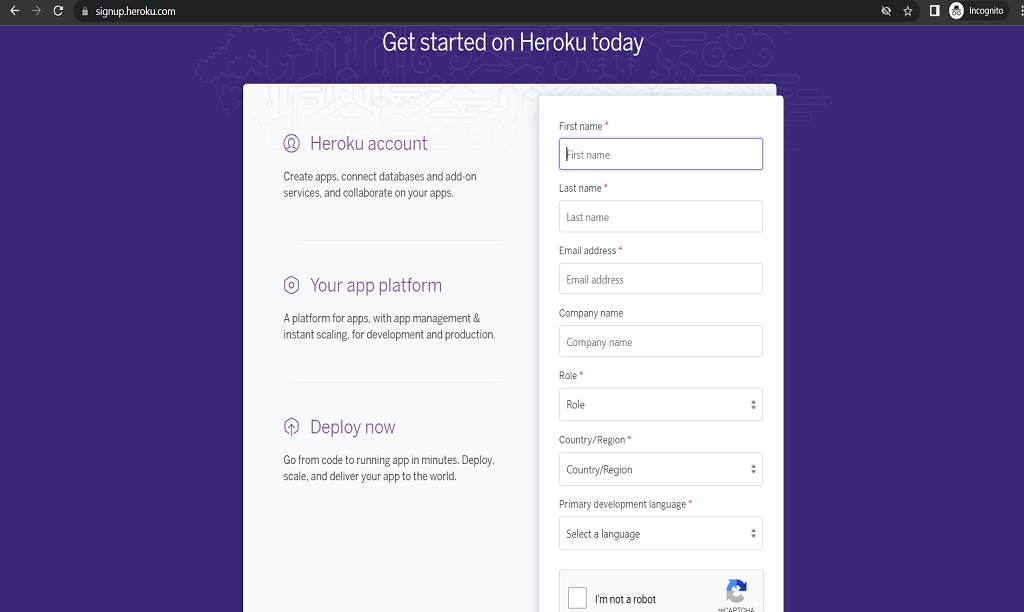
After validating the email address, it will lead you to the Heroku Dashboard. Now, you need to choose the ‘create new app’ button and can also pick language accordingly. Subsequently, it is time to name your app and select the right region.
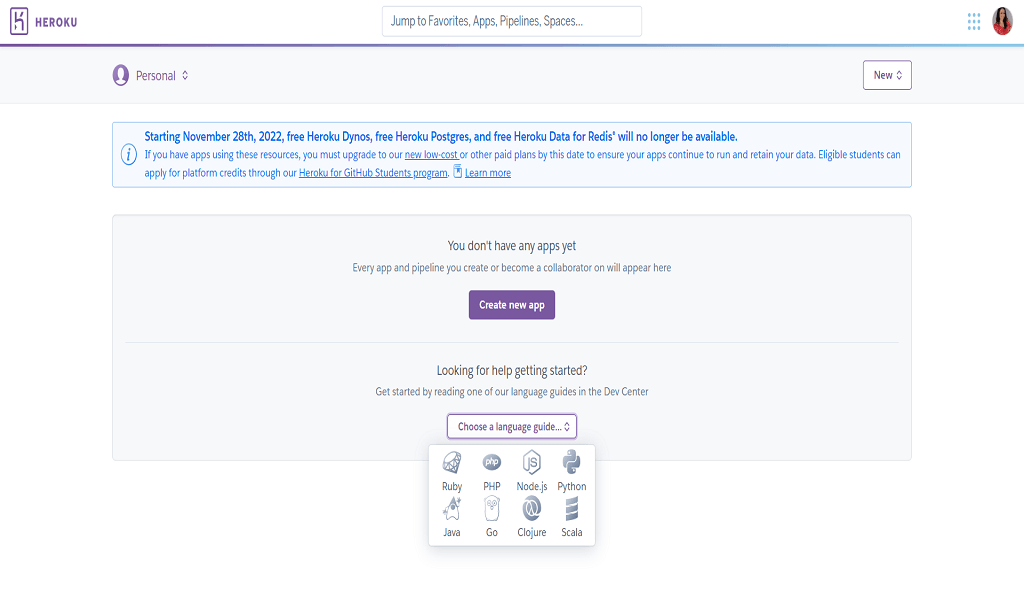
Deployment Methods
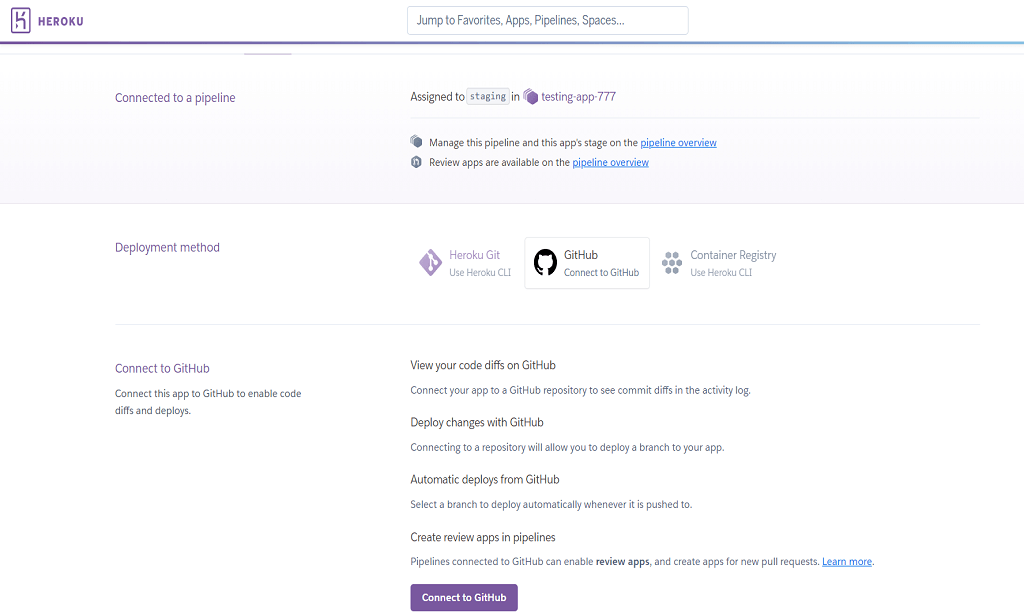
The actual cloud deployment with Heroku begins when you land on the deployment page. Here you find 3 primary ways to deploy your app through this PaaS platform.
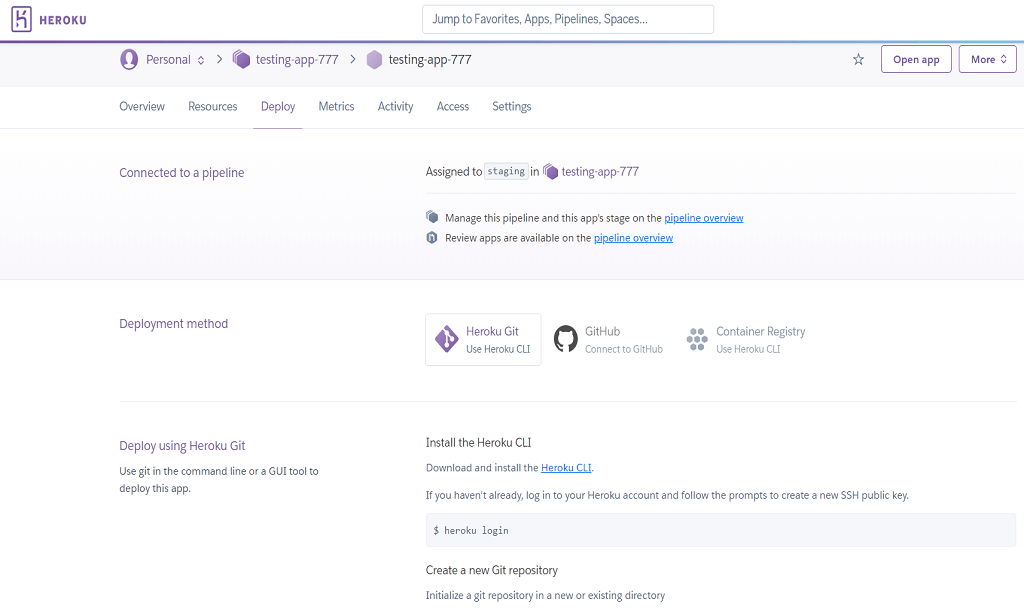
Heroku Git
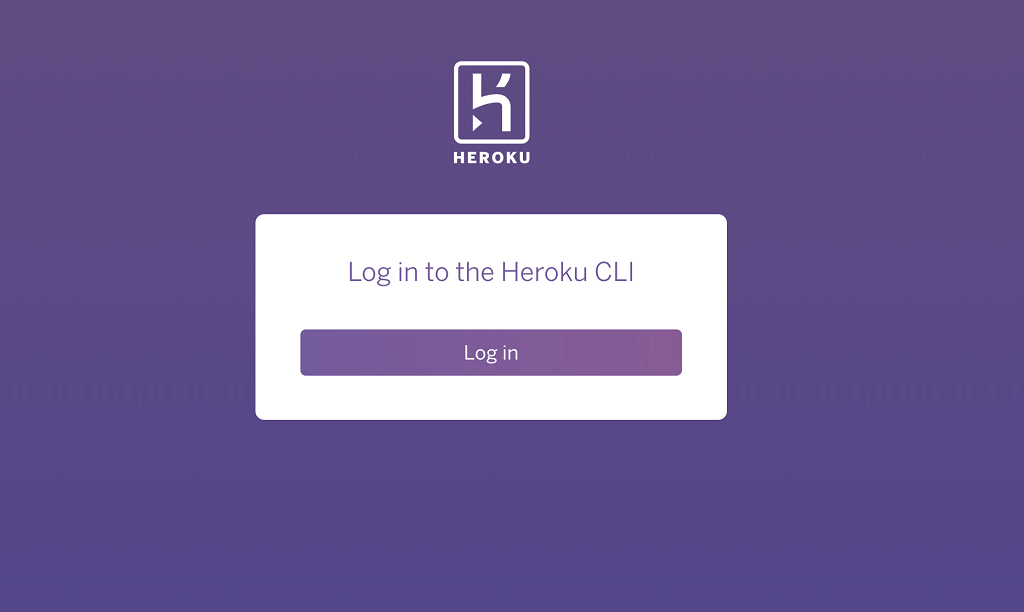
To deploy an app on Heroku through Heroku Git, you have to install Heroku Command Line (CLI) interface. It is easy to download CLI to download in macOS or Windows format. Basically, CLI aids the developers in setting up, building, and administering an app as a significant tool of Heroku. Also, it enables you to generate a Git repository and deploy it after committing.
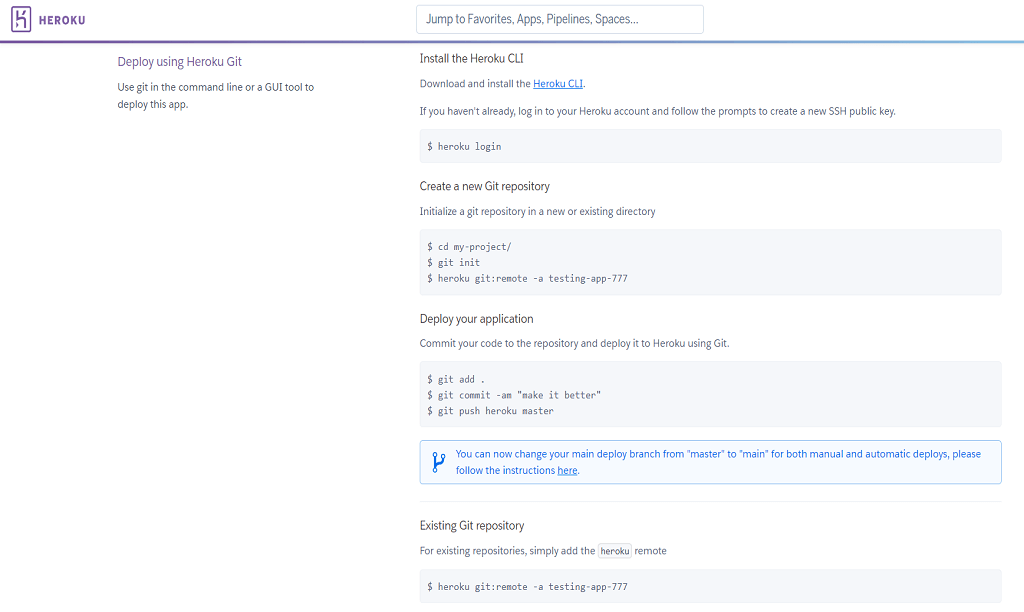
GitHub
Cloud deployment with Heroku is also super easy if you connect it with GitHub. This way of cloud deployment also permits programmers to perform script setup and diffs. Hereof, you find two ways to deploy a branch.
Manual Deployment – Manual deployments provide more control, and teams can identify the branch that is needed to deploy.
Auto Deployment – When developers implement auto deployments, all pushes frequently are set up to that branch.
Container Registry
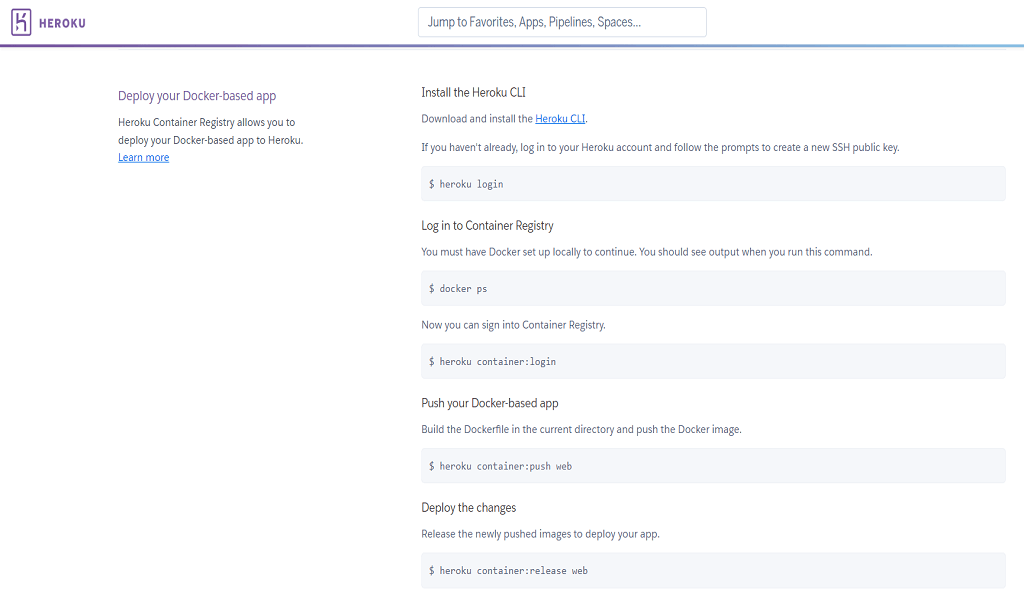
Although Container Registry also depends on Heroku CLI to deploy an app in the cloud but it is the best solution for Docker-oriented applications. With the robust backing of private spaces and runtime, this method helps you to employ Docker images with great ease.
Firebase
Firebase is another big name when it comes to cloud deployment of web and mobile applications. Like Back4App and Heroku, the signup at Firebase is entirely free, and you just push the ‘Get Started’ button here.
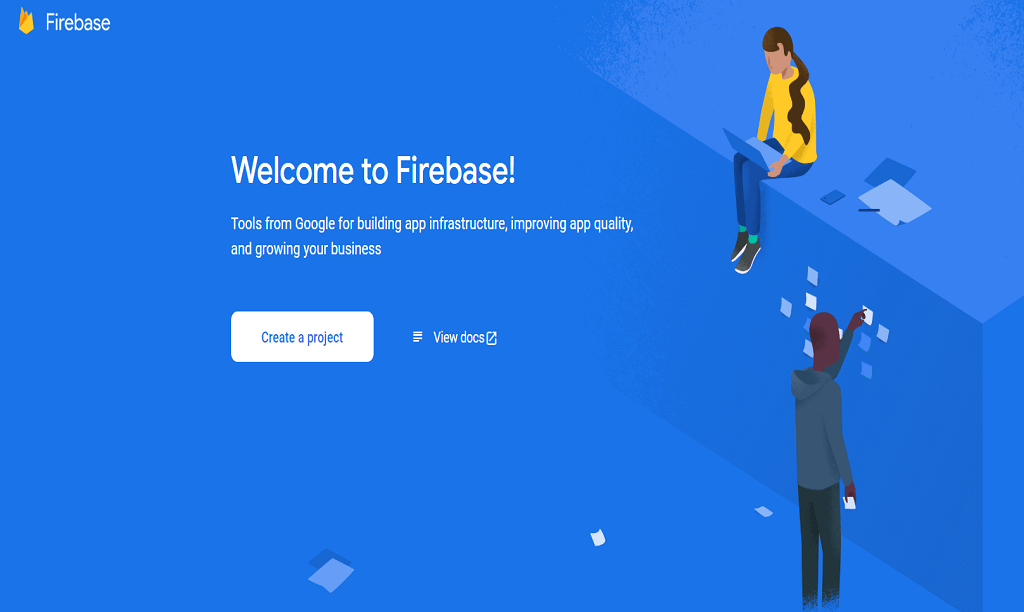
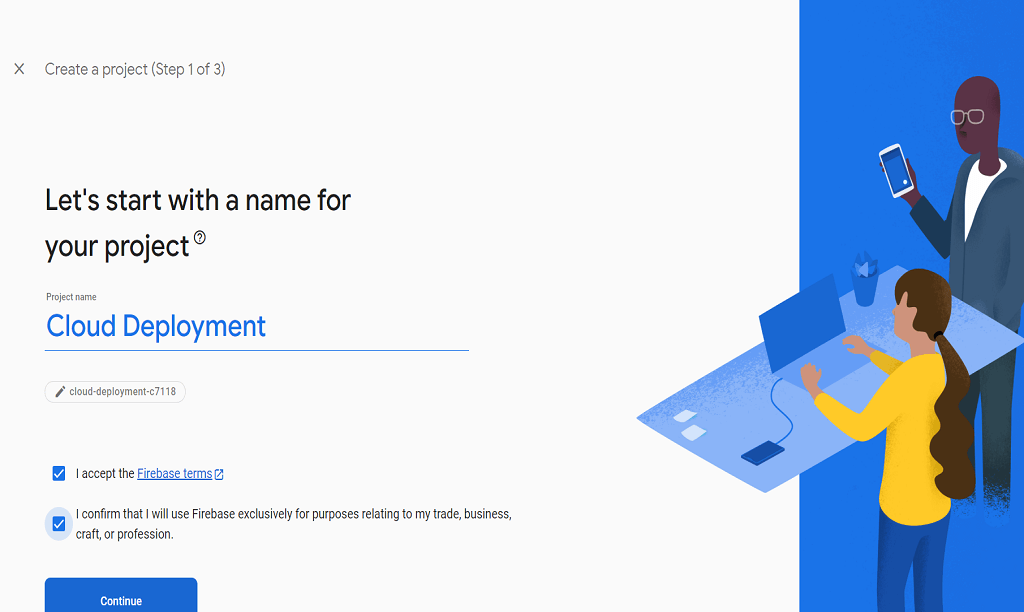
Now, you have accessed the Firebase Console, and it is time to commence your cloud deployment journey with Firebase by clicking ‘create a project’. Coders can name their projects and accept the terms and conditions to proceed further.
Firebase offers several free tools like A/B testing, analytics, user segmentation, and much more. Users can enable them for their app. After the completion of these steps, you will be able to see the cloud deployment dashboard of Firebase.
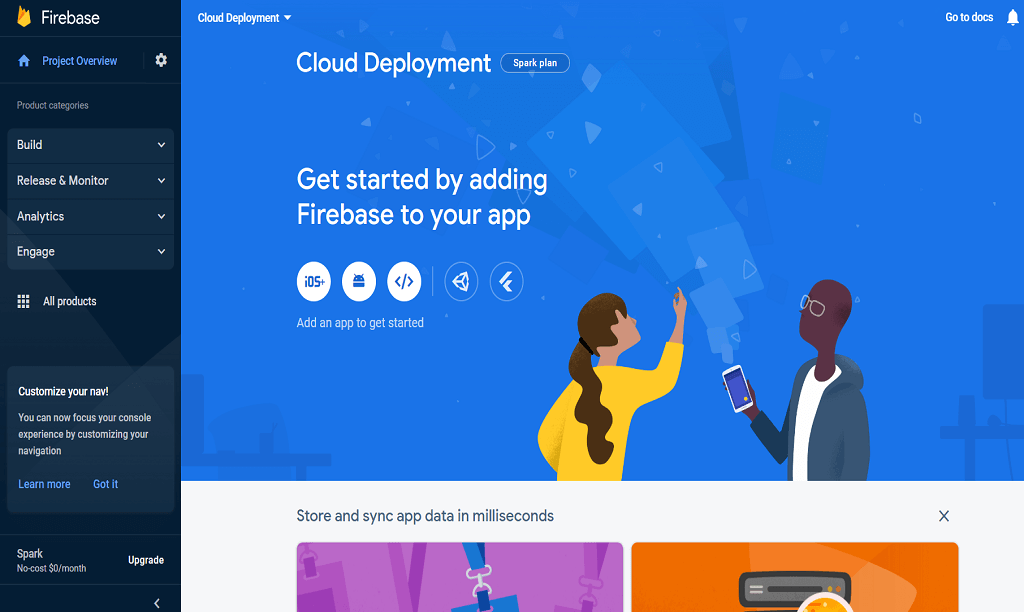
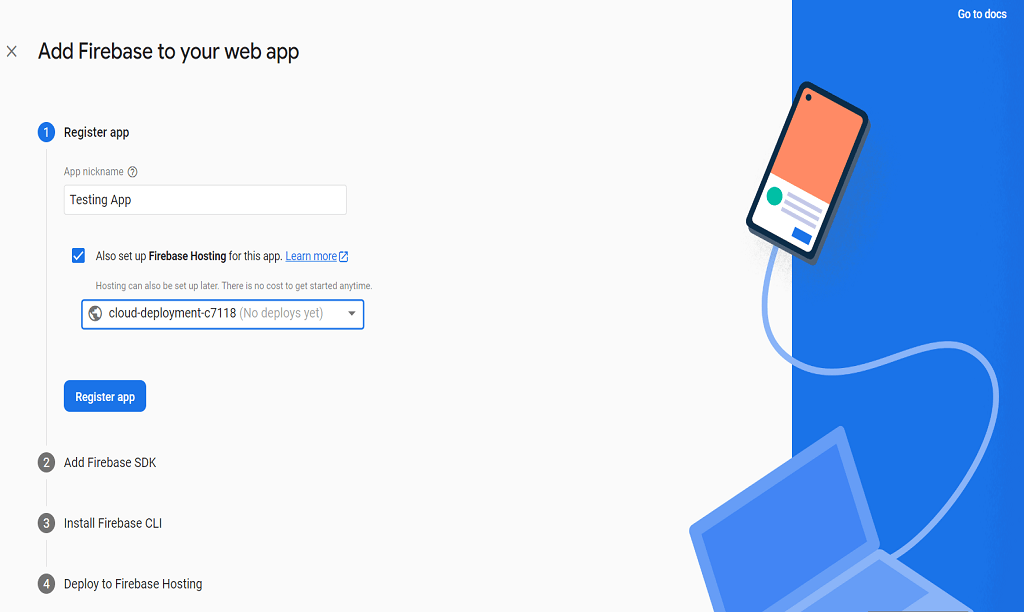
App Registration
App registration is rapid with Firebase. Developers choose an app type from provided options, including web, Android, iOS, Flutter, and Unity. The next step is about giving a name to your app, and then you can also approach the hosting solution of Firebase.
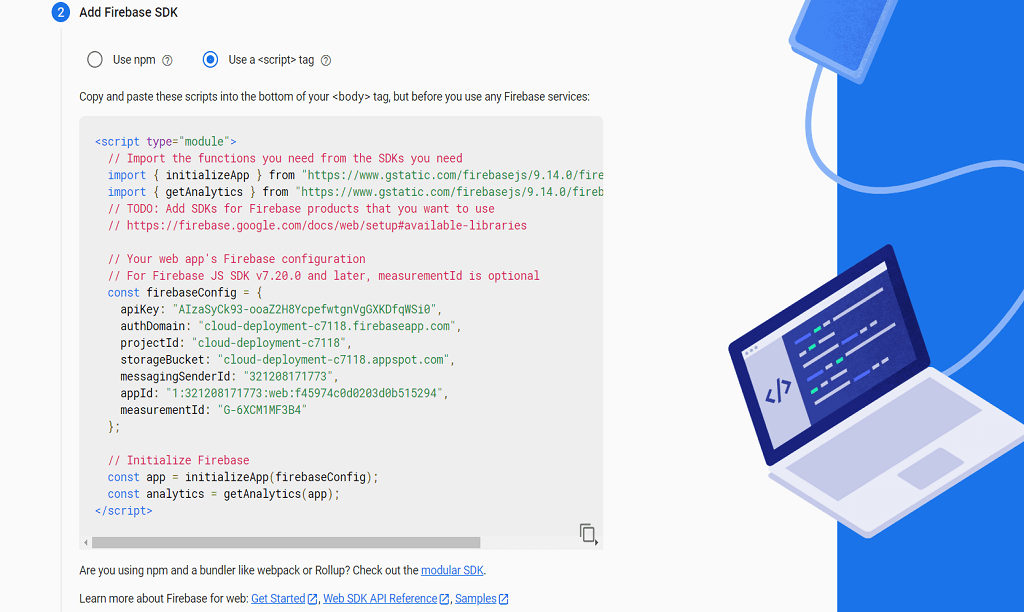
Firebase SDK
Firebase SDKs grant secure assistance to iOS, web, and Android applications. They are also responsible for integrating Firebase databases with the serverless framework of your application. Hereof, we suggest the users copy and paste the provided script in the <body> tag. It will be a good idea if you also insert this tag in the index.html file.
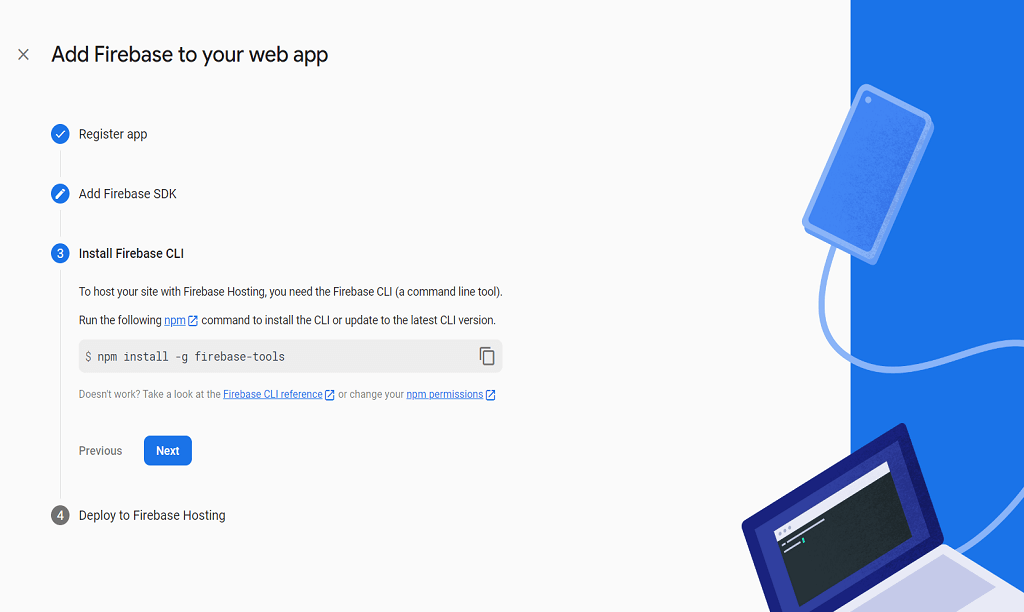
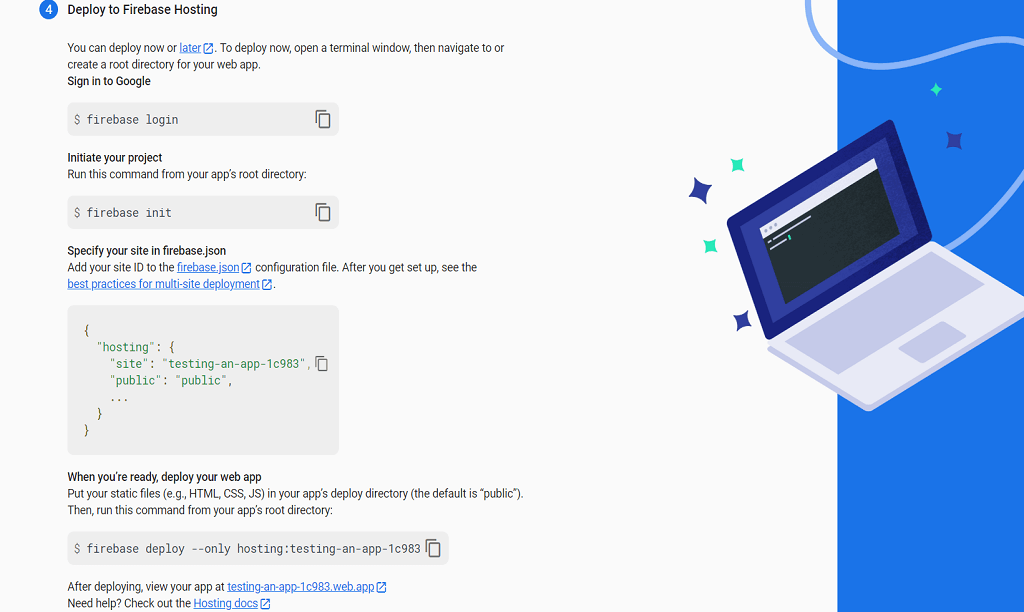
Install Firebase CLI & Deploy App
Firebase Command Line Interface (CLI) is basically utilized to simplify the interaction between the app and Firebase. It only takes one click to install Firebase CLI on your PC.
The deployment of the application is the final step that comprises three stages:
Firebase Login: If you are not logged in to Firebase, you can follow this instruction. Otherwise, you can proceed further.
Firebase init: It is about running the request from the root directory of your application. Coders should also set up and configure the app in Firebase.json.
Firebase Deploy: Now, developers can place CSS, JavaScript, or HTML files in a public directory to deploy the app.
AWS
Amazon Web Service (AWS) is the world’s leading cloud infrastructure and service provider. According to a report by Synergy Research Group, AWS occupies the first position among CSPs, with a market share worth $200 billion in the second quarter of 2022. In addition, this cloud platform is also known for providing more than 200 cloud products.
However, if we talk about how to deploy an app on AWS, the first thing that you need to do is signup. Unluckily, registration is not wholly free. You will have to provide your credit card details to AWS, and it will probably hold $1 from your card.
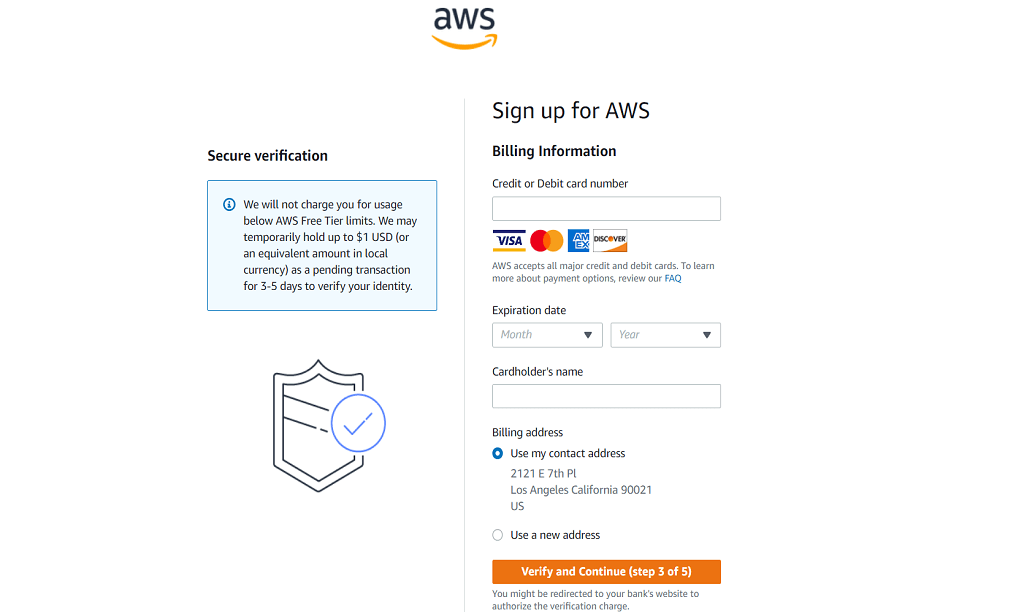
After completing all registration steps, you can now access AWS Console, and AWS Amplify could be a reliable place to deploy or host your app with AWS. It is undoubtedly a trustworthy product for deploying JS, React, or Vue.js applications.
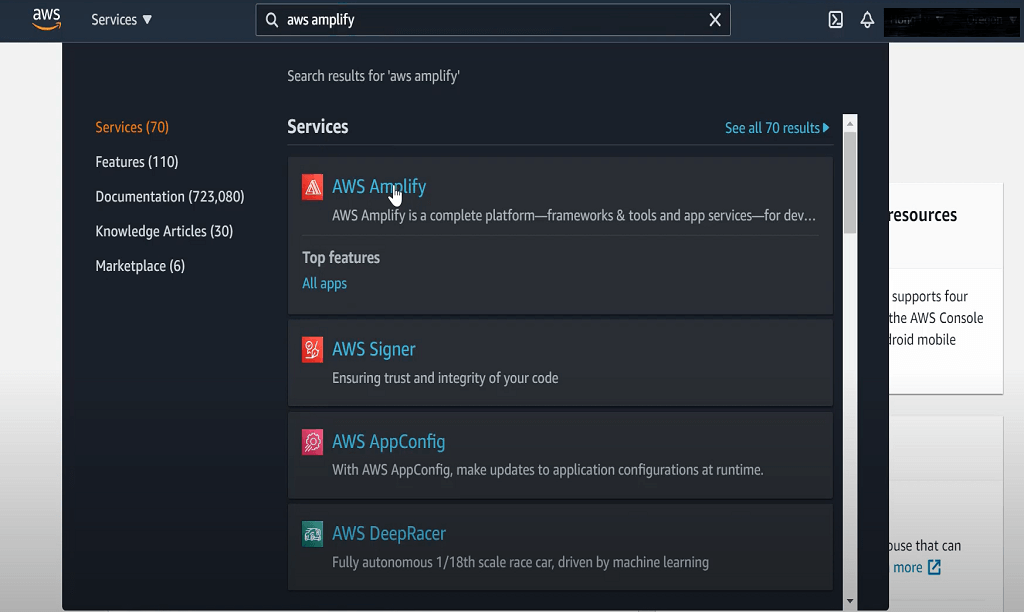
Deploy App with AWS Amplify
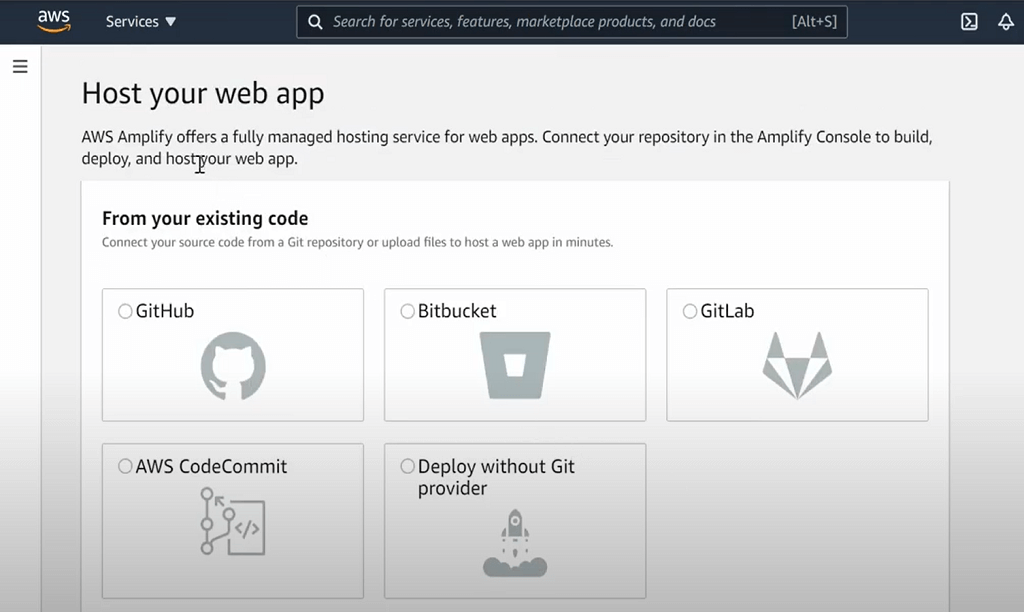
AWS Amplify doesn’t only help in building the server side of your applications, but it is also swift and safe to deploy applications in the cloud. Developers can choose the ‘AWS Amplify’ from AWS Console. You can now elect the Deliver section and then click on ‘Get Started’.
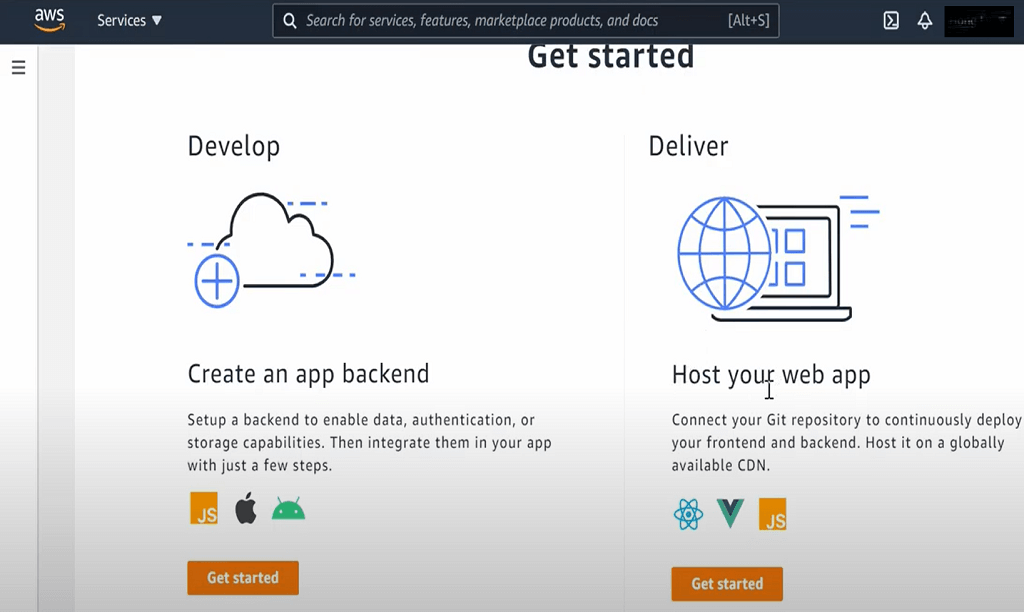
To deploy and host an application with AWS Amplify, businesses and developers can take advantage of various means, including GitHub, Bitbucket, GitLab, and AWS CodeCommit. It is also possible to perform cloud deployment with AWS Amplify in the absence of a Git provider, but we are showing a way to set up an app in the cloud through GitHub.
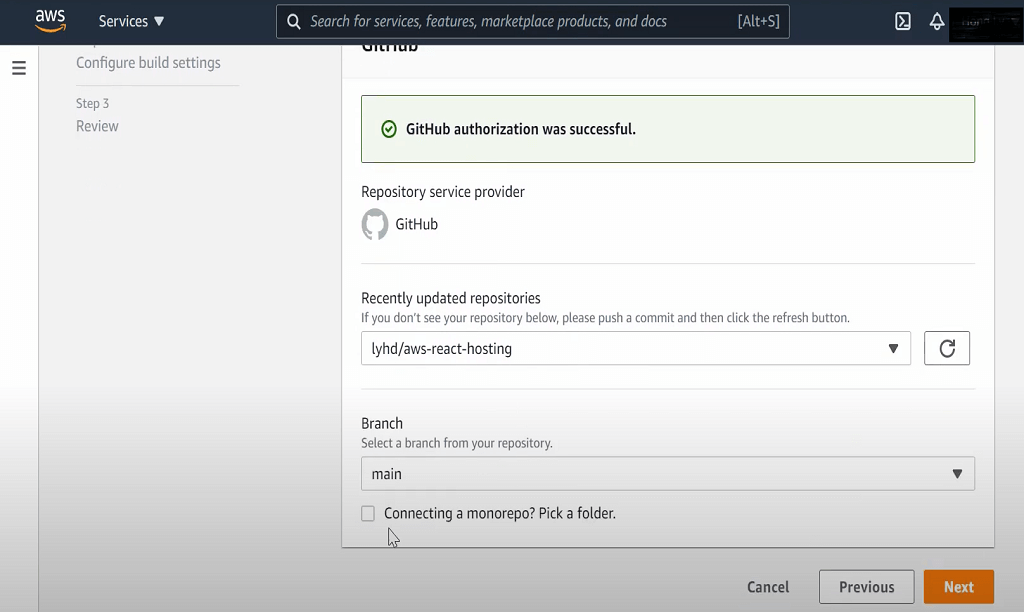
Now, users just need to conduct GitHub authorization and select the right branch and repository. After performing this step, you can see two options: backend environments and frontend environments. You can choose the desired environment and connect the branch.
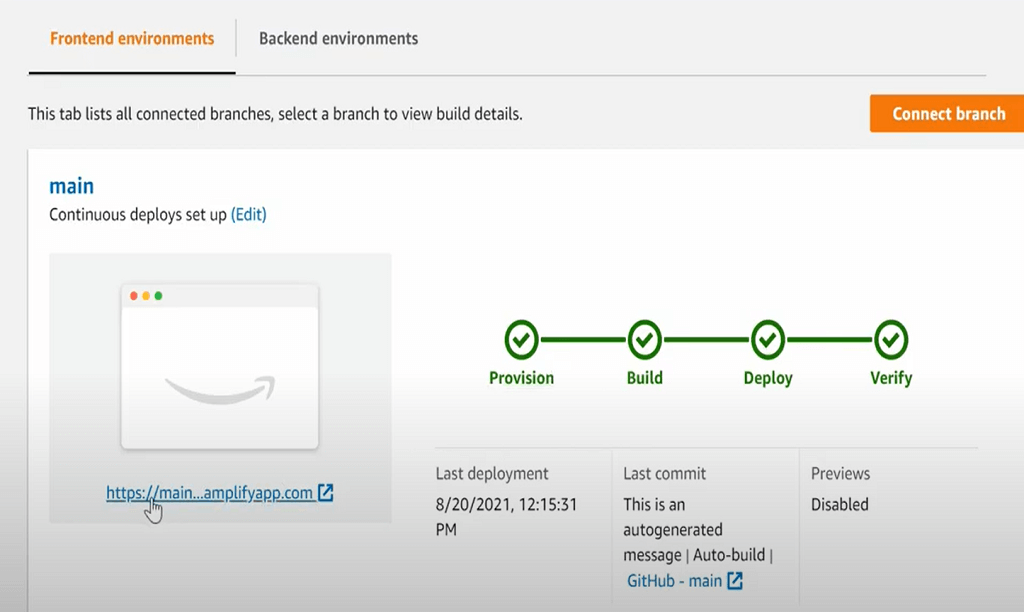
Subsequently, it takes a few seconds to provision, build, deploy and verify an application.
On the other hand, if you want to deploy a web application, then Amazon EC2 should be preferred. Similarly, Amazon S3 could also be an option for cloud deployment.
Conclusion
Cloud deployment is getting a competitive edge over other means of setting up applications. Therefore, this article confers a detailed guide about deploying apps in the cloud through different CSPs. Hopefully, with this comprehensive road map, it will be uncomplicated for startups, novice developers, and enterprises to adopt or switch to cloud service.
FAQ
What is cloud deployment?
Cloud deployment is the process of deploying an app via one or more hosting models such as SaaS, PaaS, BaaS, or IaaS.
What are the benefits of cloud deployment?
– Cost savings
– Resilience
– Scalability
What are some of the best cloud providers?
– Back4app
– Heroku
– Firebase
– AWS


